Dev Insights: Forge World
A detailed look at the development of Forge World in Halo Infinite built with the Forge level editor.
 Written by Okom on Feb 15, 2025 in Halo. Last edited: Feb 15, 2025.
The importance of Forge World
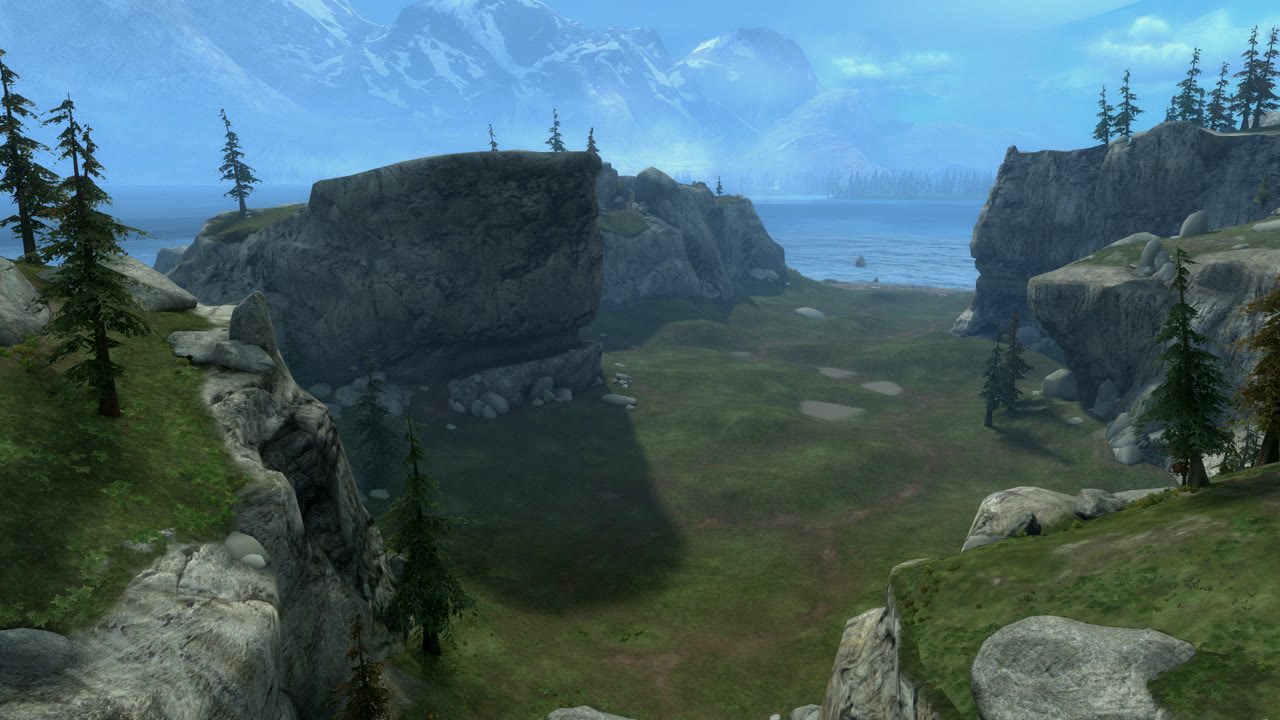
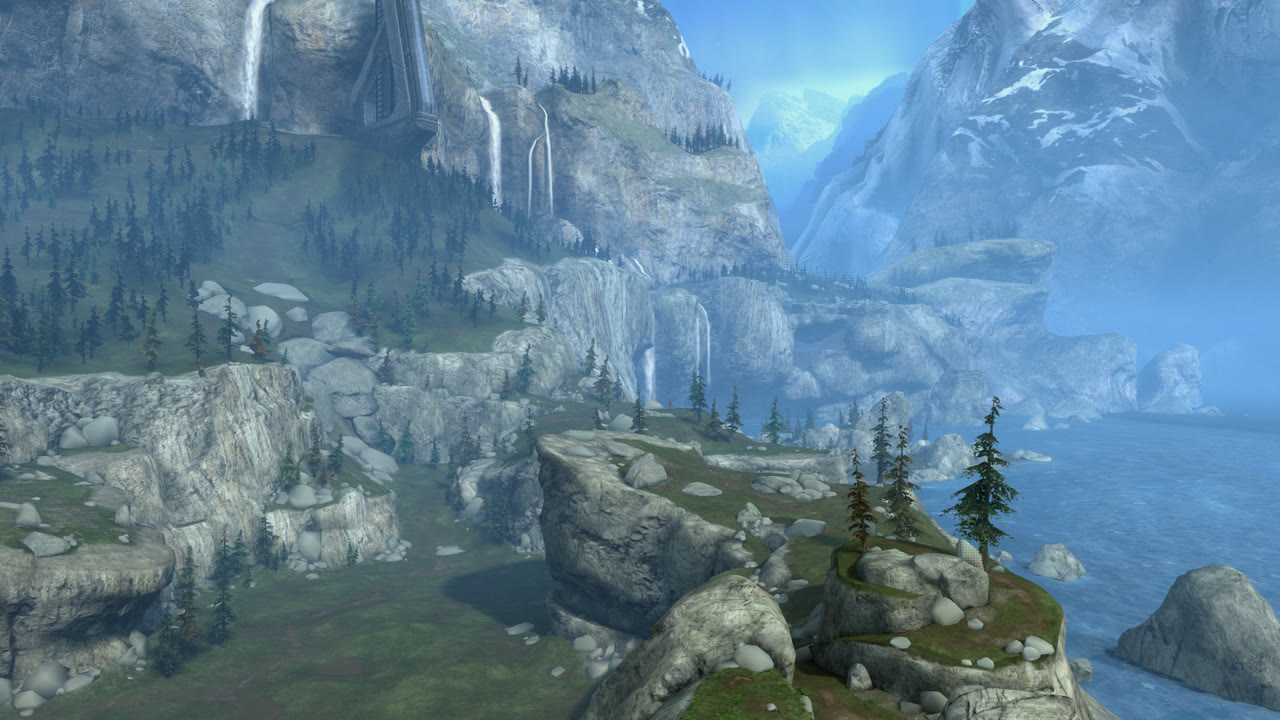
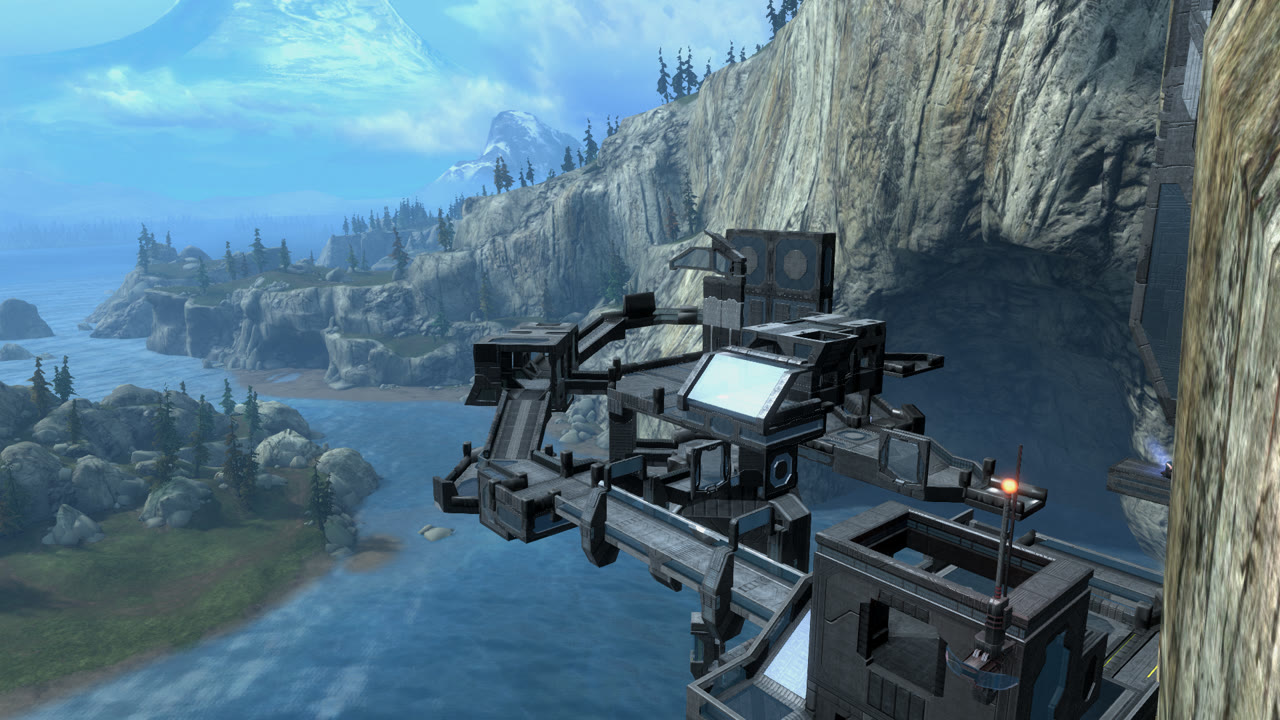
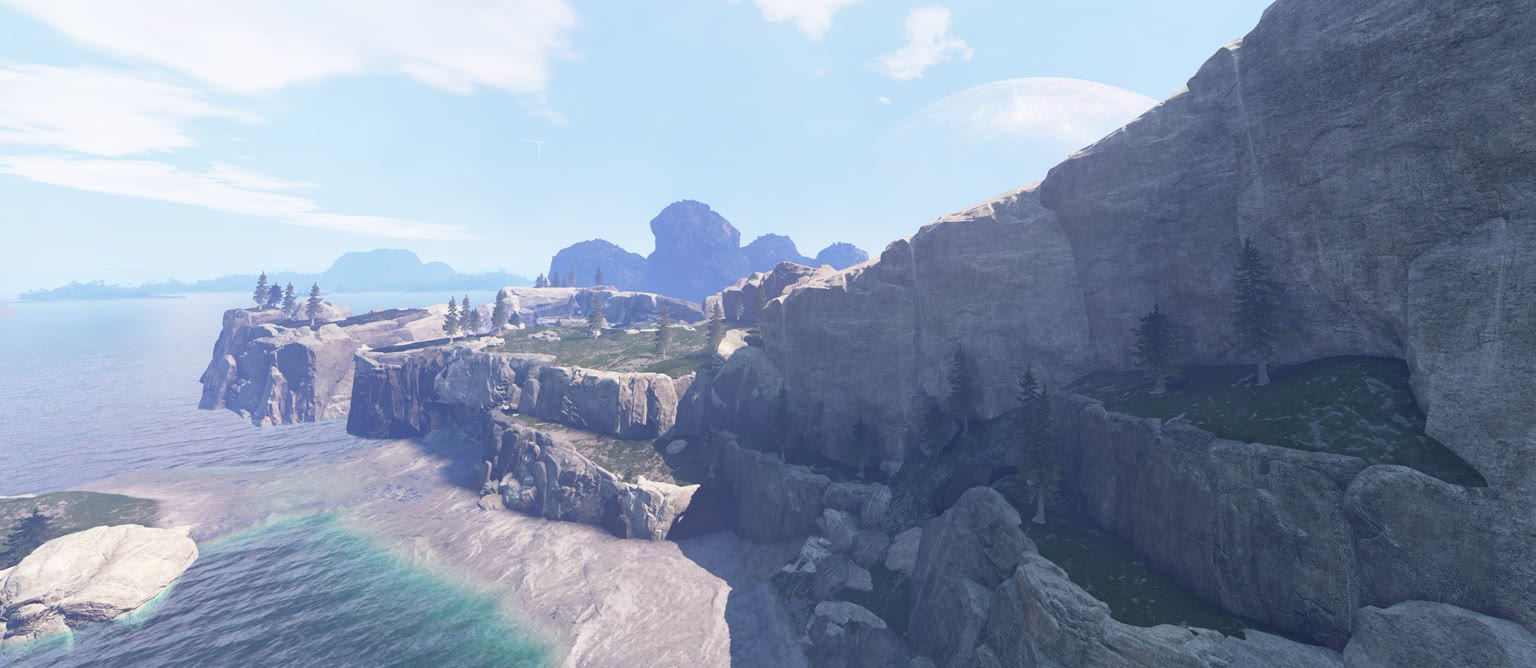
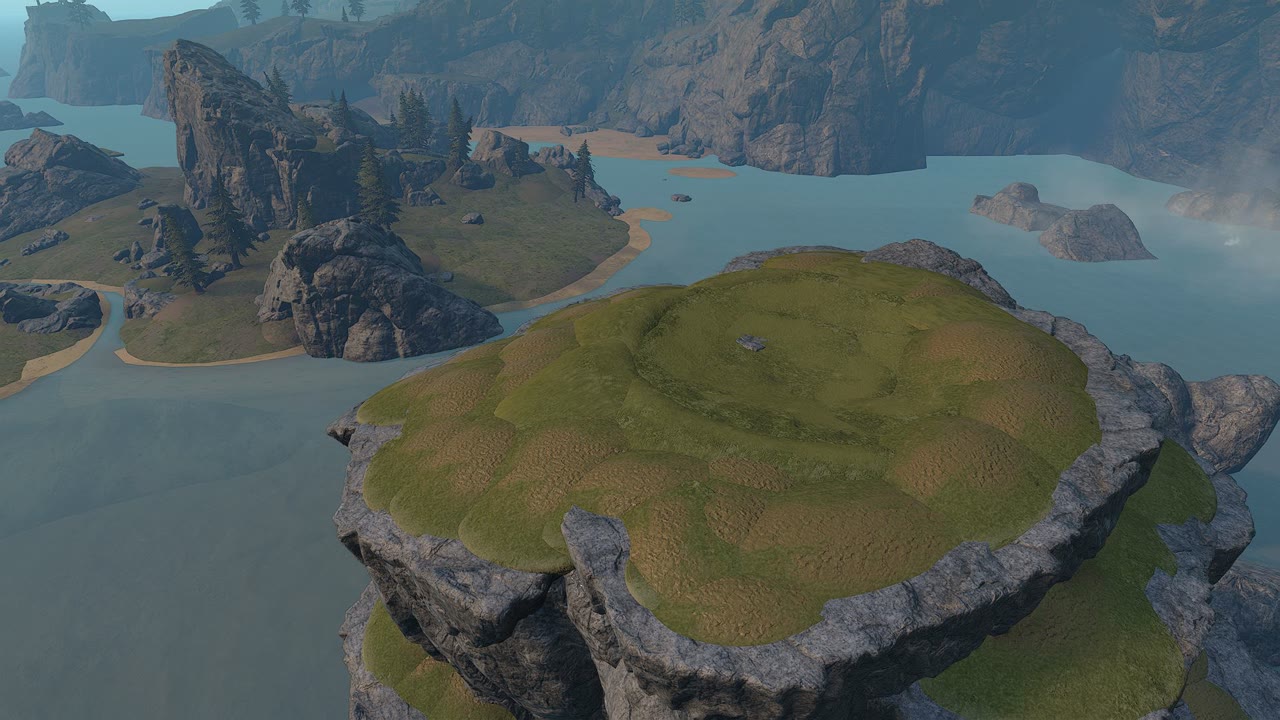
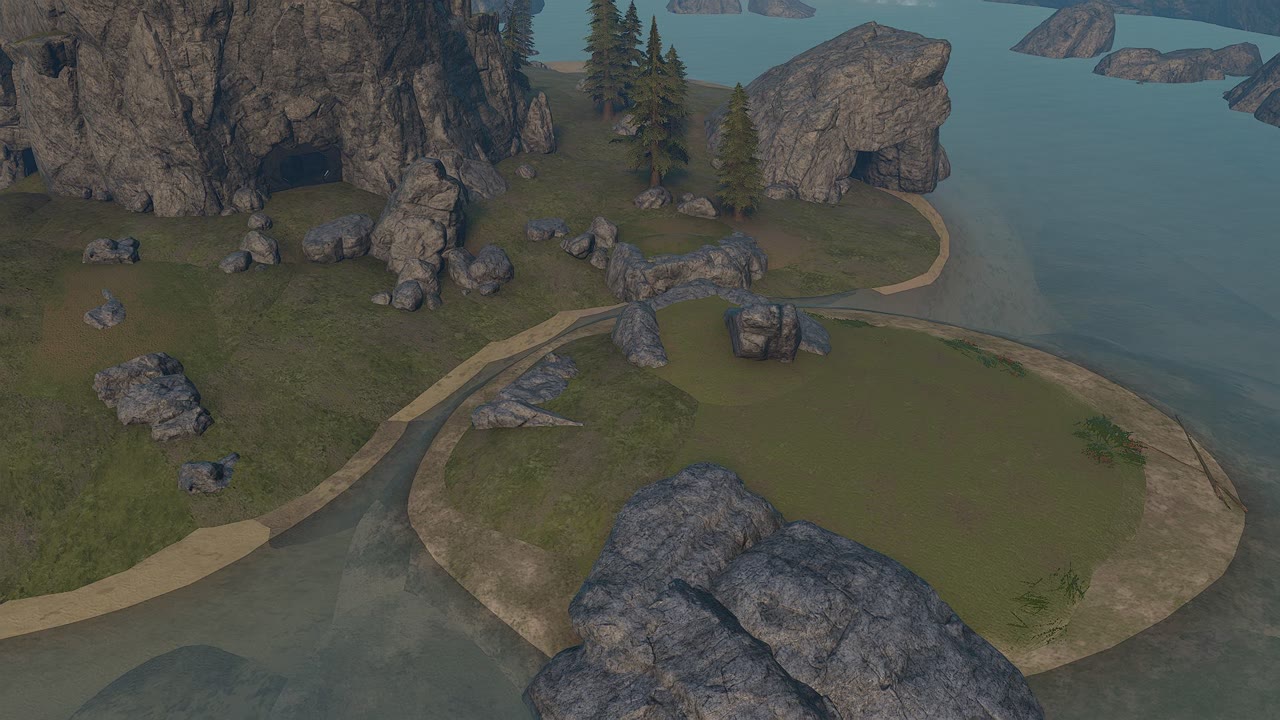
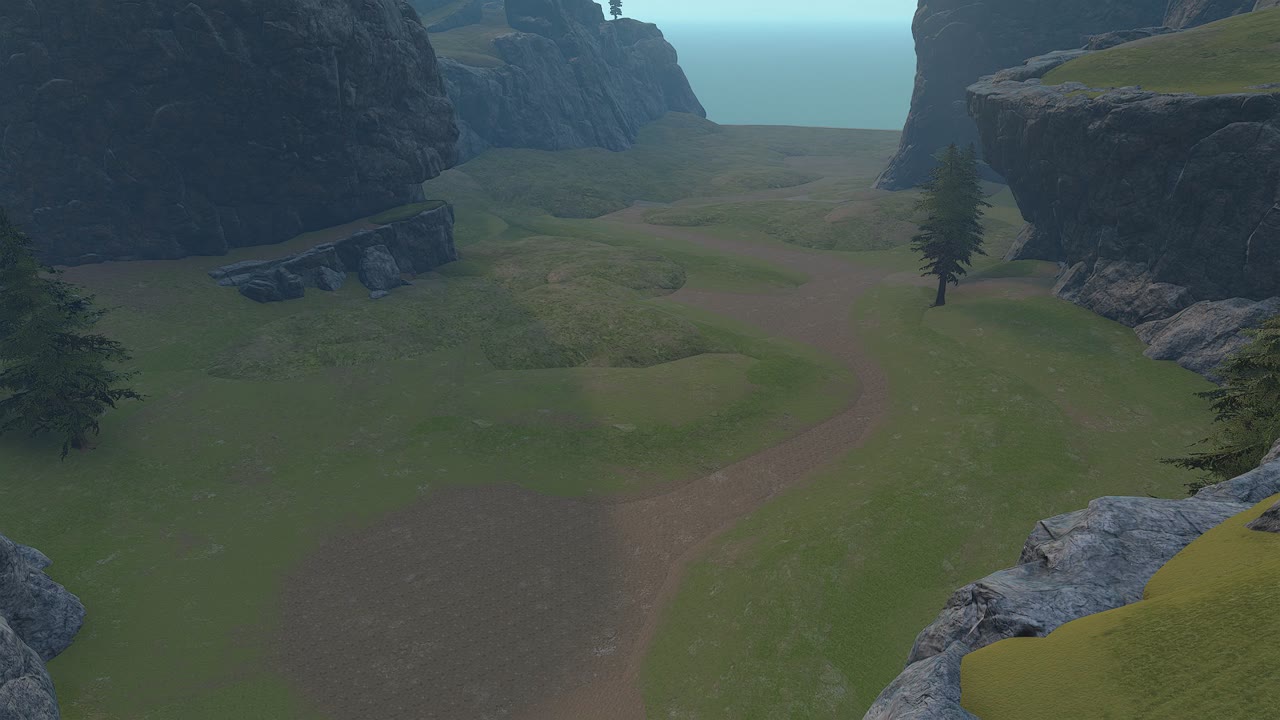
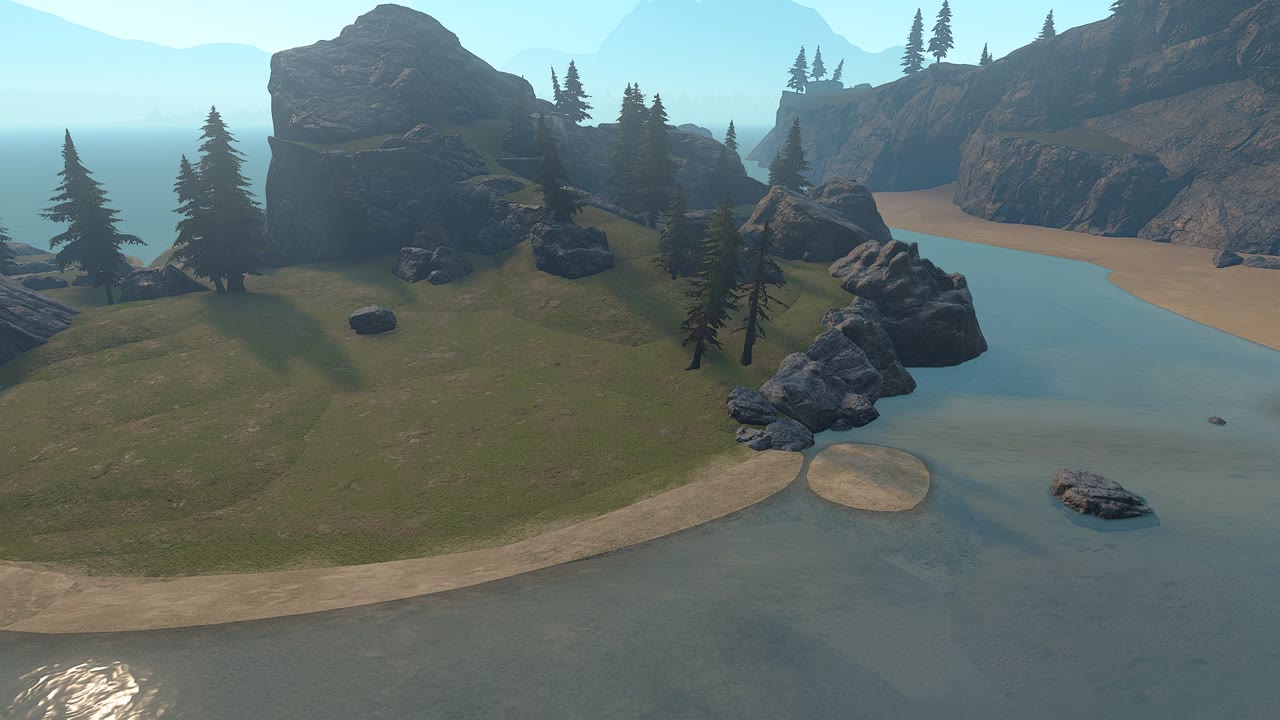
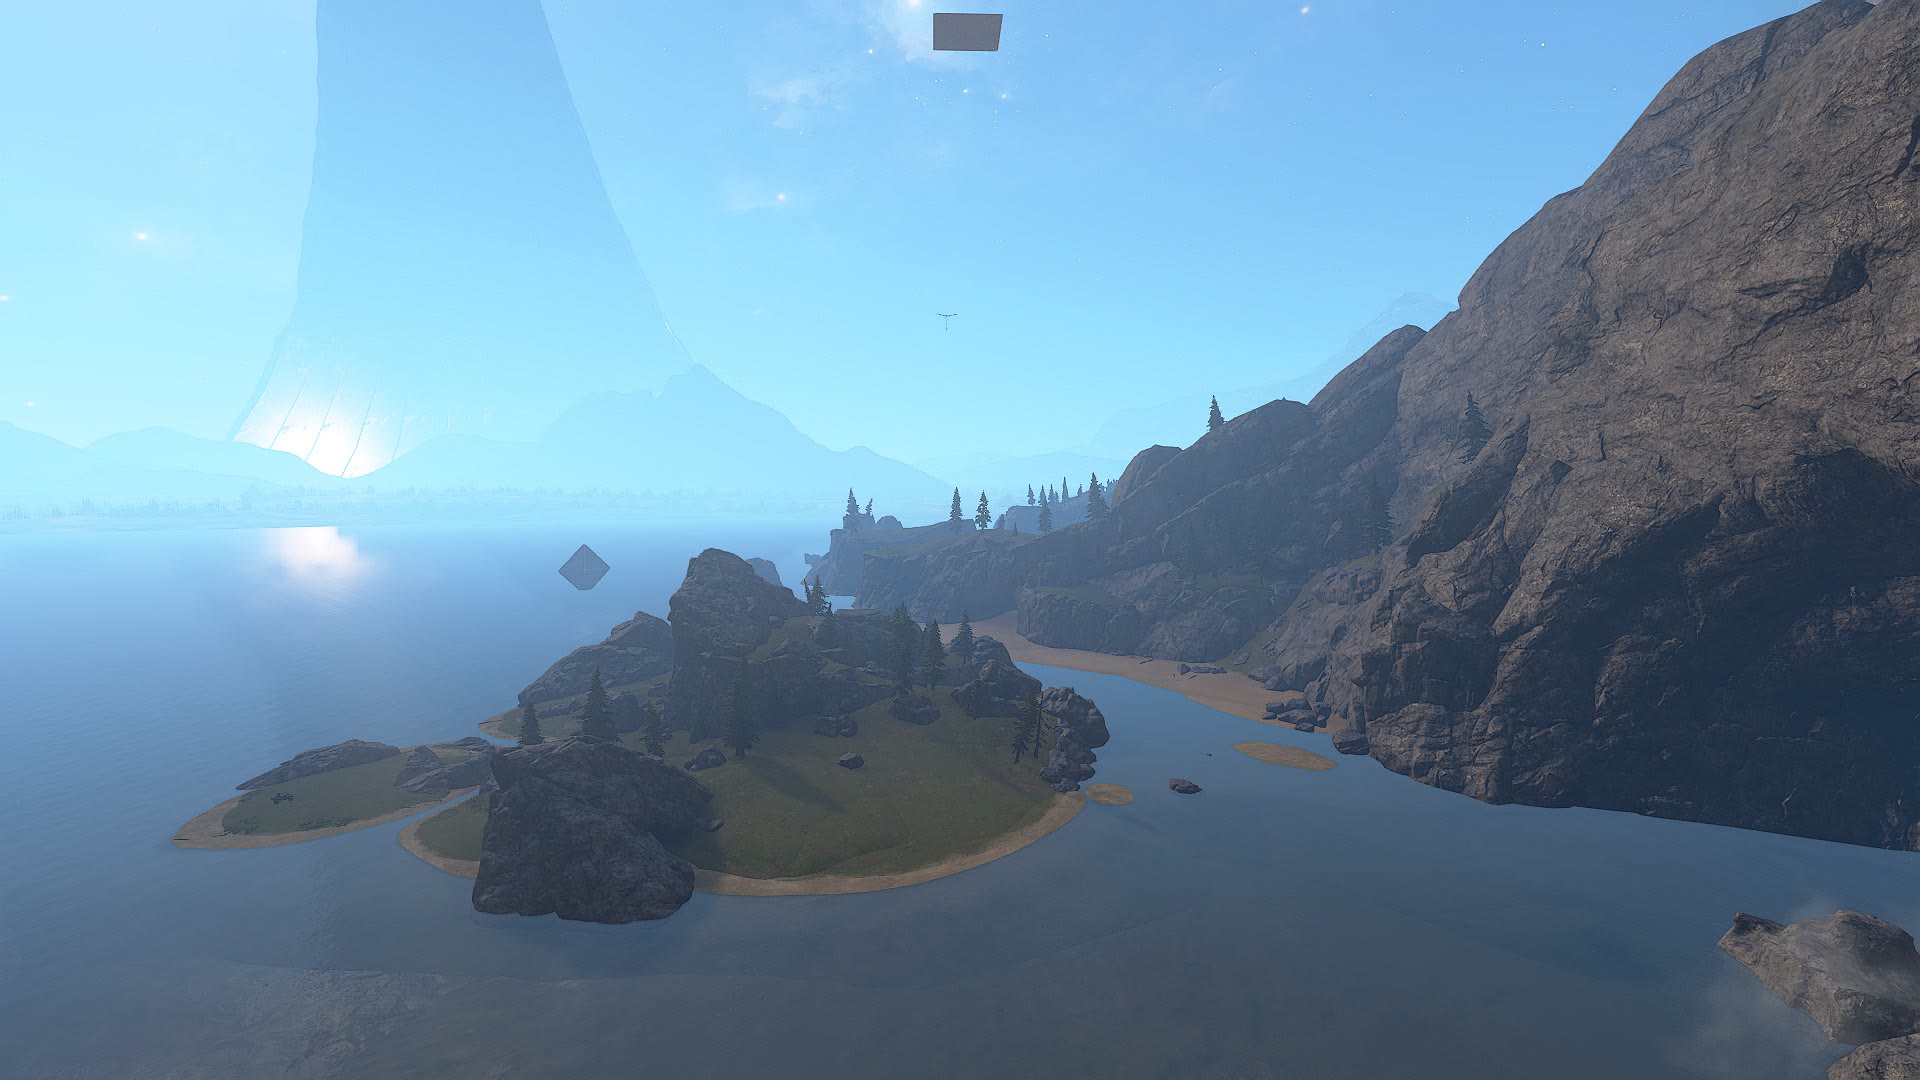
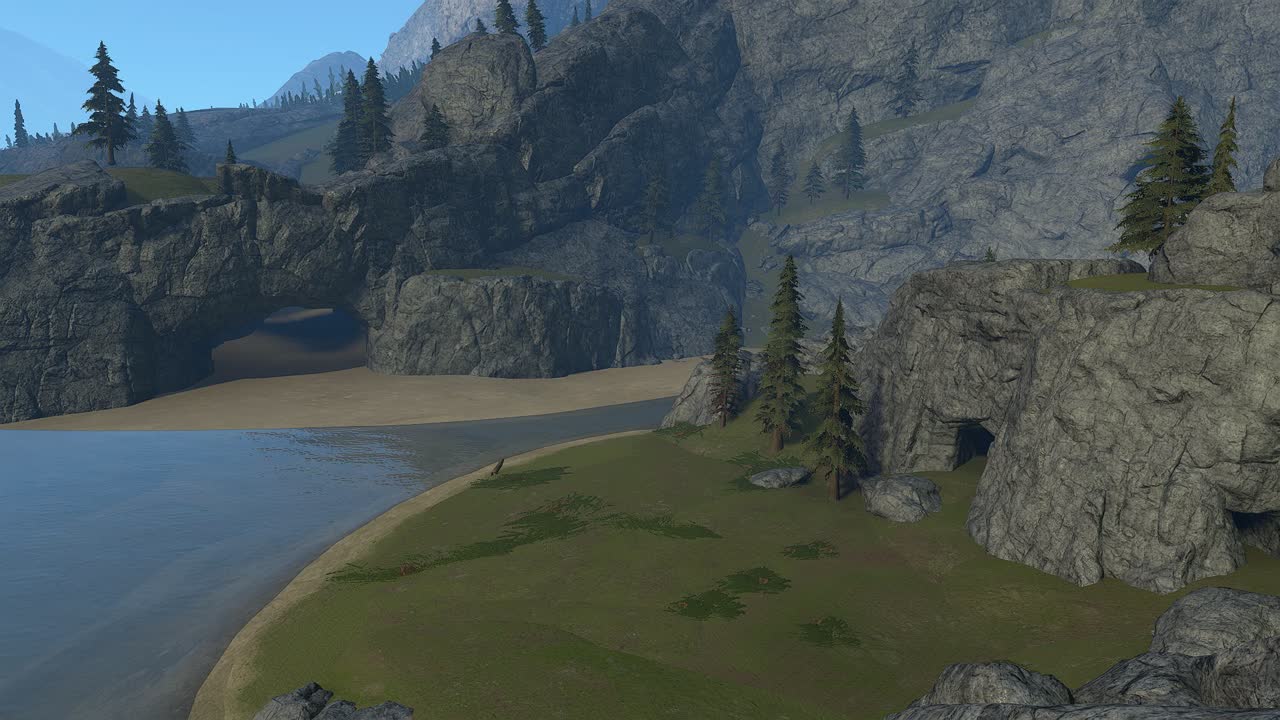
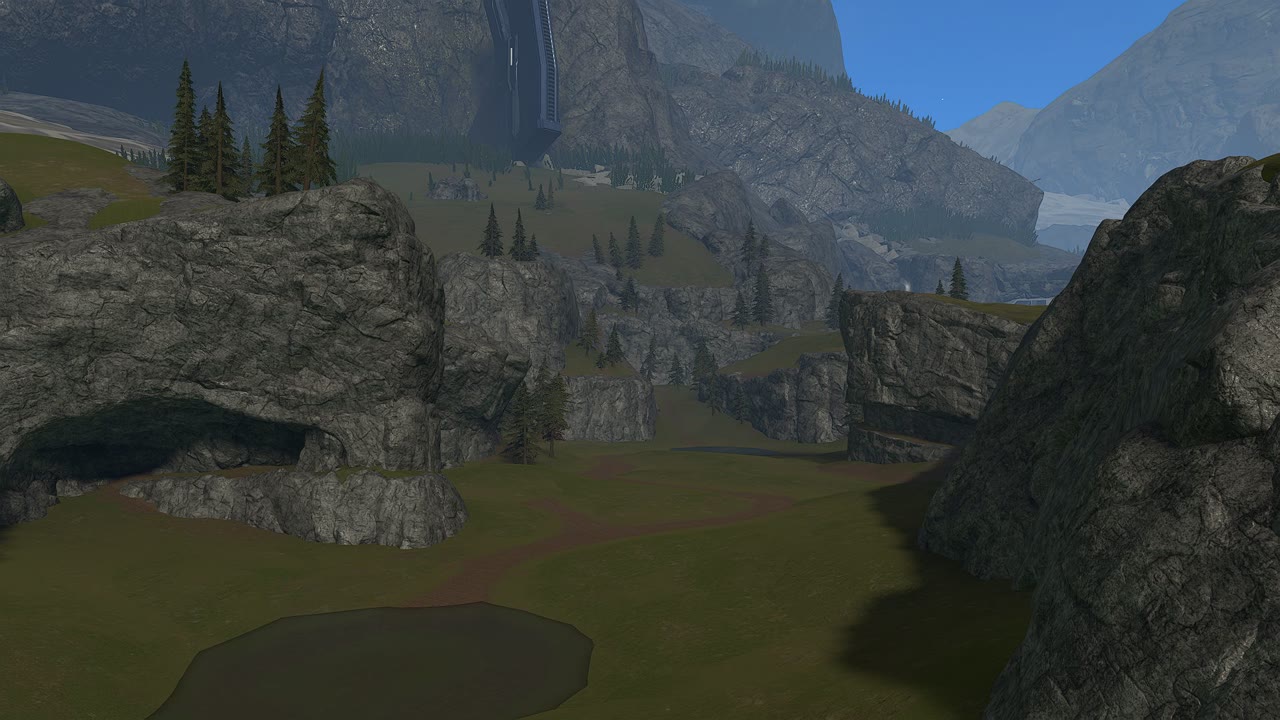
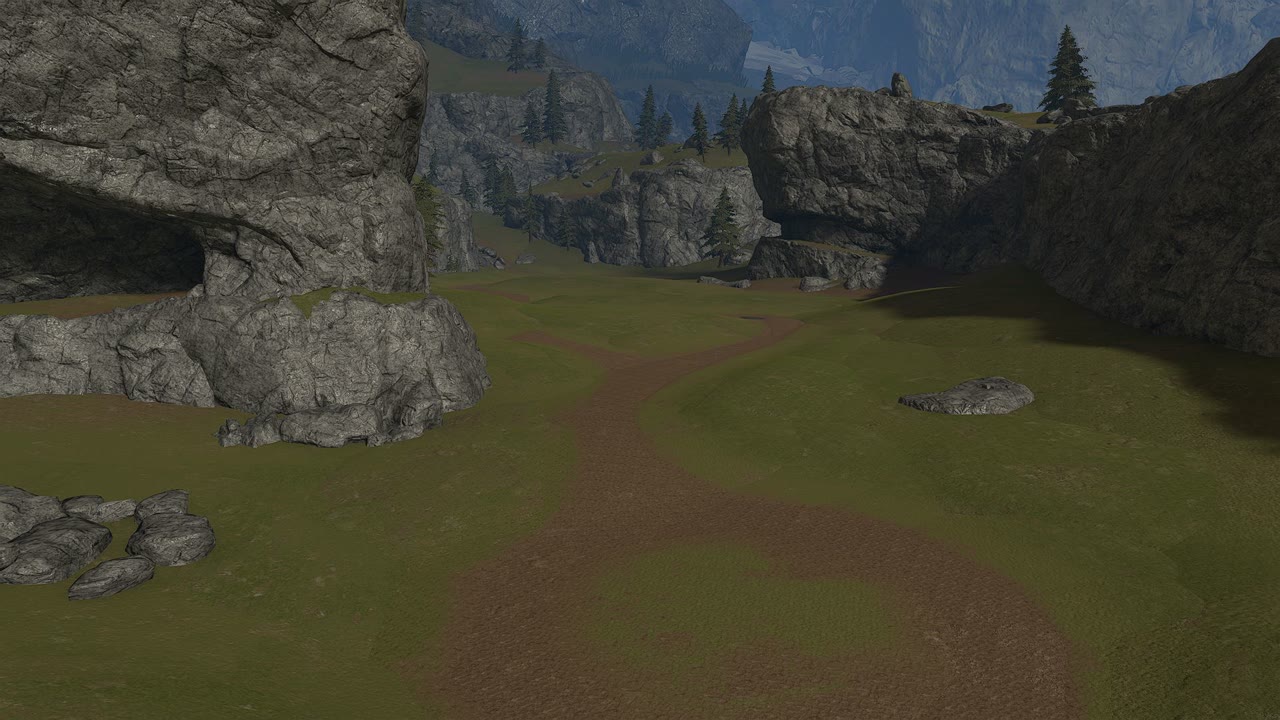
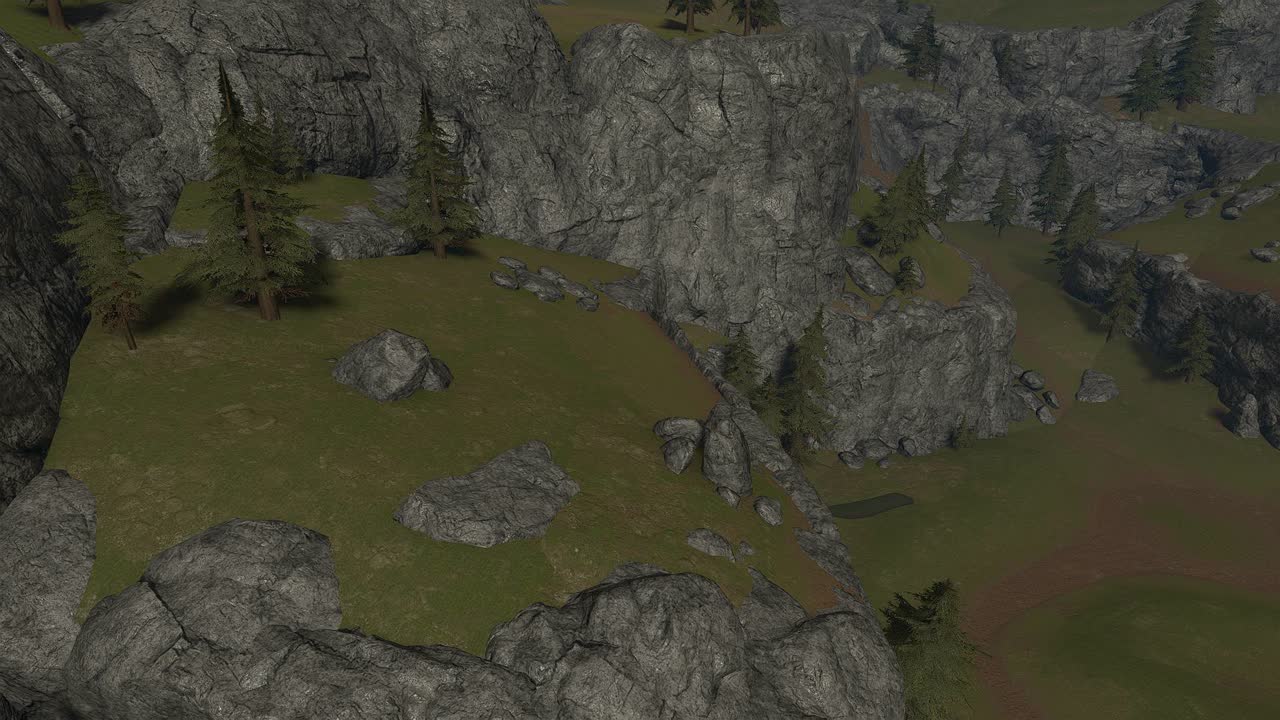
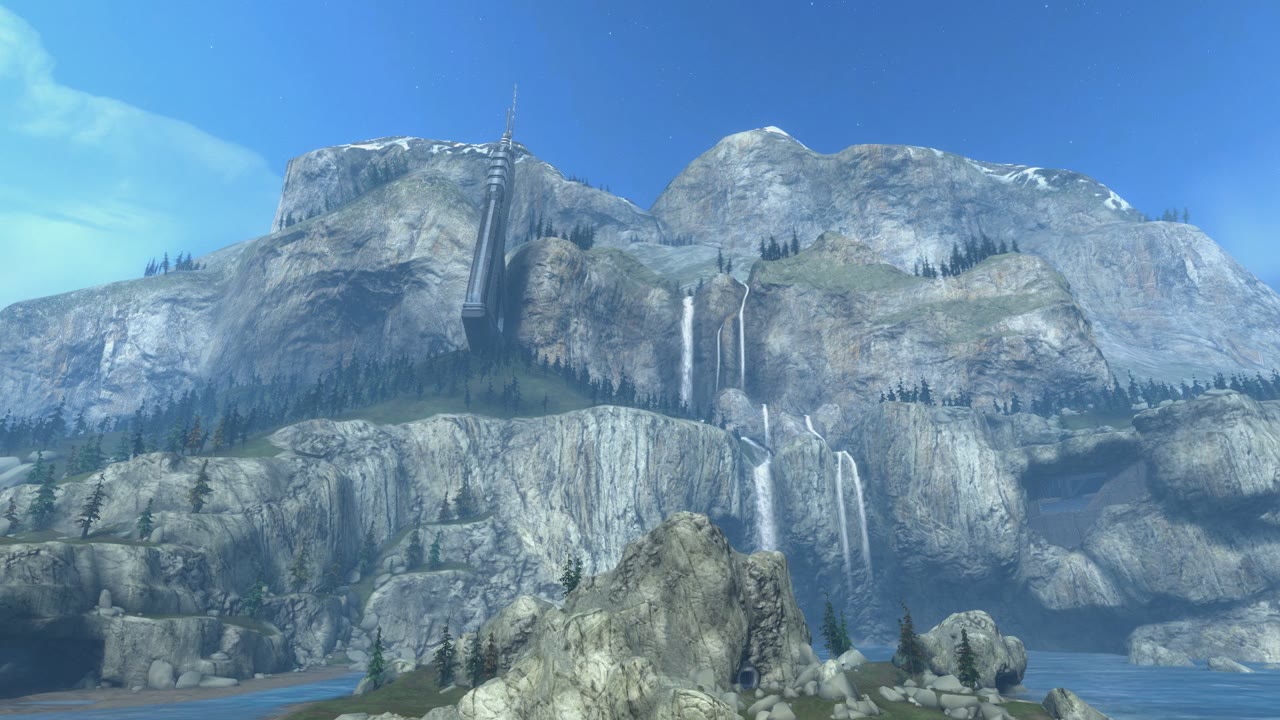
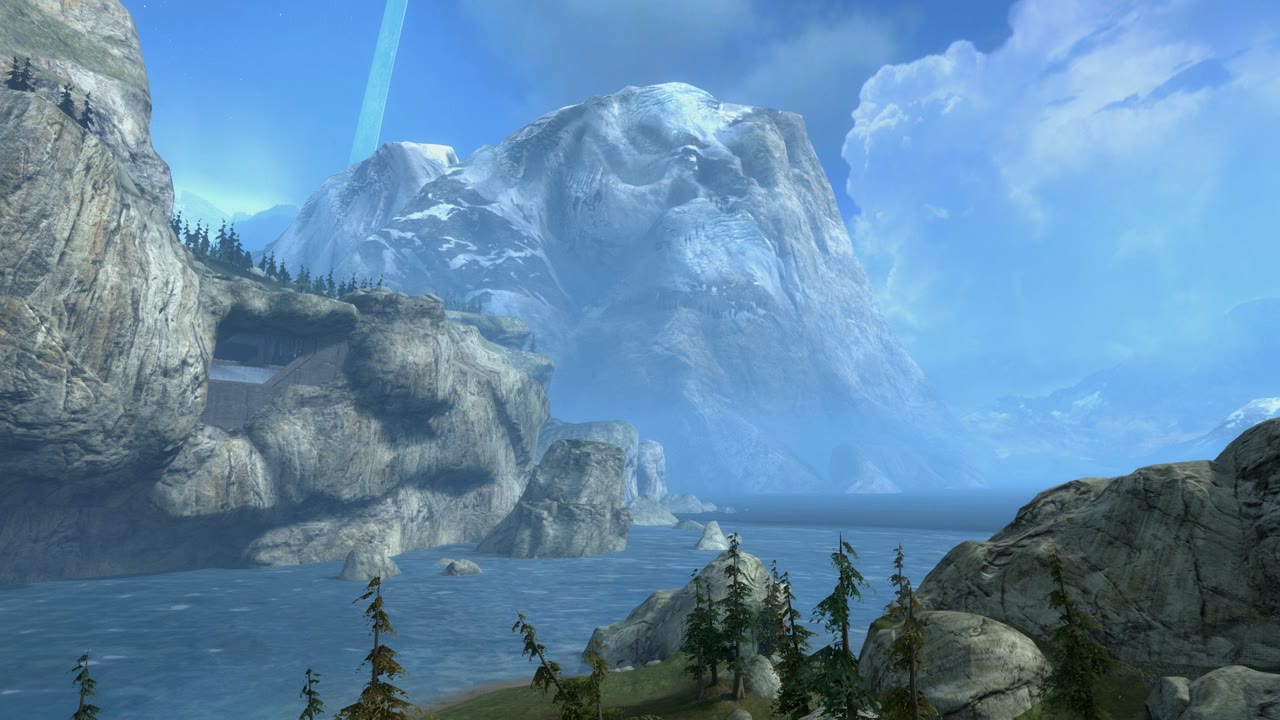
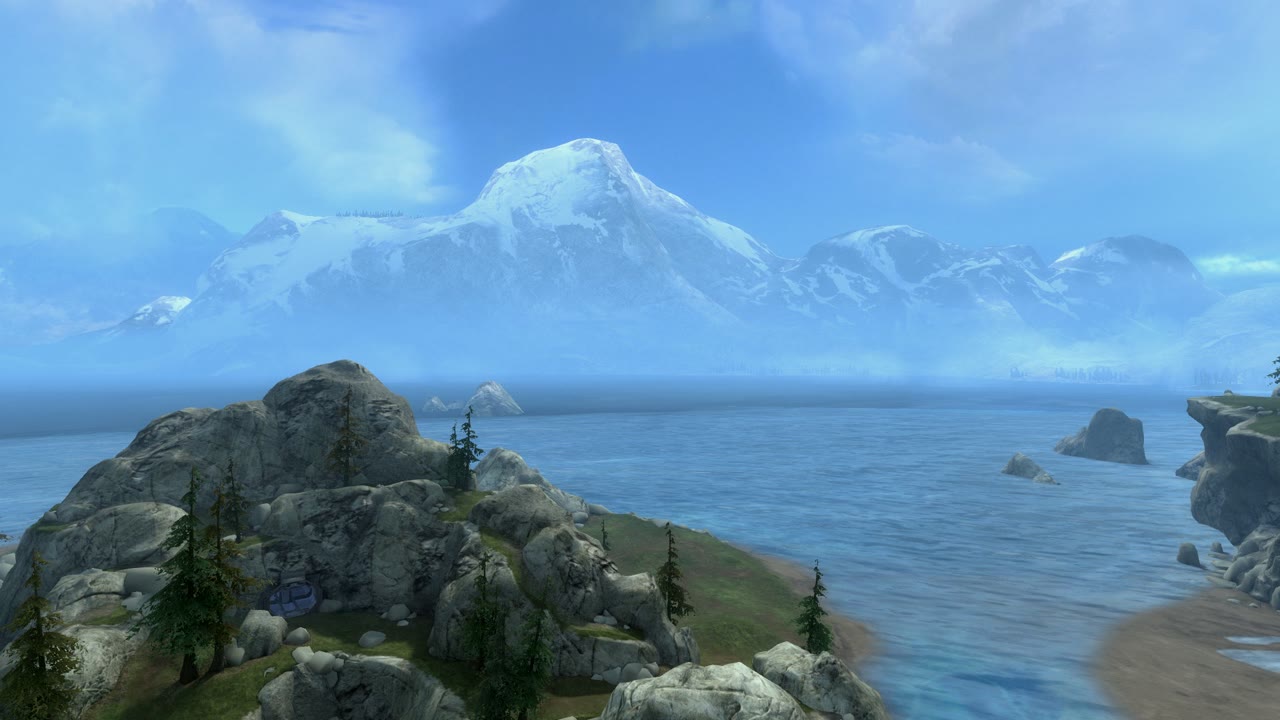
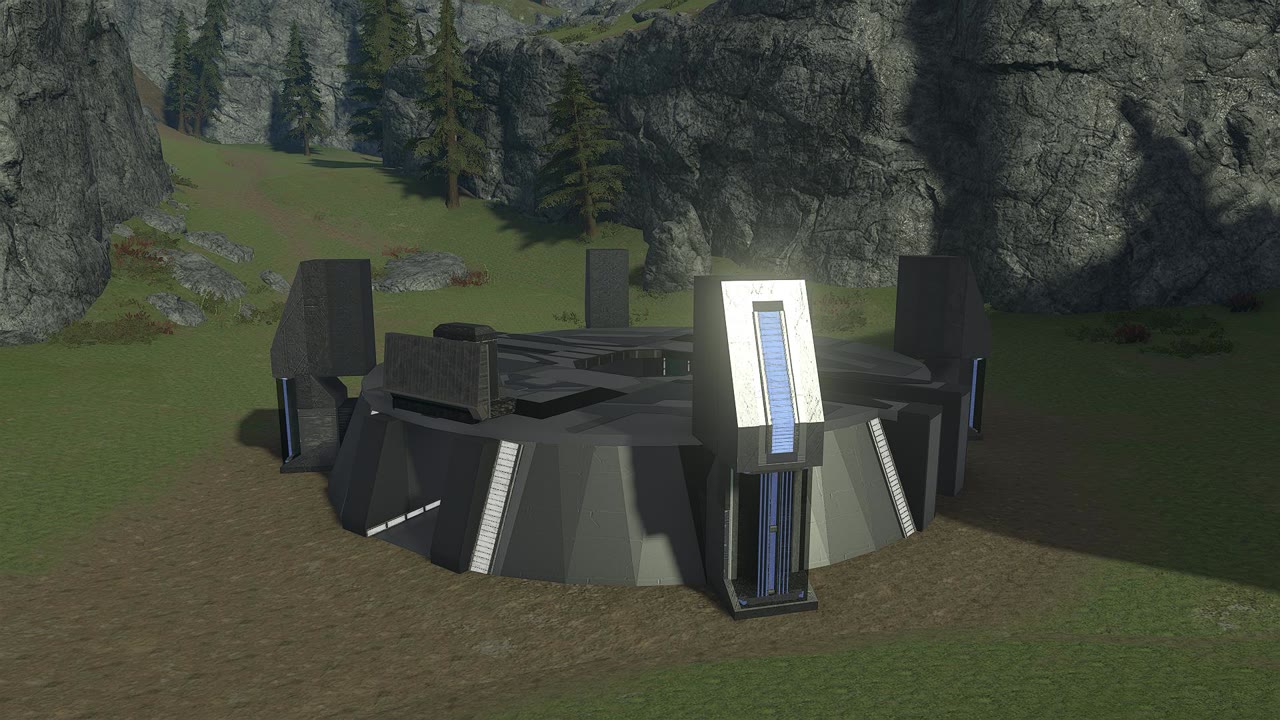
Forge World isn't just any old map, it's a recreation of an iconic map from Halo Reach named Forge World that was a dev-made canvas where players could build their maps on top of. It was so popular, that it was used as the base canvas for most of the community creations you'd find in Halo Reach. Forge World has various locations for players to begin their own creations from, and at its core is already an interesting layout to play in.
Having these unique landmarks eases a lot of the heavy lifting of coming up with a map layout as there is already some geometry (geo) in place. It also helps that the map looks visually stunning, and has a bright and positive theme to it so even if the geo isn't being used, at least it's nice to look at. Late Night Gaming and Rocket Sloth have made great videos discussing Halo Reach's Forge World.
Easy to start building
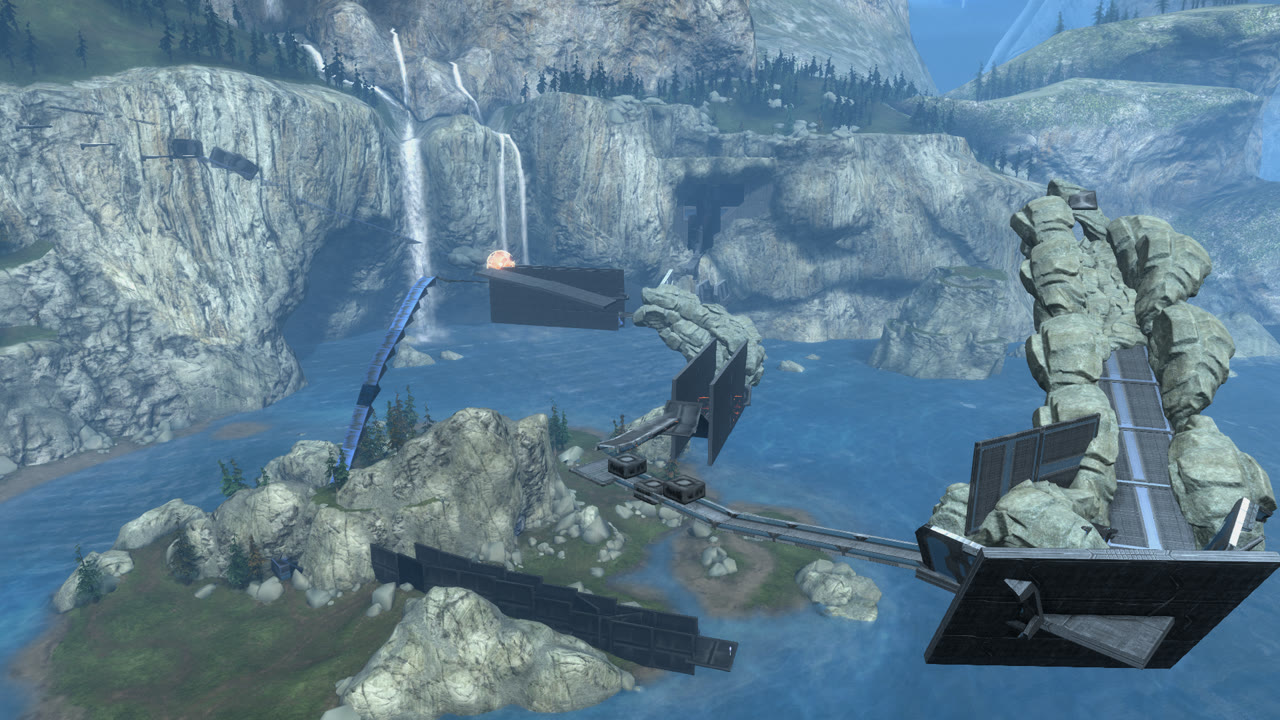
I think the success and popularity of the original Forge World comes down to the variety of prebuilt areas that the map supports as players can just start imagining their own creation on top of those rather than having to start from a complete blank slate, which has been the unfortunate trend with every subsequent Halo's dev-made canvas maps since Reach. Many of the maps created on Forge World utilized the map geometry as a main feature of the map, but some maps were also just built on floating platforms that used the canvas as a pretty skybox.
Forge World in Halo 5
The original Forge World from Halo Reach started off as five separate maps that the team at Bungie were somehow able to pack into a single map using the technology at the time which is mentioned in their Forge World ViDoc. As it was a huge leap for the developers at Bungie to make a map of this size work in 2010 with their internal tools, it took until 2017 with Halo 5's Forge tools for a community member, Ducain23 to recreate Forge World in the game's Forge map editor after a viewer on his livestream had challenged him to do it. Recreating a map of this magnitude entirely in an in-game map editor just shows the passion for the canvas that gamers had; even multiple years after Halo Reach had lost its mainstream appeal.
I reached out to Ducain23 about what he saw as the biggest limitations of Halo 5's Forge that held back his Forge World recreation, to which he recalled:
- The lack of object scaling which meant that he had to use multiple smaller objects to create large structures, sacrificing on the precious object count budget.
- A total usable object count of 1600 meant that even after cutting corners in multiple areas, he was at 100% object usage budget and couldn't add anything more to the map.
- The small forgeable canvas size which resulted in him having to scale down portions of the map such as the beach and mountains next to the Island in order to stay within the boundaries.
Forge World in Halo Infinite
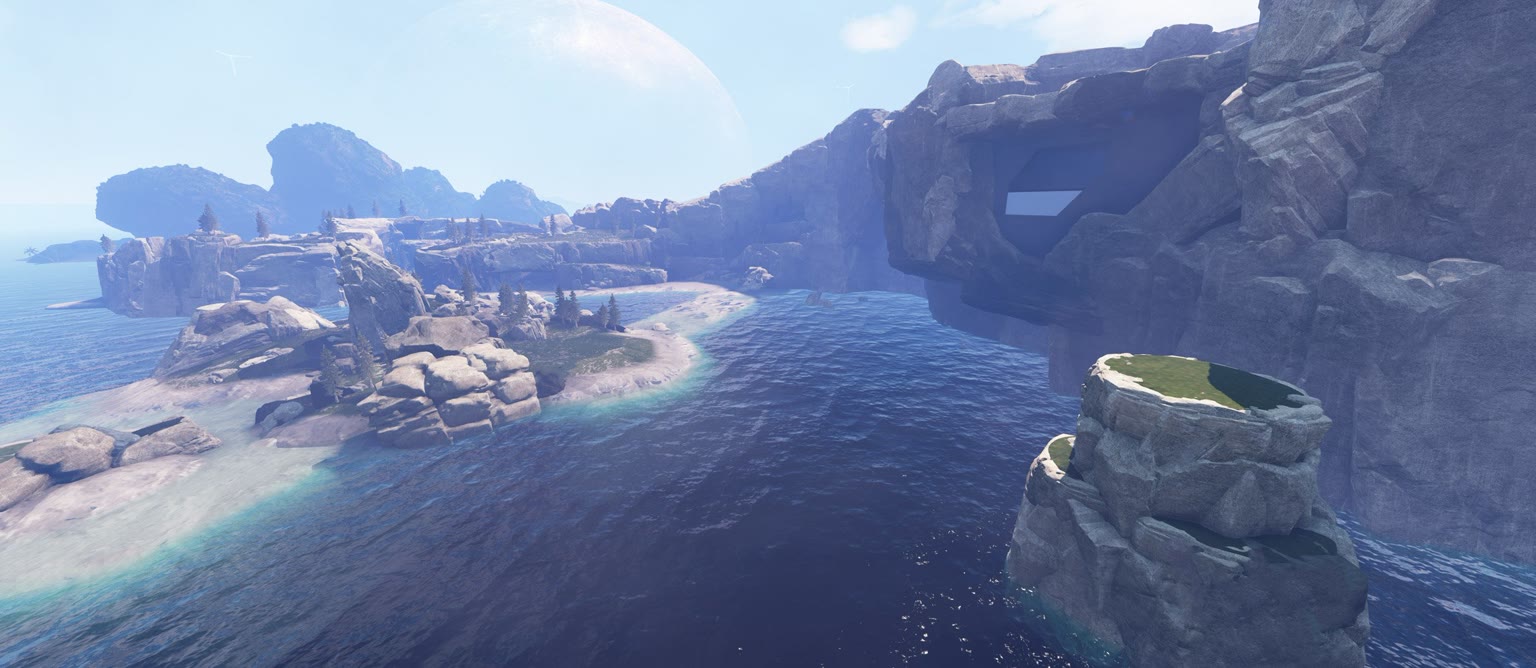
Luckily faithfully Recreating Forge World in Halo Infinite was much more of a realistic endeavor as the new Forge level editor would allow for object scaling, a majorly increased usable object count of around 5700 and a larger canvas size equaling to about double of that in Halo 5's Forge.
Remaking the beloved canvas in Infinite had been a topic in the forging community ever since the launch of Forge on Nov 8, 2022, but nobody had successfully done it to the degree and striking accuracy that we ultimately did with our release of the map on Dec 31, 2024. It took over two years for forgers in Halo Infinite to gather experience with the editor and understand it from top to bottom in a way where all of the combined knowledge and talent from multiple individuals could be used to create Forge World in Halo Infinite while pushing the map editor to its capabilities.
This article takes a deep-dive into the full development of the Halo Infinite Forge World recreation made by the following HaloFunTime forgers:
- Okom1: Project Lead, Gameplay and Technical Designer
- Scrubulba: Technical Artist, Audio Placement, Forerunner Artist
- Virus11010: Artistic Lead, Forerunner and Environmental Artist
- Mr IncrediJON: Environmental Artist
- spartan blood 1: Landscape and Environmental Artist
- Handsome Huber: Skybox Artist
Find the bookmark link for the map below and try it out yourself in Halo Infinite!
Original idea
In May 2023, Virus11010 (Virus), Scrubulba (Scrub) and bullet2thehead9 (Ethan) had the idea of bringing Forge World faithfully back to life in Halo Infinite by initially combining some existing maps. There had been three maps remade from Halo Reach: Hemorrhage, Asylum and The Cage which all originally took place on Forge World, and the forger of each map in Halo Infinite had to eyeball the skybox of Forge World for each of them. The guys realized that they could take the geometry of these maps and combine them into one to get a rough outline of Forge World and then start refining it from there to create a more accurate remake.
Manual measurements
Virus and Scrub started work on getting the measurements accurate for some key structures by utilizing the measuring technique Ethan had used for Asylum and The Cage where one unit in Reach transferred to 10 units in Halo Infinite. Ethan had used this ratio to remake the Halo Reach forge objects used in those two maps and the scaling seemed right, so Scrub jumped on Reach and started placing down some blocks while Virus worked on the file in Halo Infinite.
Virus was the main contributor to the file during these early stages as he had made good progress on the Coliseum interior and started drafts of the Forerunner Tunnel in the Island, but May 19, 2023 would mark the beginning of a long pause in the map's development.
The Blender era
Ducain's Forge World
I wasn't a part of the HaloFunTime Forge World project yet, but I had known of Ducain23 working on his own Forge World remake in Halo Infinite sometime after Forge had launched, and for this blog post I pinned down the date when he began work on it to Nov 15, 2022, which is just a week after Forge released.
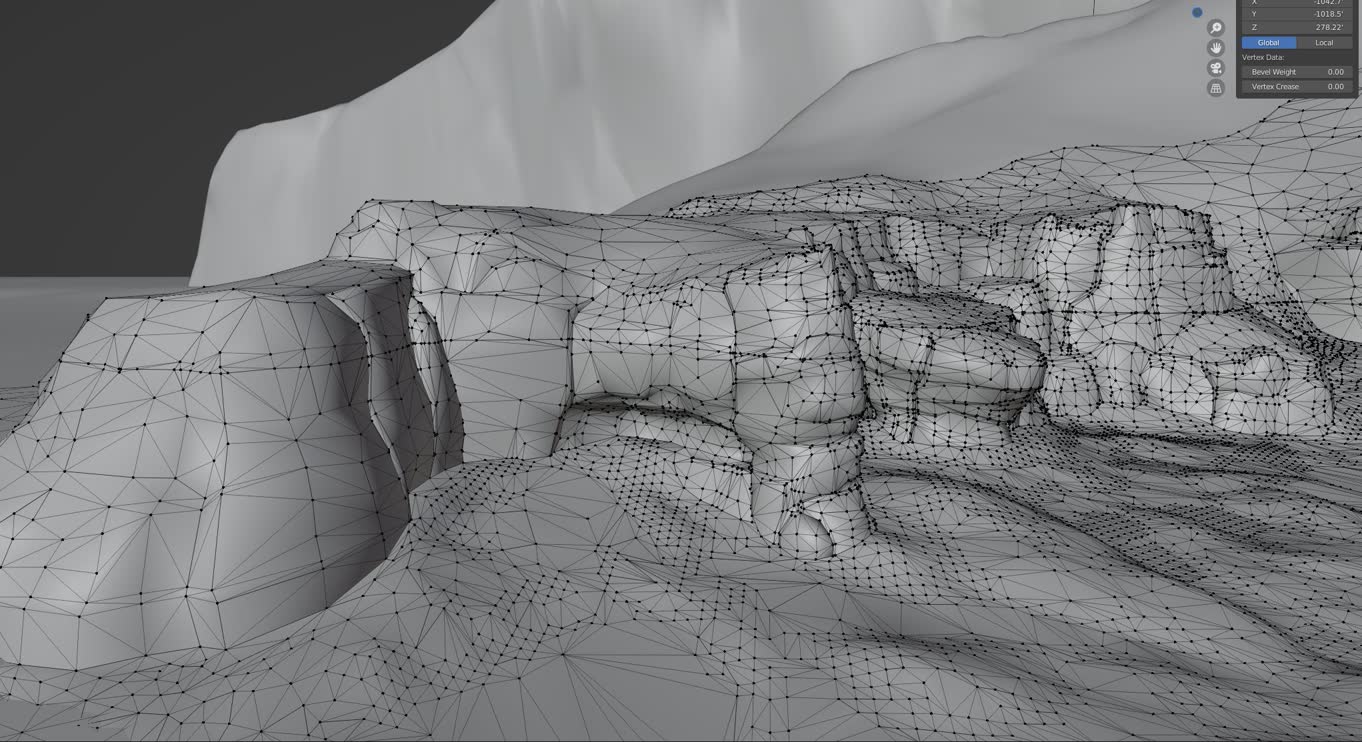
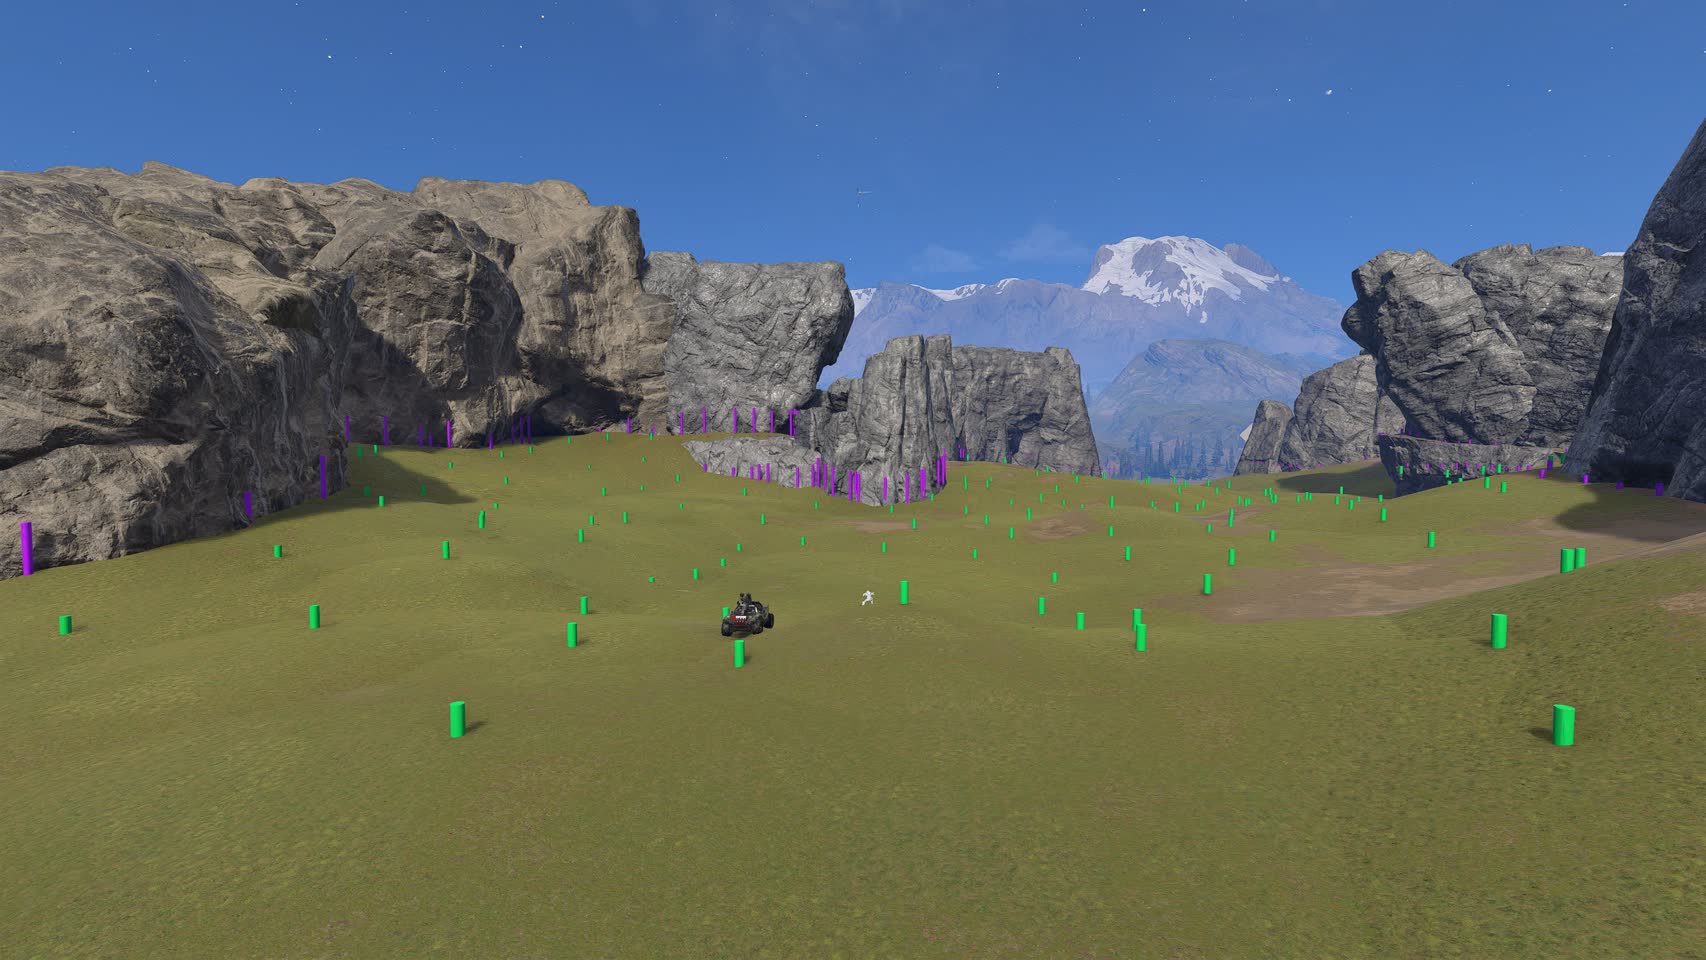
Ducain used a method where he loaded up the original model of Forge World in Blender, positioned the map to fit within the forgeable bounds of 4000x4000x1500 and started noting down the position of some vertices in the geometry. He would then place cylinder objects in Forge and use the coordinates of each vertex as the coordinates for the cylinders. After hundreds of cylinders placed, this would turn into a point cloud of sorts that could be followed inside Forge as a guideline on where to place rocks and terrain. Two livestreams of Ducain working on this can be seen here and here.
While progress on his remake seemed linear, it halted around June, 2023 as Ducain said he lost interest in Forging for Halo Infinite and had allocated his time elsewhere. While his remake didn't go as far as he had hoped, Ducain still pioneered the Blender-to-Forge method that we would also ultimately use—granted, more efficiently—in accurately remaking the HFT Forge World canvas after the project would be continued.
B2FP scale tests
On Oct 1, 2023 I took a stab at recreating some basic outlines of Forge World in Blender using a refined method of Ducain's Blender reference method that's now known as the Blender2Forge Printer (B2FP). In summary, it is a software-assisted workflow where Halo Infinite Forge objects are first manually placed inside Blender at certain coordinates, scales and rotations, and then later those are "printed" into Halo Infinite using a keystroke macro script. It's a clever workflow that a lot of the top Forgers in Halo Infinite have utilized to accurately recreate maps from other games as you can trace the original geometry models in Blender with Forge objects and then print those objects to Halo Infinite.
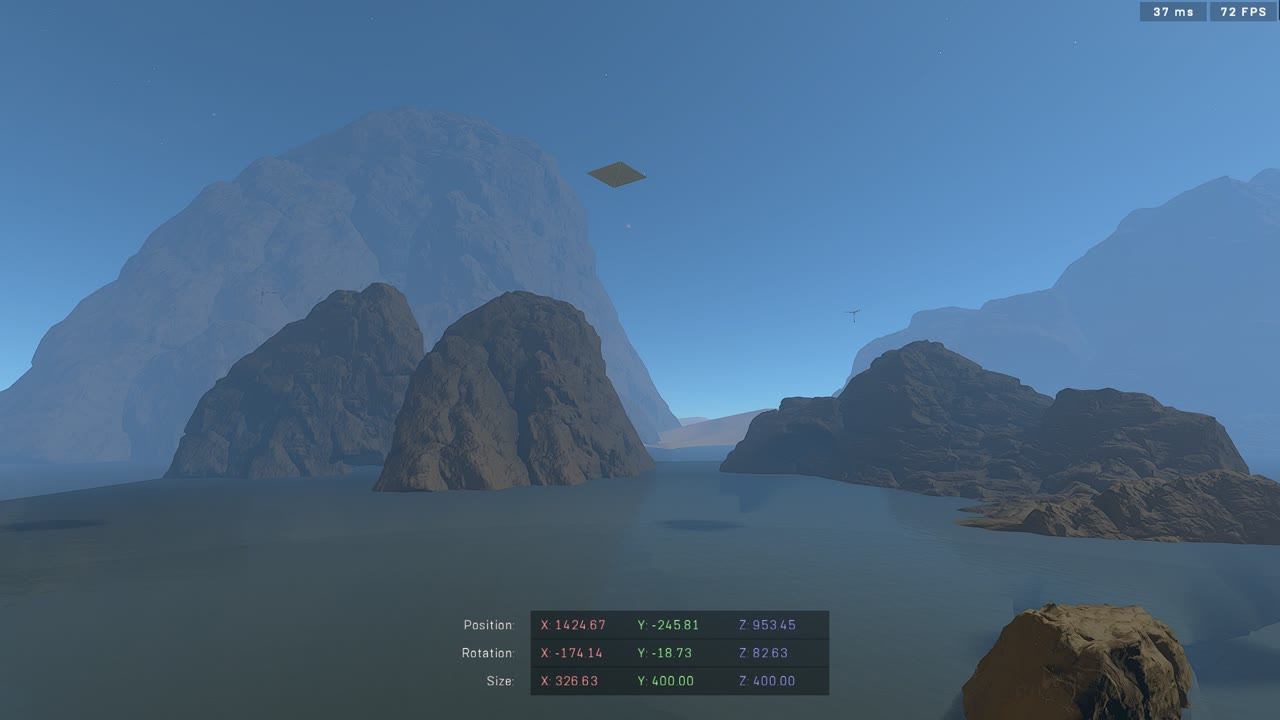
At this point I had good knowledge of the B2FP workflow and knew from prior map remake projects that halo Reach maps required an upscale of 6.8% when remaking them in Infinite. With this upscale in place, the entire playable space of Forge world just about fit into the 4000x4000x1500 canvas at a -30° angle. My initial print was with 57 objects in five different locations of Forge World, and was a test to see if the whole map could fit within the forgeable canvas and how the scale felt in-game.

I confirmed that the map could be built in specifically that position, rotation and scale, and now would just be the long road ahead of tracing out the entire map geometry with Forge objects. I didn't fully commit to it, but I placed around 390 objects mostly from the Canyon area and printed them to Infinite. I did another test, this time for the general color palette of the map to determine if I could achieve a close resemblance to the original.
The project continues in Blender
On Mar 15, 2024, 10 months after the project last saw any movement, I was in talks with Scrub about redoing the Forge World geo in Blender as I had already done some tests that proved it was possible. The tests I had done were disconnected from the Forge World project by Scrub and Virus, but at this point we decided to merge them into one and continue it as a collaboration. Scrub recalls that the 10-month gap in development may have been caused by the amount of work that eyeballing measurements required, so moving to the Blender-to-Forge method was seen as a positive way to continue the project.
I sent over the Forge World Blender files I had been working on to Scrub along with two videos that showed an introduction to working on the Blender file and how to continue work on the object placement. It was also at this point that forgers using B2FP were worried that the next update on Mar 19, 2024 would break the functionality of B2FP as Easy-Anti Cheat was to be implemented into Halo Infinite with said update. This fear also got to Scrub as he wanted a more accurate version of Forge World printed before the update released, and so he got a print done with the majority of the rough geo in place just before the update.
Luckily the Easy-Anti Cheat update did not break the B2FP method, but Scrub and Virus still took a hiatus from working on the project for another 3 months as times were busy for both of them.
Back after a break
With a new and reliable workflow in place using the B2FP method, Scrub continued with making the geo more accurate using it. In an efficient sprint from June 21 — July 11, 2024, Scrub placed geo for all the major areas of Forge World and had asked Virus to continue on the project as well.

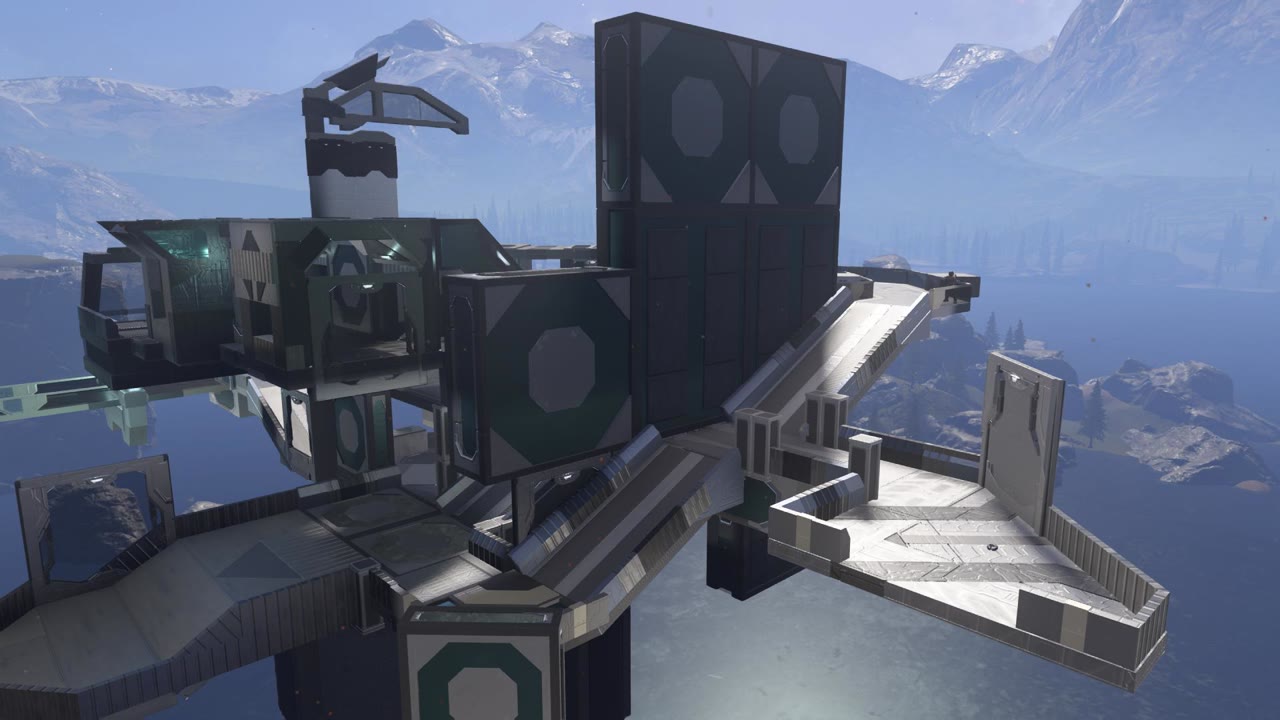
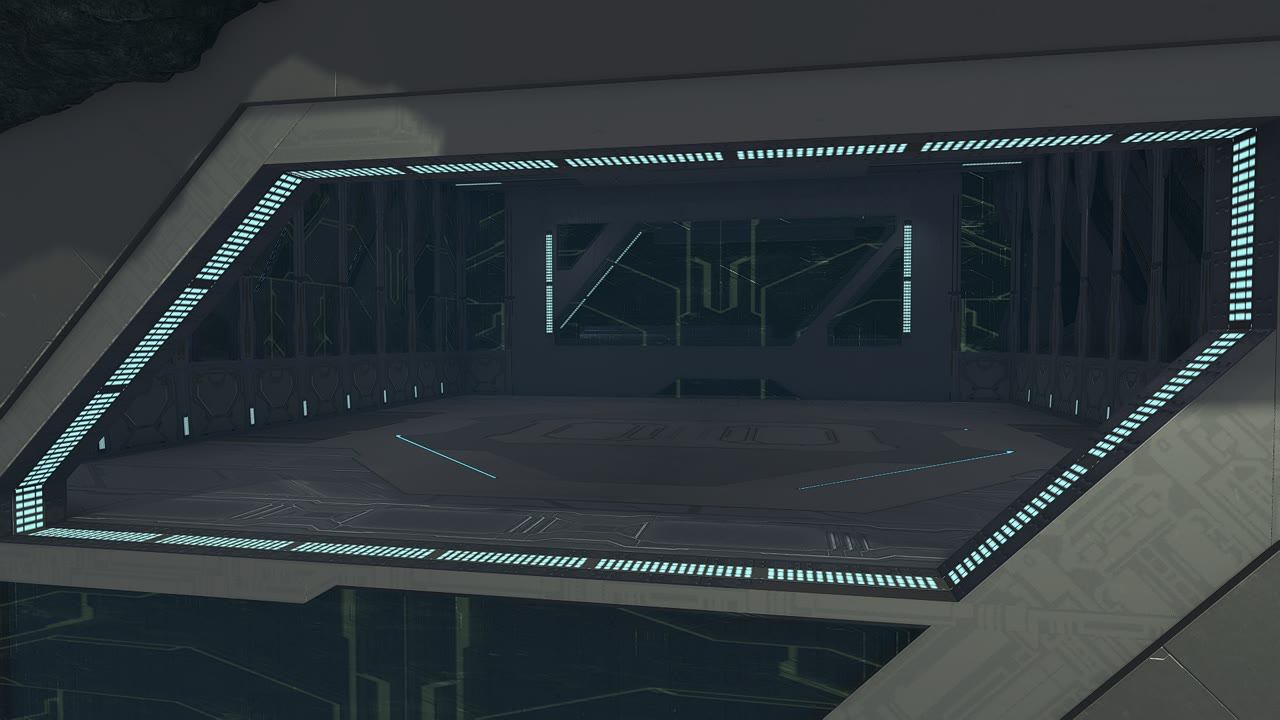
Since the geo was now scaled differently, and not eyeballed like before, the structures that were built in Forge such as the Coliseum had to be rebuilt. Virus was responsible for creating those structures and luckily it was just a case of re-fitting the objects to a differently sized room, but a tedious process nonetheless. The work was worth it though as the Coliseum came out looking amazing.
Handsome Huber (Huber) was asked to help with sculpting the skybox where he used a prefab of mine, tsg haloRing for a representation of the Halo Ring in the skybox. He also altered the skybox lighting to have more fog so the distant mountains didn't pop out so much. Scrub also took the time to refine the geo on some more areas.

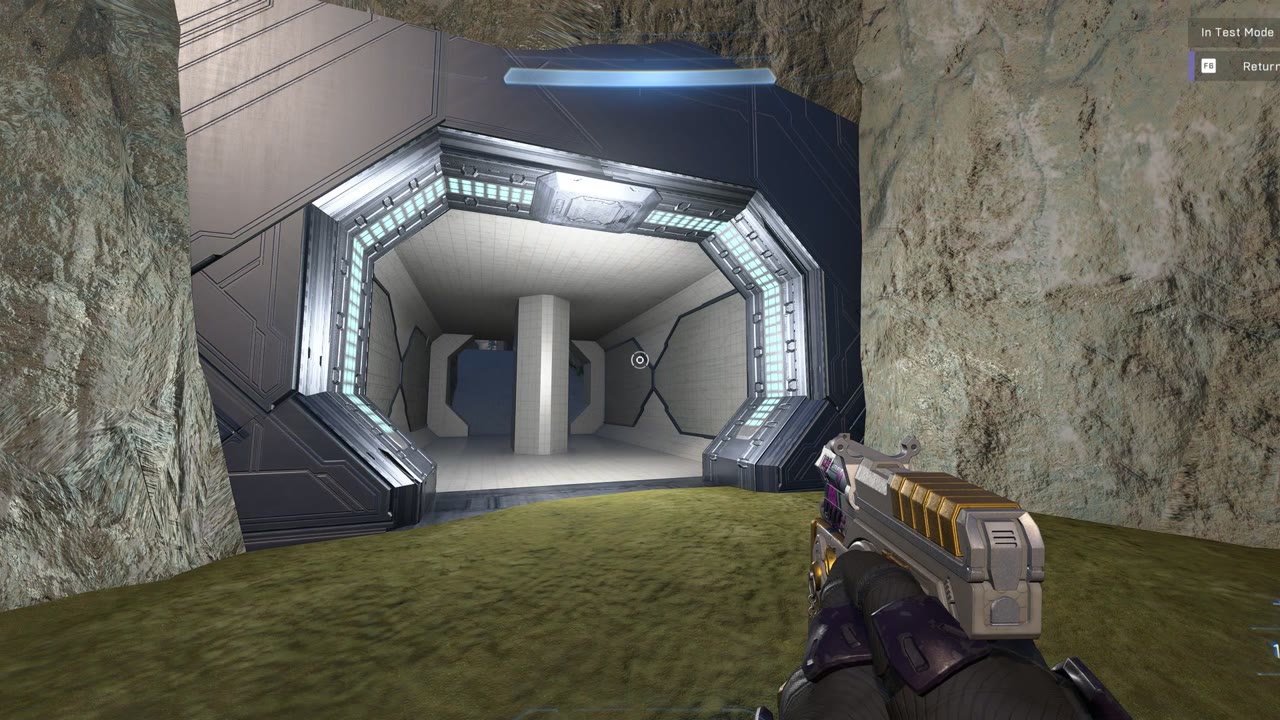
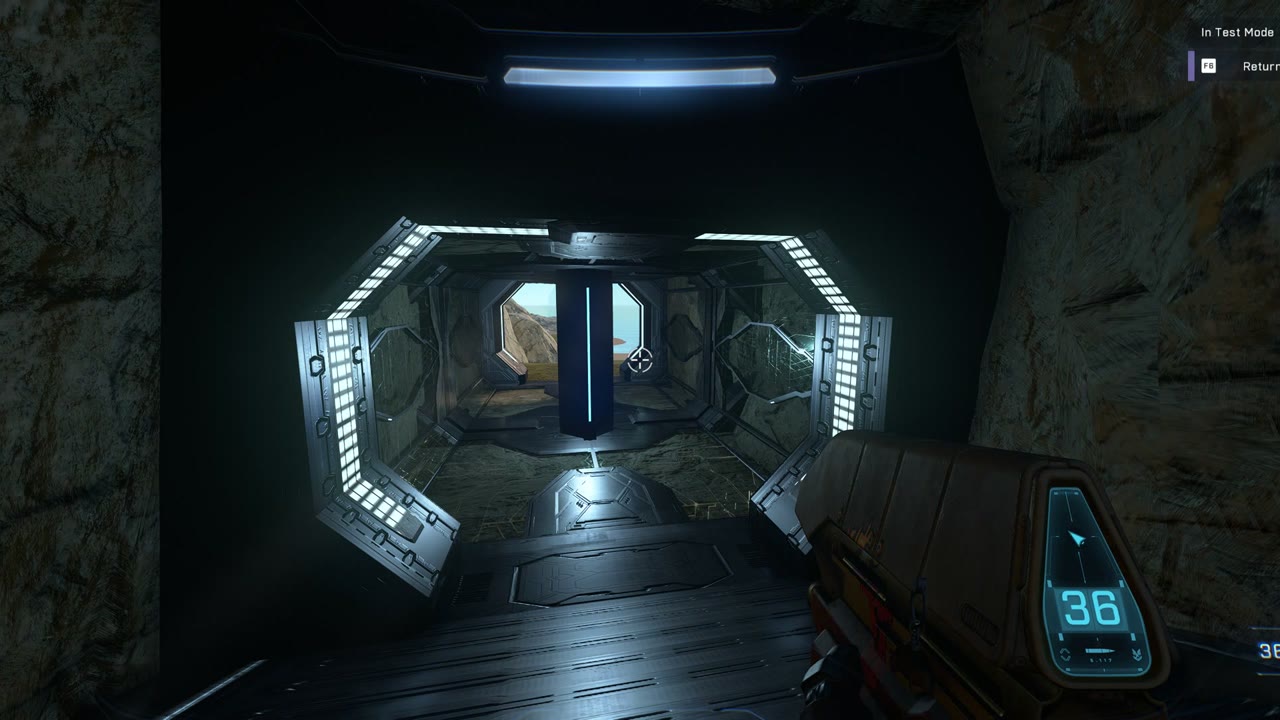
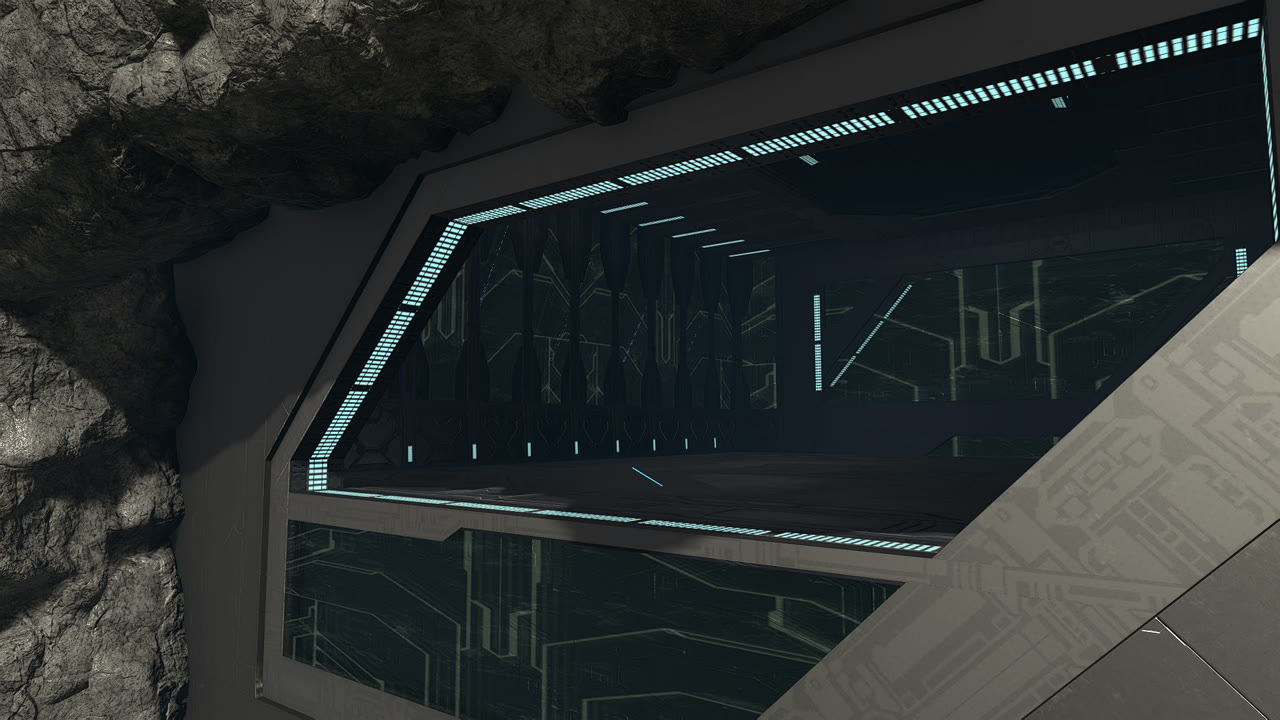
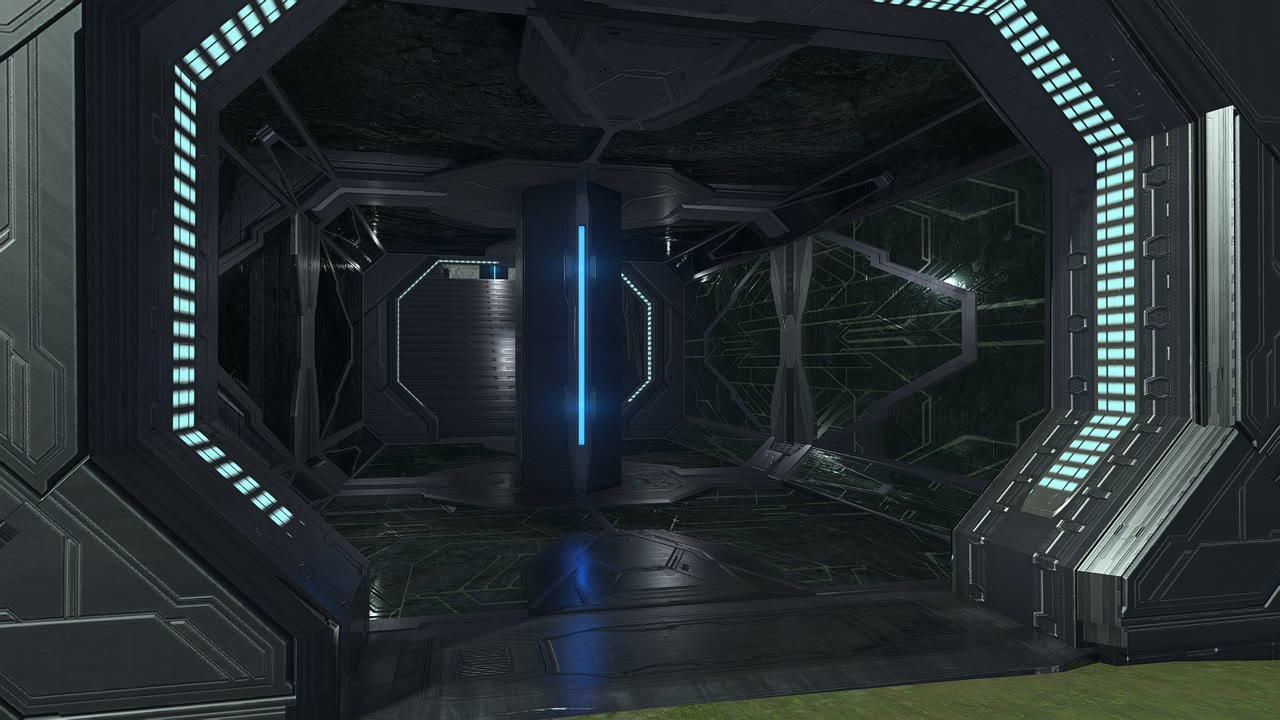
Virus, who arted the Coliseum, also took responsibility of the Forerunner Tunnel in the Island and did a phenomenal job at matching the vibes that the tunnel in the original map gave.
Spotting a major mistake
I noticed that the guys had continued work on the file and I was excited to check out the progress so on Jul 11, 2024 I loaded up the map in Forge, but something felt off. I had done extensive testing on the scale of my initial test prints to ensure the scale was as close as possible, but somehow now this map felt too small.
I checked some key areas of the map that I knew wouldn't have fit inside the canvas with my scaling as I had noted those to be the boundaries of the map, yet on this file they were well inside the bounds. I quickly came to the conclusion that the map scale in Blender had somehow gotten adjusted in the process of me transferring the Blender file to Scrub and him beginning the initial work on it. I let Scrub know of this immediately as continuing manual object placement work on the wrongly scaled map would result in lost work if they wanted to correct the scale.
How it was missed
I reasoned with Scrub on what could've caused the sudden change in the entire map's scale and I theorized he might've done a sequence of accidental key presses in Blender when working on the file before doing the first print of the map before Mar 19, 2024. He recalled this never happening, but I think in Blender he mistakenly did the sequence of:
- Press A (select all objects)
- Press S (scale selected objects)
- Move mouse (acts like a slider to adjust scale)
- Left click (applies scale)
- Left click again to select an object
- Forget what you just did
As the movement keys in Blender are WASD with the workflow I taught him, a mistake like this could possibly happen and go unnoticed if you're not paying attention, and happen spot something out of the ordinary. This wasn't Scrub's first time working in Blender as he had done two other maps with the B2FP method, but everyone can make mistakes; this was just quite a major one.
The rebuild
After discussing it with the project team, the decision was made to re-print the entire map with the corrected scale. Scrub had checked the scale of the map in Blender and realized it was 77.4% of the scale it should've been, which he also found unacceptable, though only after some tough decision-making.
"Really, this whole process will suck, lol"
All of the objects manually placed in Forge on top of the printed geo would have to be replaced or adjusted to match the new scale, and an adjustment to the Pillar position would have to be made. Scrub and Virus discussed the biggest annoyances to be re-scaling the Coliseum and Tunnel art as well as replacing all of the trees, which positions were eyeballed.
The Pillar fit inside the map at the smaller, incorrect scale, but now it would sit just outside the map like I had originally envisioned. Scrub solved the issue cleverly by keeping the pillar at the right scale, but just moving it inside the map. This would be the only major deviation from the original geo positioning of Forge World, and frankly I've not heard anyone call it out as looking odd.
Having now re-printed the entire guide geometry once again at the right scale, it was time to rebuild everything that was placed by hand in Forge. Virus made quick work of re-scaling the Coliseum and Forerunner Tunnel art as well as started placing the trees again, while Scrub added some more detail to specific areas from Blender.
Skybox improvements
The existing skybox also had to be adjusted now that the scale had been fixed, but there wasn't much of it yet present, so Huber did some broad strokes with it. Using largely scaled rocks and terrain pieces he matched the vibe of the skybox that Reach had given to the player. At this point we had not printed any guide geo for the skybox.
Huber used a clever trick to mimic cheap 2D trees in the skybox by flattening some specific bush and grass objects that from a distance looked like a line of trees. These were scattered around the skybox mountains to bring some detail to the otherwise empty shapes.
Major rock replacement
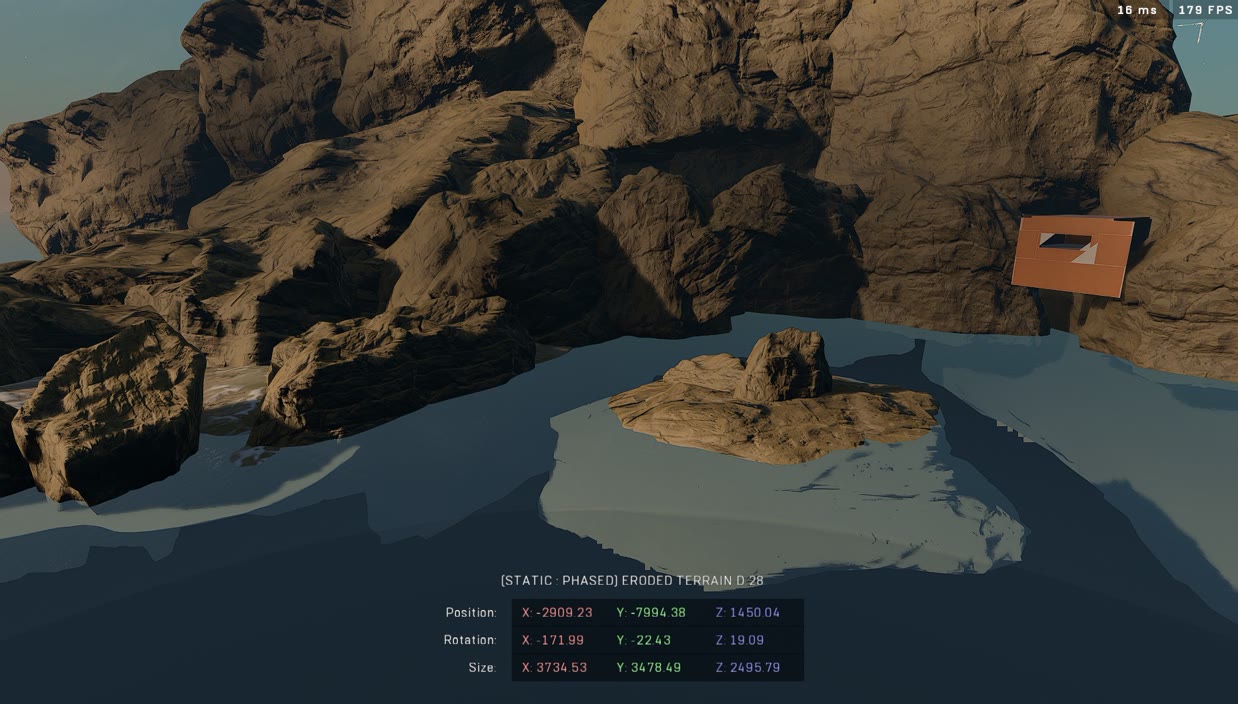
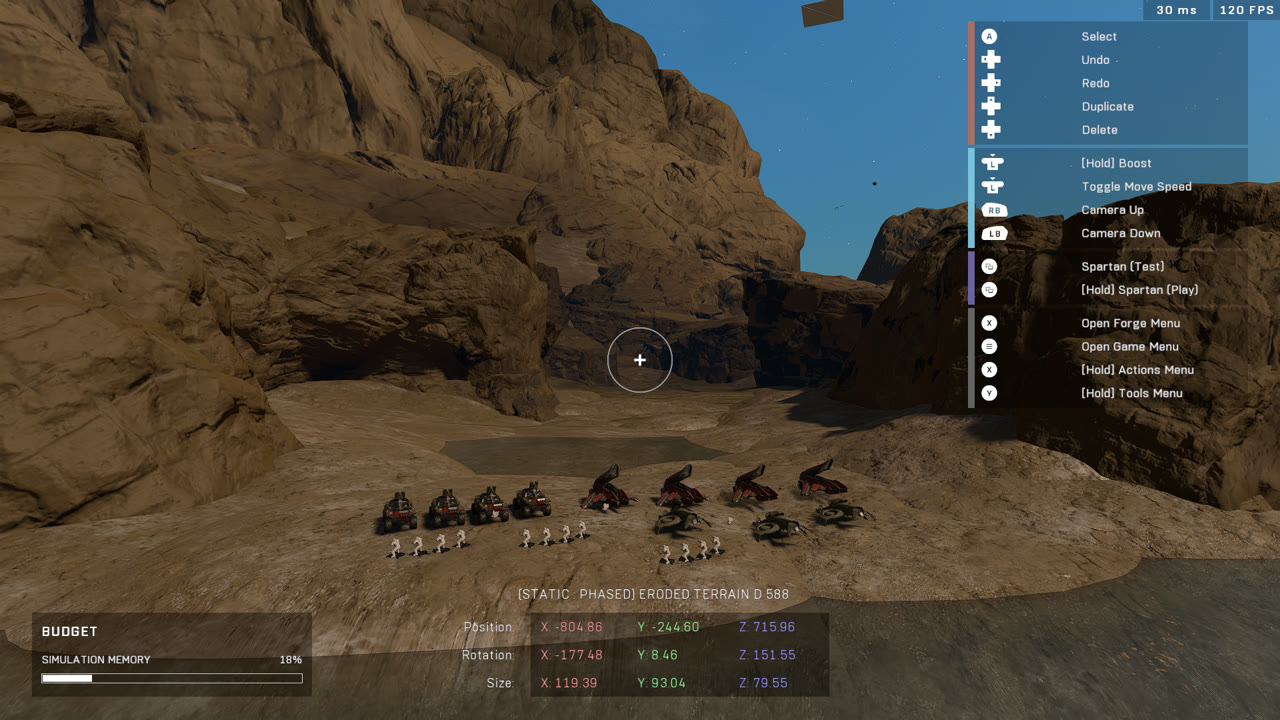
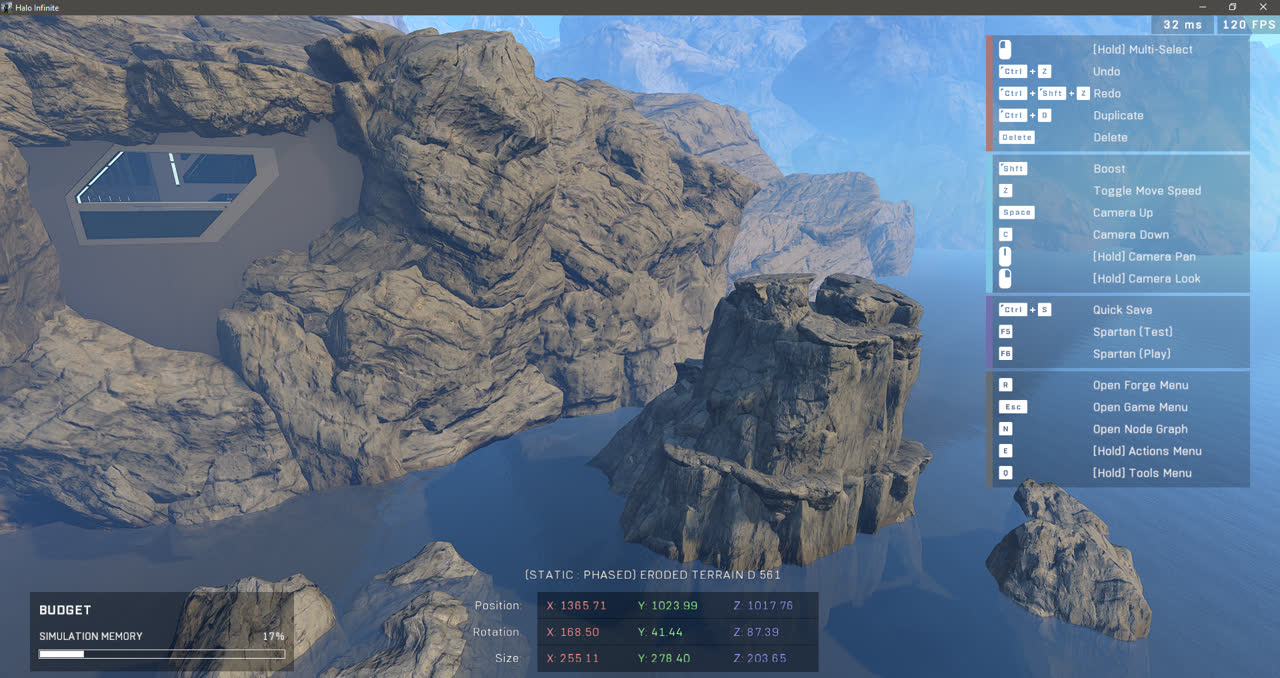
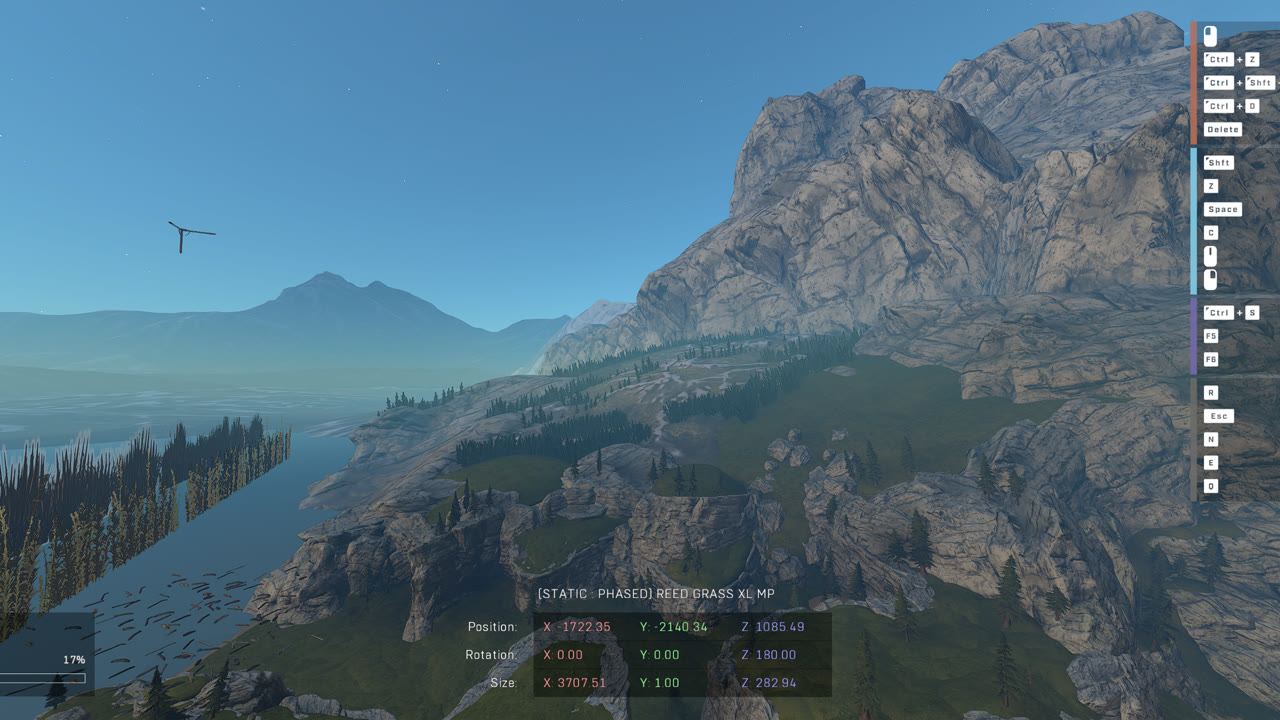
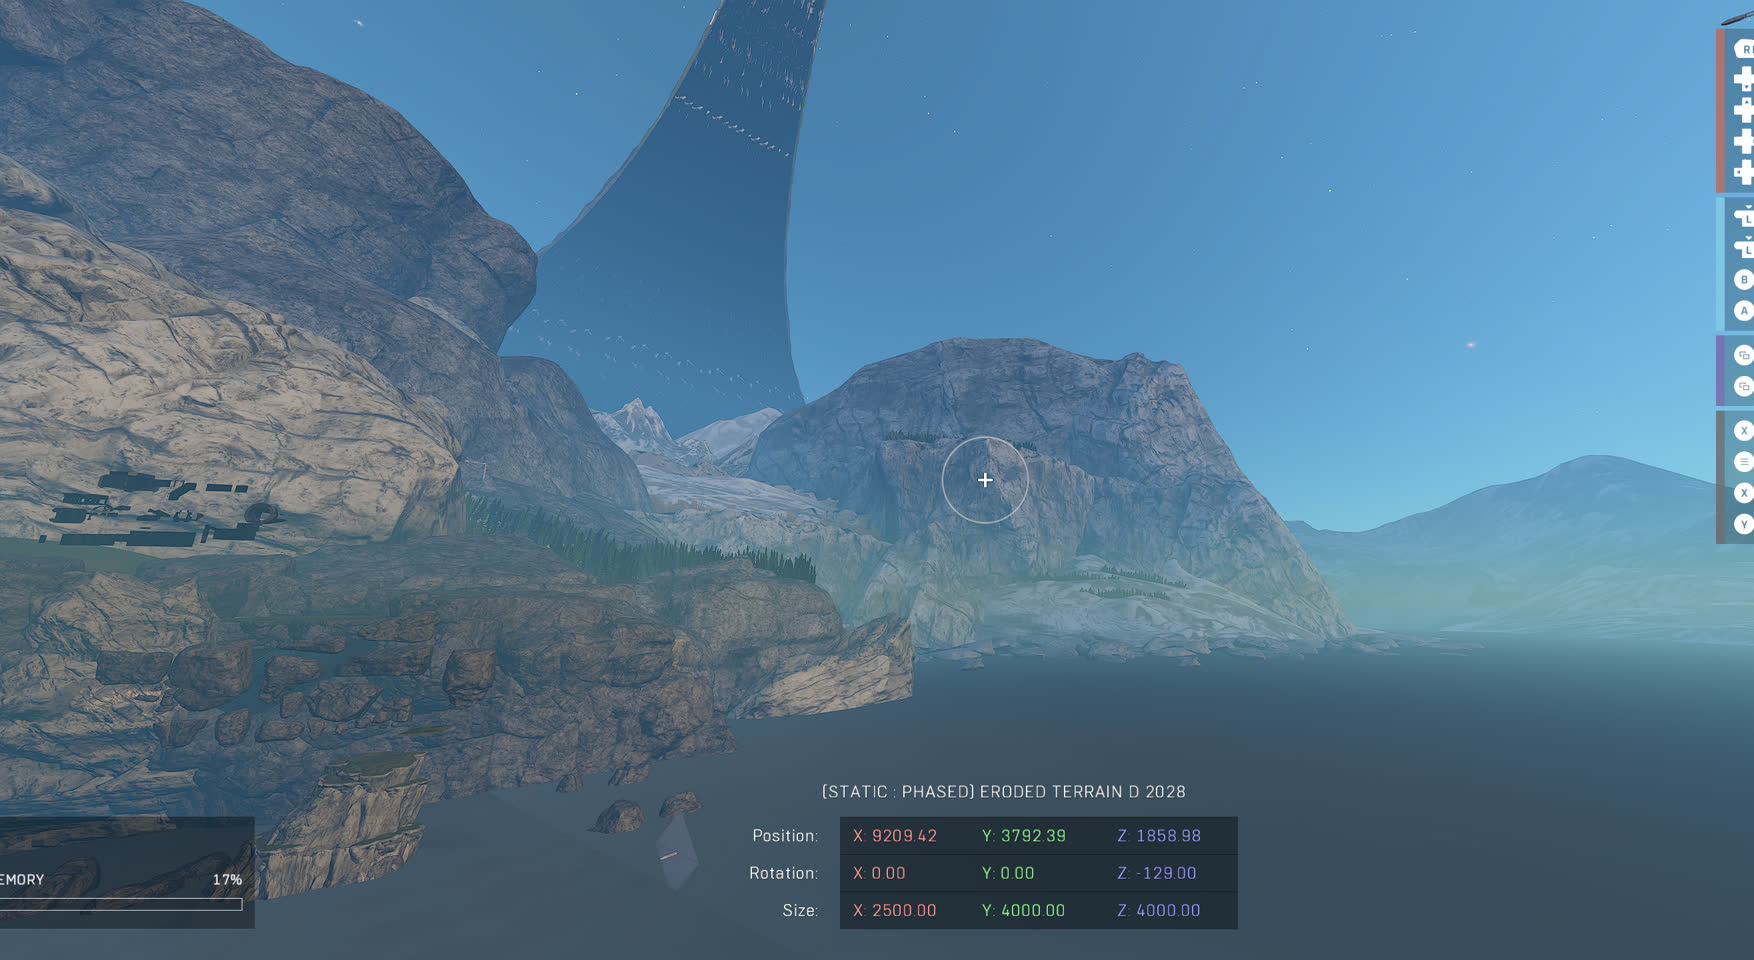
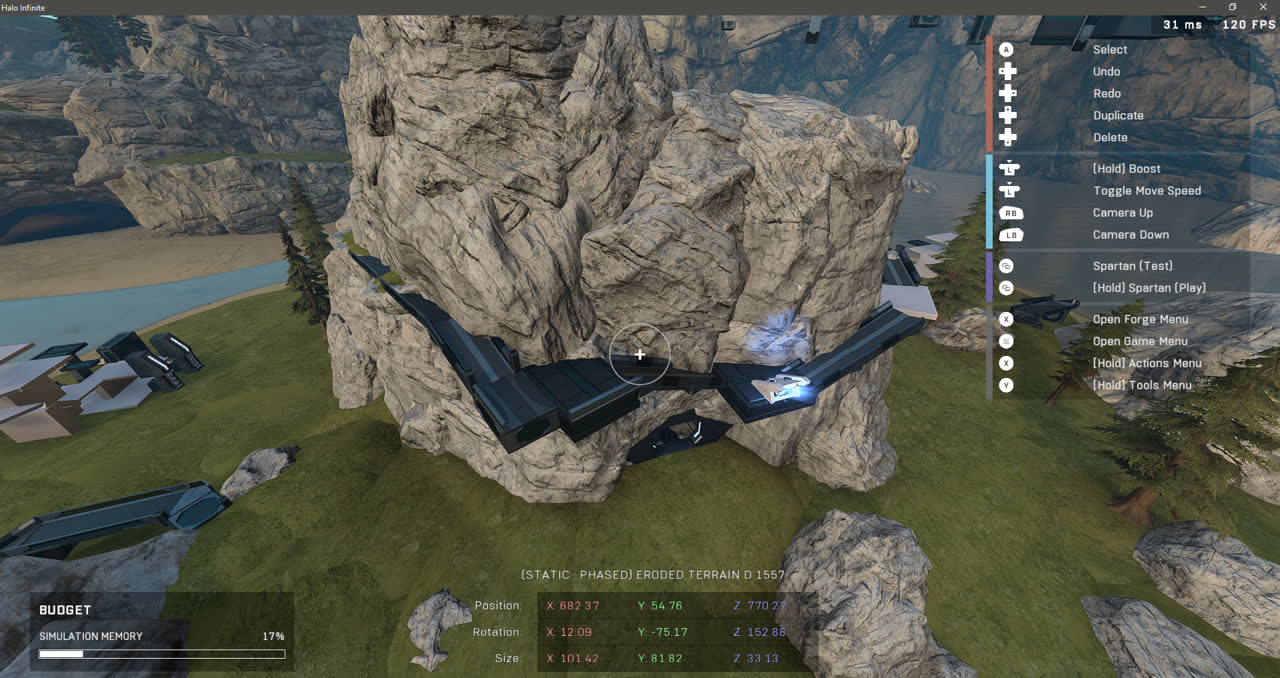
The white rock object used for all the mountain and rock geo up to this point had been the "Eroded Terrain D" object, which many forgers know and love for its ability to change texture and color. But a downside of the rock is that there is literally just that one variant of it that could be used for this case.
The Eroded Terrain D object was initially chosen due to it being the best generic rock piece and being able to have its color changed, as the rock texture on Halo Reach's Forge World was tinted more white than grey as well as the Eroded Terrain D being the only non-blockout rock object we had ported into Blender for use with the B2FP at the time.
Why not use the other Misc Rocks?
There are other similar rocks in the same "Rocks - Misc" category, but they all have different material properties, so combining them with the Eroded Terrain Ds wouldn't work seamlessly. Having to just use this one rock for everything, the mountains looked messy and repetitive. The texture for each would also have to be custom-fit to somewhat work with the others, even if they were able to be blended together. Also, when scaling up some of the rocks, the shadows would completely mess up on them and cause ugly dark patches that could not be fixed. These reasons combined led Scrub to try out a different rock type.

Alpine Rocks
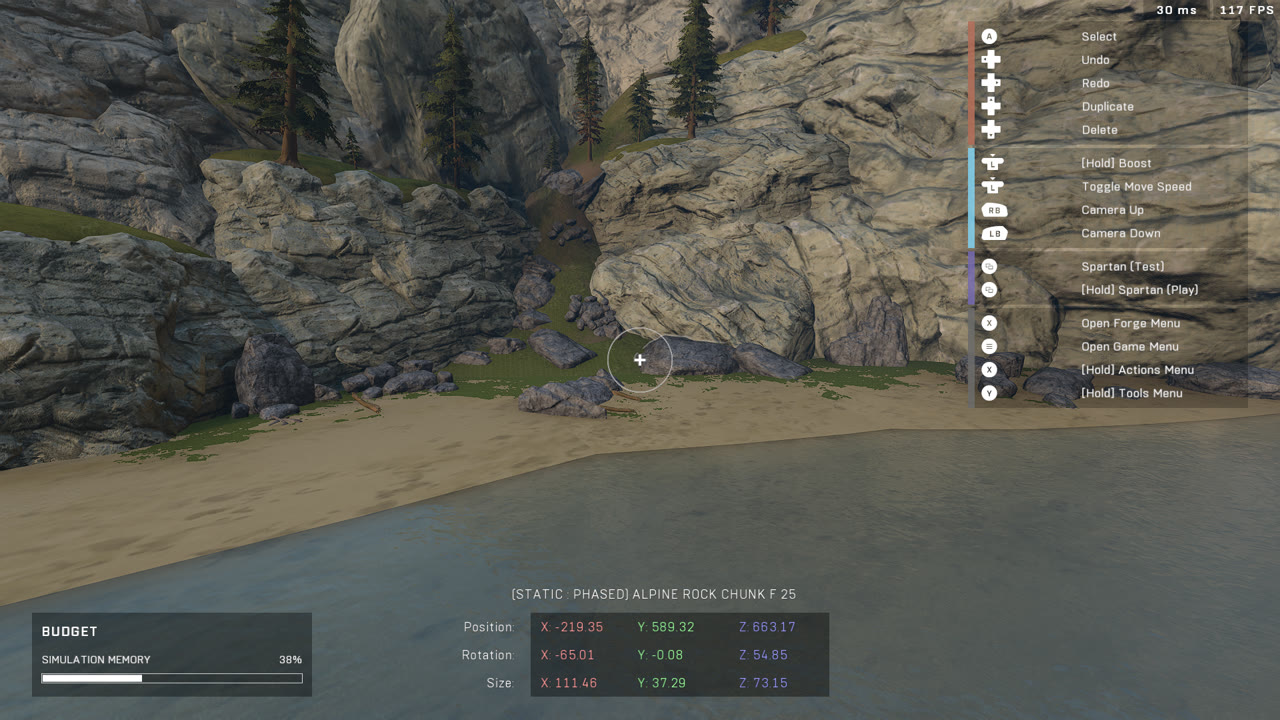
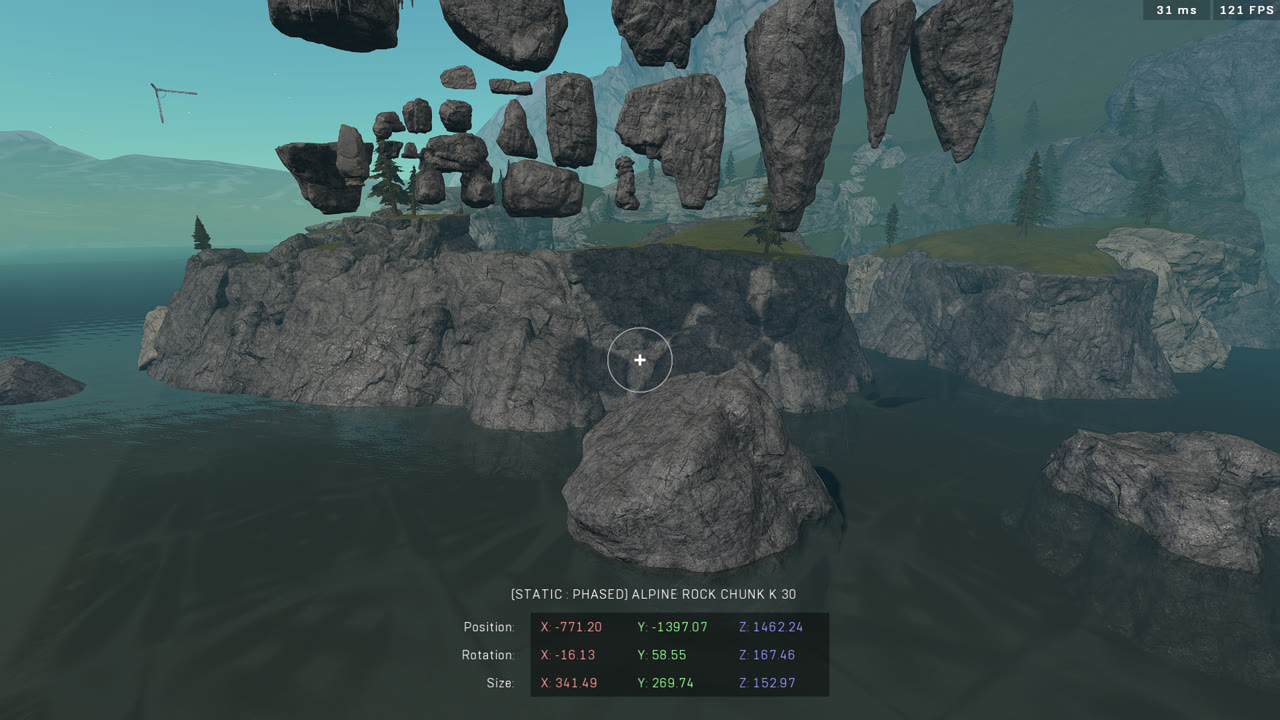
Alpine Rocks are a set of grey rocks with 29 different shaped variants and the only major downside of these is that their texture can't be changed. As they come in so many different shapes, some rock formations could be created with much less objects compared to only using the generically-shaped Eroded Terrain D.
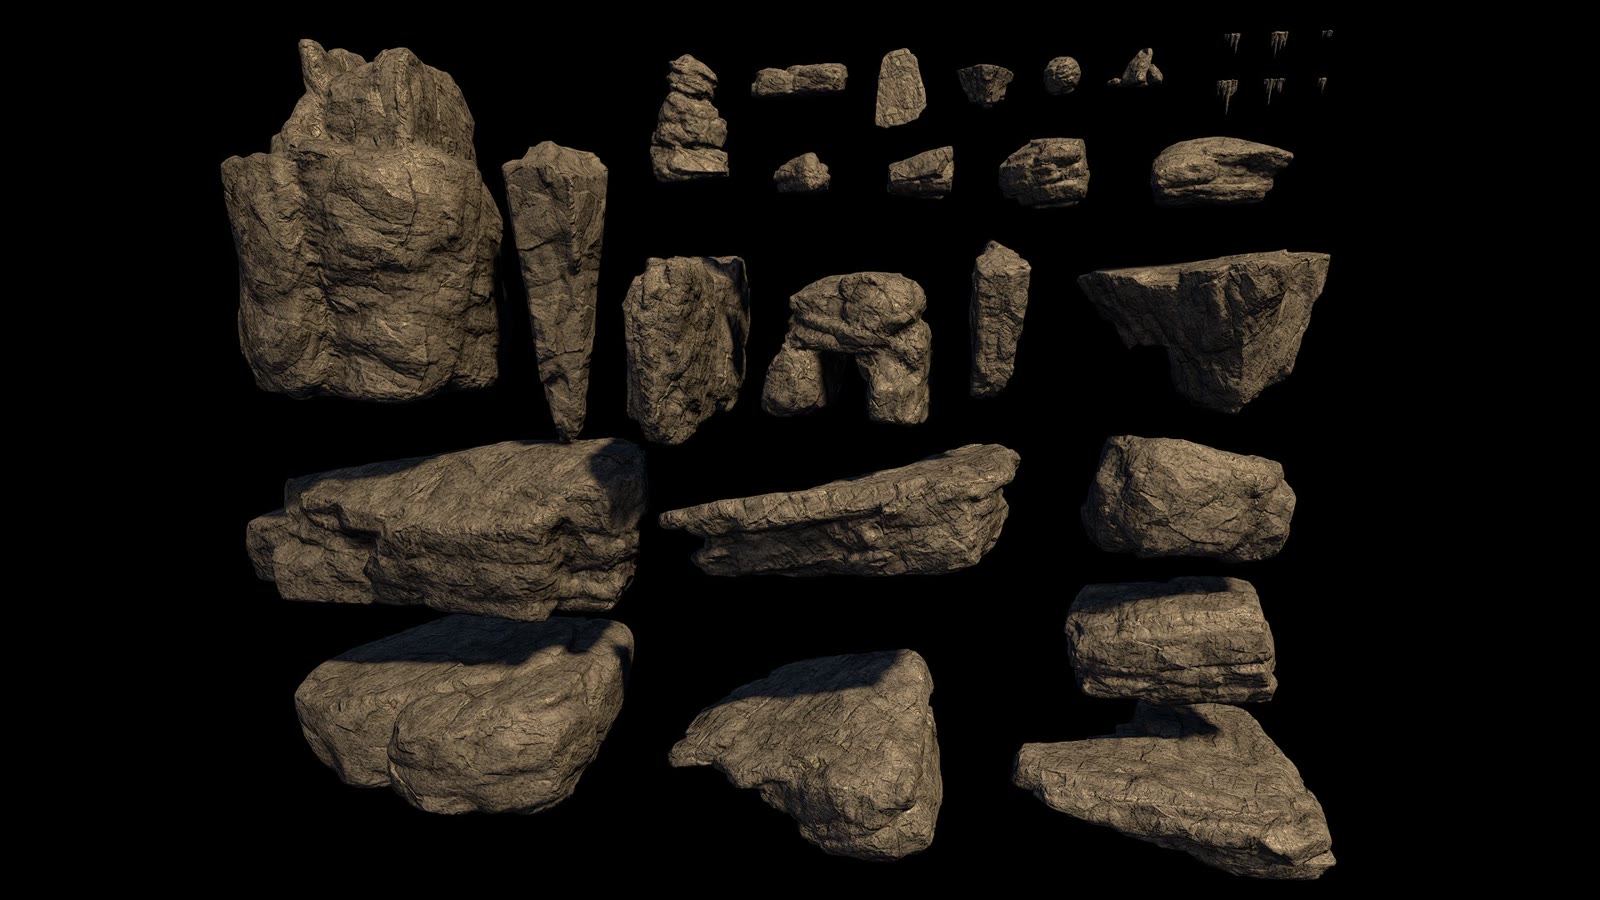
With the only downside being that the color might look off, but so many other benefits including more efficient object usage and higher quality textures, Scrub asked Virus to swap out the Eroded Terrain Ds on a test map to the Alpine rocks to see if they would fit.
This test map was a remake of a Halo Reach forge map in Forge World named "Paradiso", which took place on the Island. The guys had already built the blockout for this as a side project, but in this case, we'll just focus on the Alpine rocks. Virus made quick work of replacing all rocks on the Island with Alpine rock variants, and he noted that the total object count for the rocks used had been significantly reduced as a result. Another thing he noted was that he scaled each rock uniformly in all directions to avoid the texture looking noticeably stretched on one axis.
Scrub now confirmed that the call to swap to the Alpine rocks was the right call and he also started helping with the replacement efforts. Just like with the Paradiso copy file, Scrub initially did the Alpine rock replacement on his original map "Hemorrhage", which now had the updated Forge World mountain geo ported over from the main map. He did the replacement on that file first as he had other collaborators working on the terrain for Hemorrhage and wanted the rocks to be accurate there first.
Regardless where the initial rock replacement was done, they were eventually transferred over to the main file by grouping the objects in a saved "Prefab" and placing the prefab on the Forge World file at the same location.
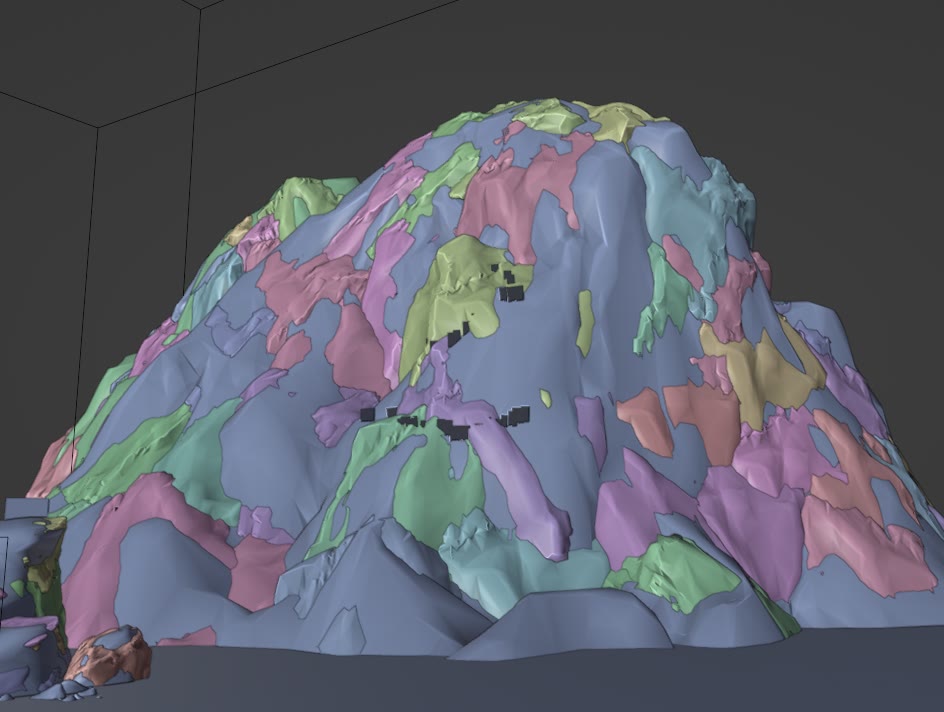
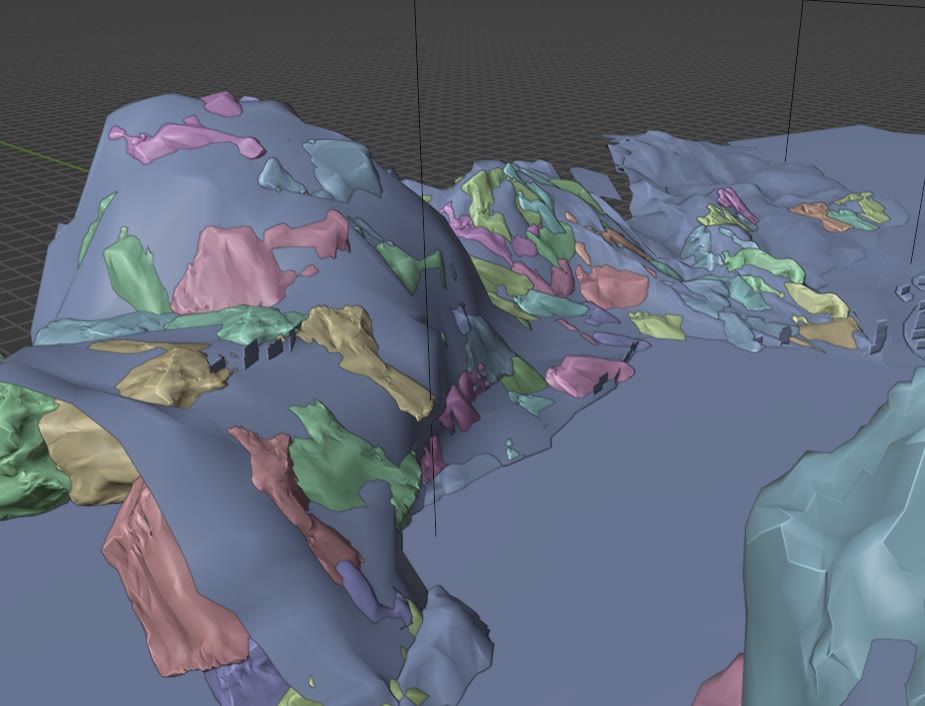
Terrain overhaul
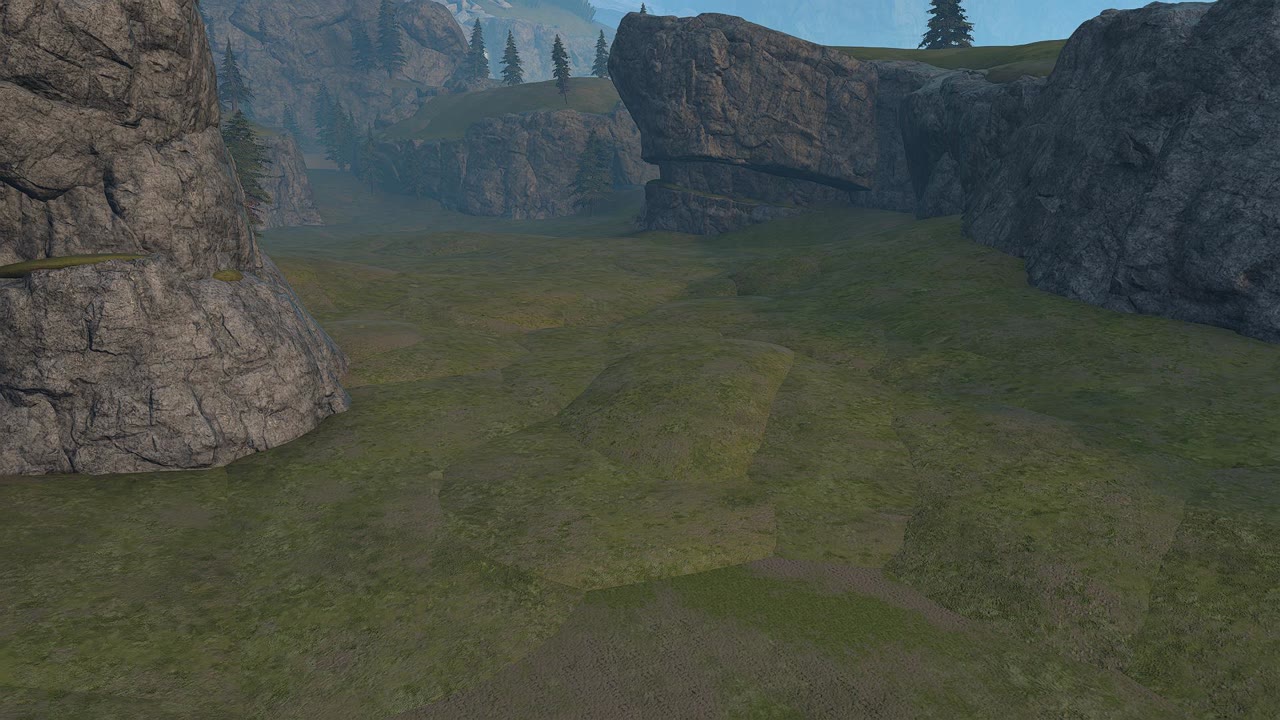
One aspect that hadn't been touched yet was the accuracy of the terrain, which at this point looked like a Michelin Man due to the terrain objects being sloppily placed in Blender. Creating terrain in Halo Infinite is an art form where you are given a palette of Terrain objects that have to be combined together in order to make a convincing looking surface by moving, scaling and rotating each piece perfectly in an attempt to avoid any seams and bumps. It's far from an ideal way where you'd start with a flat landscape and just sculpt the required areas to fit the shape you want.
Who wants to do terrain?
Not that many people in the Halo Infinite forging community want to do terrain as it's a very tedious process if you want to achieve great results, but we were lucky to have met someone willing to help us. Virus had met spartan blood 1 (Hamish) at HCS Worlds 2024 who said he had worked on crafting the terrain on maps like Dead Silent and Kattegat in Halo 5, and Nadair in Halo Infinite. After the event had passed, Virus contacted Hamish to see if he would want to help with the terrain on Forge World, mentioning that it was a monumental task, but Hamish agreed to jump on the project.
Hamish did some great work with blending the terrain pieces between Nov 21 and Dec 8, 2024 to not only hide the seams, but also blend in different textures such as the grass with dirt or sand. Hamish recalls that the biggest challenge with the terrain on Forge World was working within the guidelines and expectations of what kind of shape each part of the terrain should follow.
He says that there's more freedom with creating terrain for original maps as players have no expectations for how the terrain should look like. With remakes, players have an expectation and are often quick to point out some inconsistencies, which are usually very difficult to get perfectly right with the limited tool set of Halo Infinite.
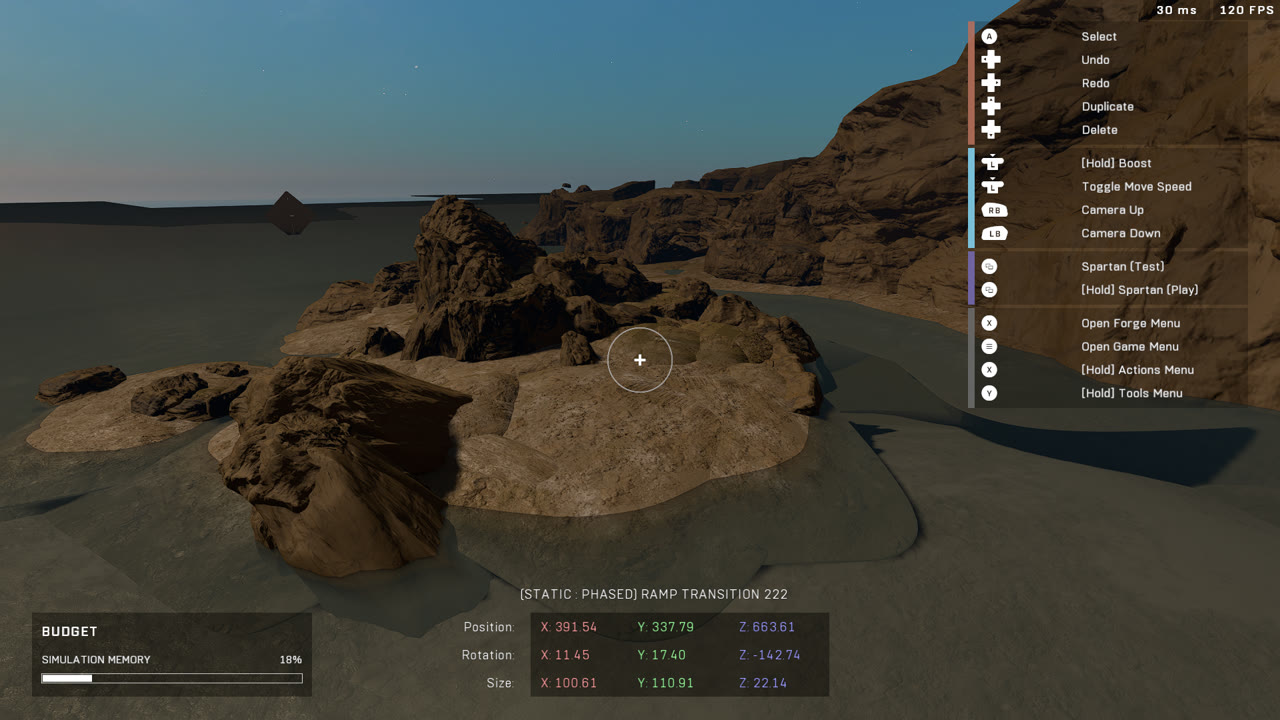
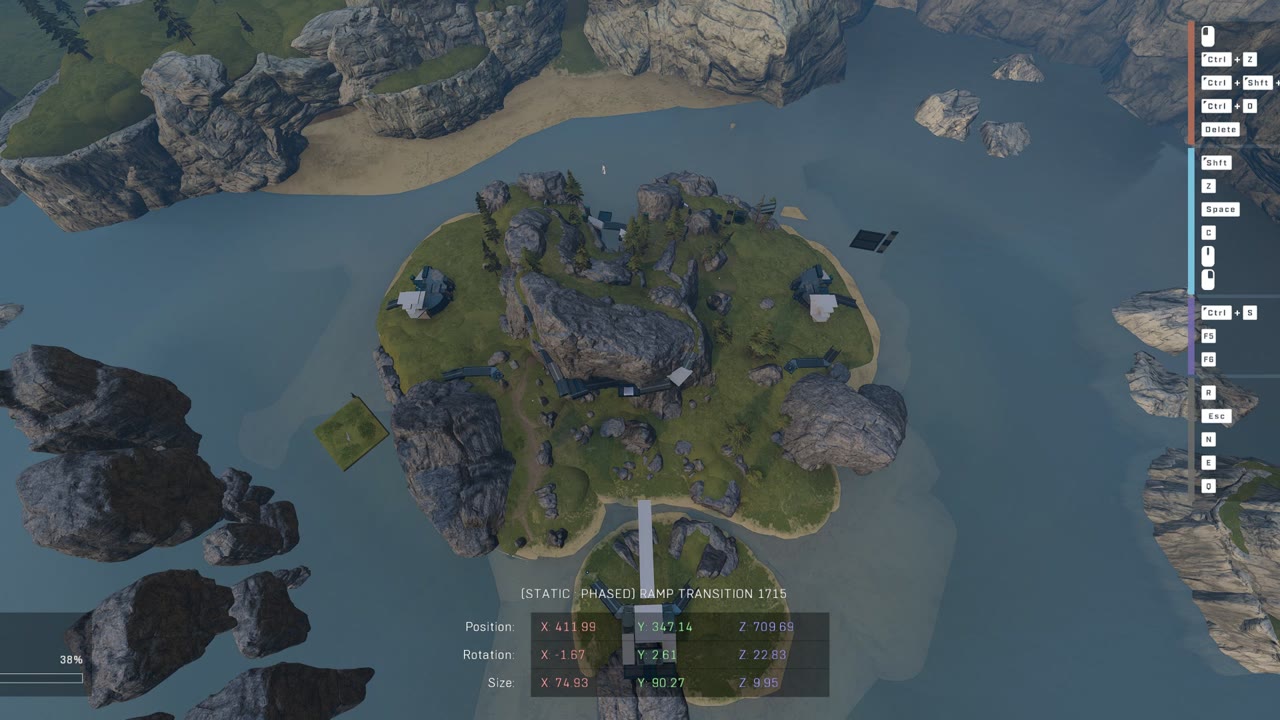
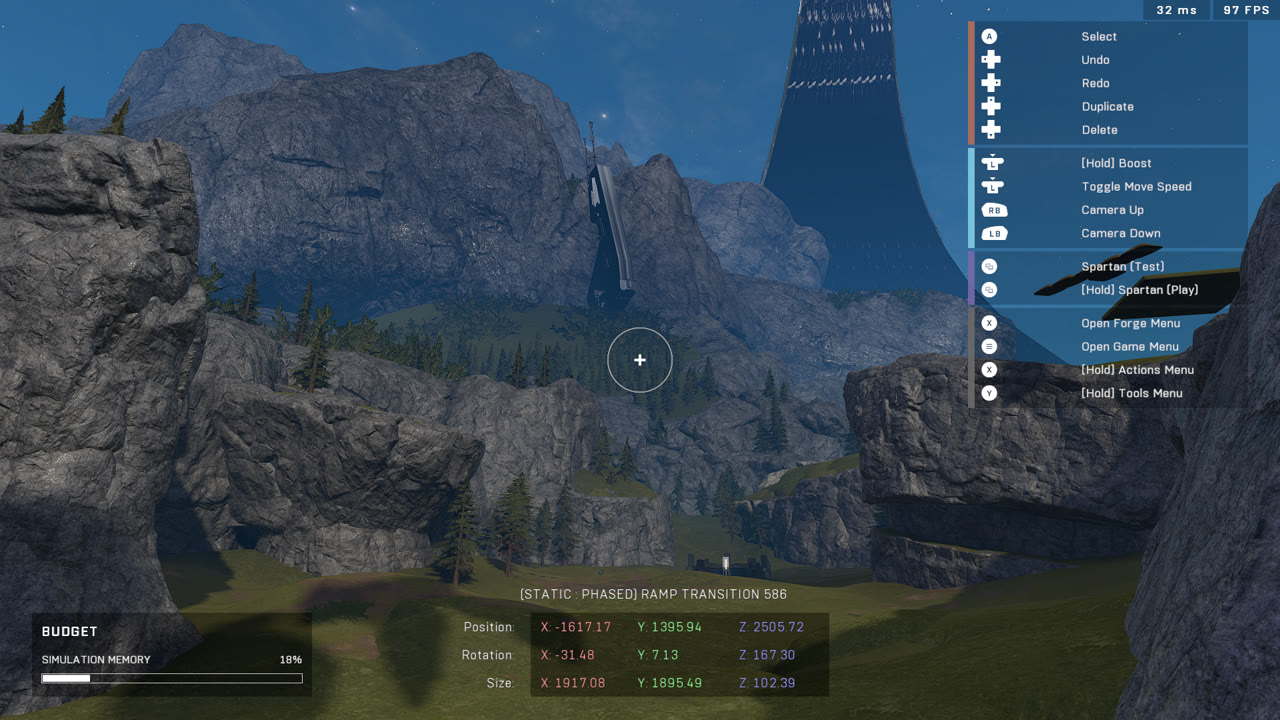
Making convincing looking terrain that smoothly blends in two textures is not easy to do in Halo Infinite, and there are only a few terrain pieces that can be used for such blending of textures. Again, it's not like you can just select a brush and blend two textures together like in a terrain editor; you need to use a preset object that has those two textures blended somewhat and try to fit that object in with the rest. The majority of Hamish's terrain was done with the objects "Ramp", "Ramp Transition" and "Terrace Terrain". He also did some of the Alpine rock art work and said to have used a lot of the different rock variants.
Lighting updates and canvas swap
It was at this point that there were 23 days until the project deadline of Dec 31, 2024 and the convincing looking commits to the map had piqued my interest. The guys had released some work-in-progress media about the map already and were just planning a teaser trailer for it, but there were a few things that were off-putting to me still. I want to see all projects and especially large commitments like this one get released with very little complaints on launch day, and I'm very picky when it comes to the polish part of a project to ensure a smooth launch.
Initial lighting update
The first thing that caught my eye and made me want to jump on the project again was the skybox lighting, which looked too neon cyan to me, and negatively impacted the map experience. I spent some time adjusting the lighting, and after many errors landed on something that I was content with as a baseline. The difficulty with Forge World was that we had to have a large map with clear visibility, but also have thick fog far away to not make the distant mountains pop out too much.
While still not being satisfied with the initial pass for new lighting, I added more yellow to the sunlight, and more green to the light bounce which were my takeaways from doing numerous side-by-side comparisons with the original map from Reach. Having to go this far with trying to accurately match the lighting taught me to look at the colors of the map and understand why those light settings should be the way they are.
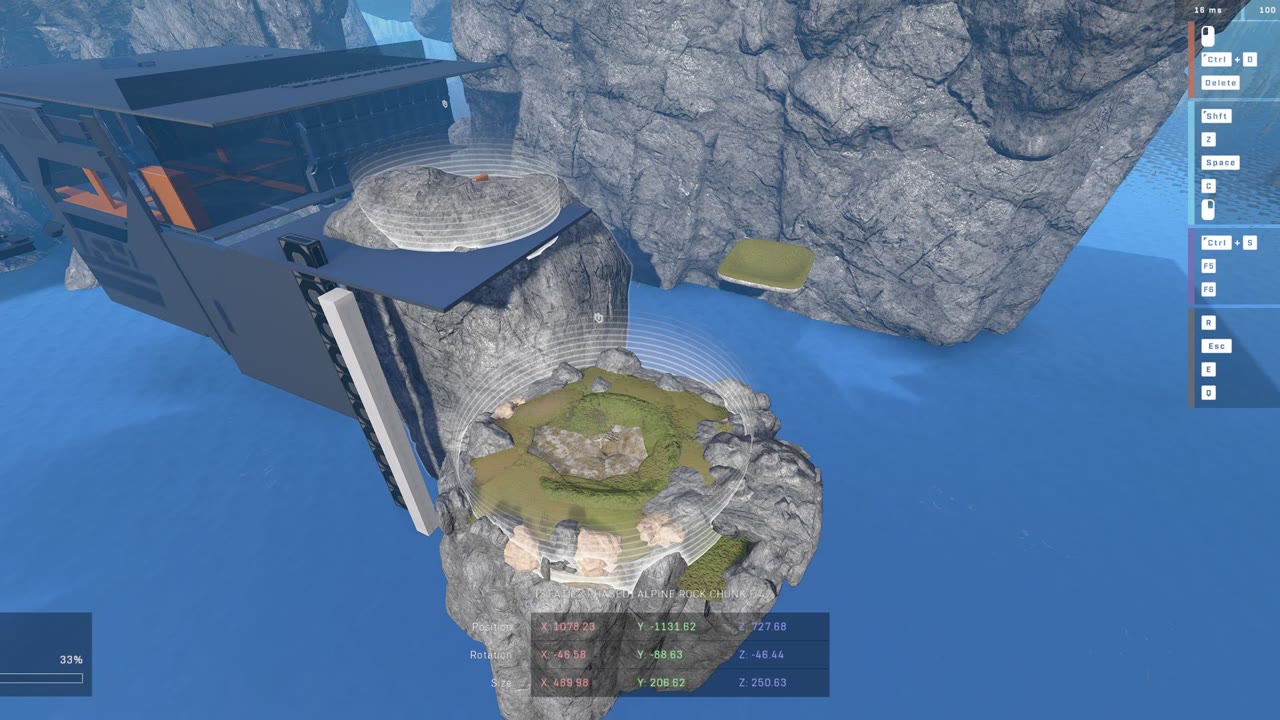
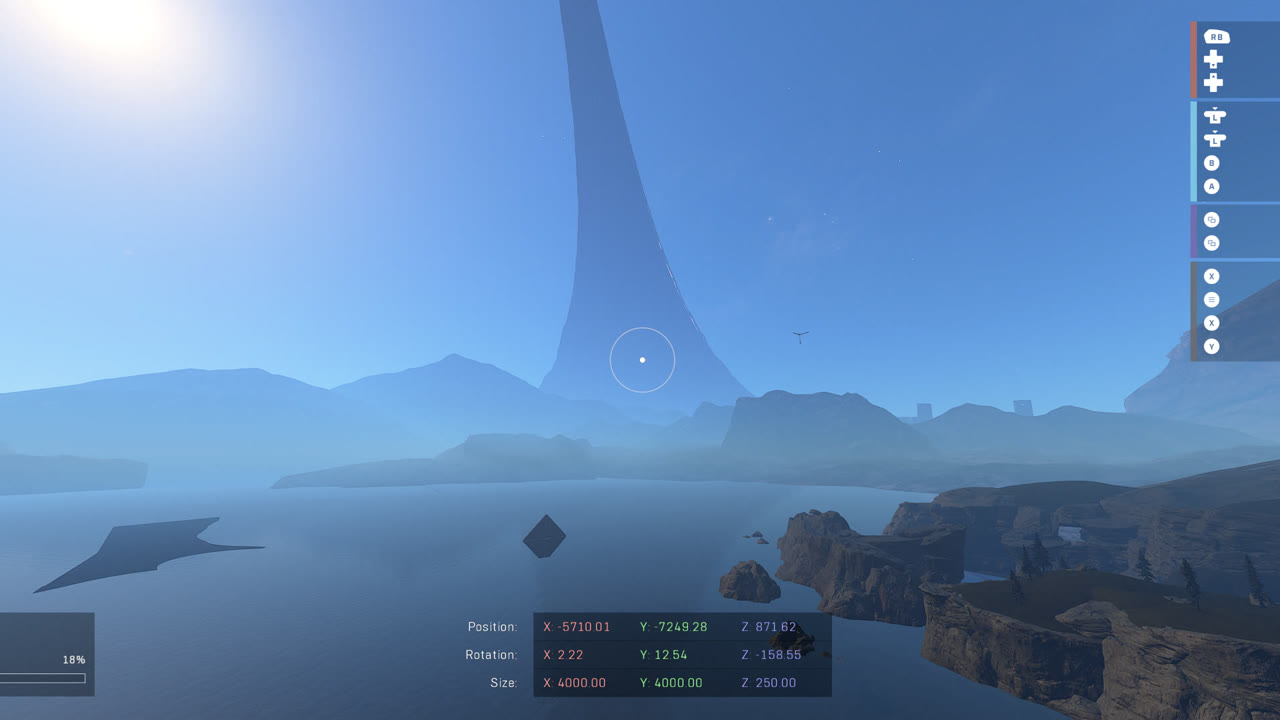
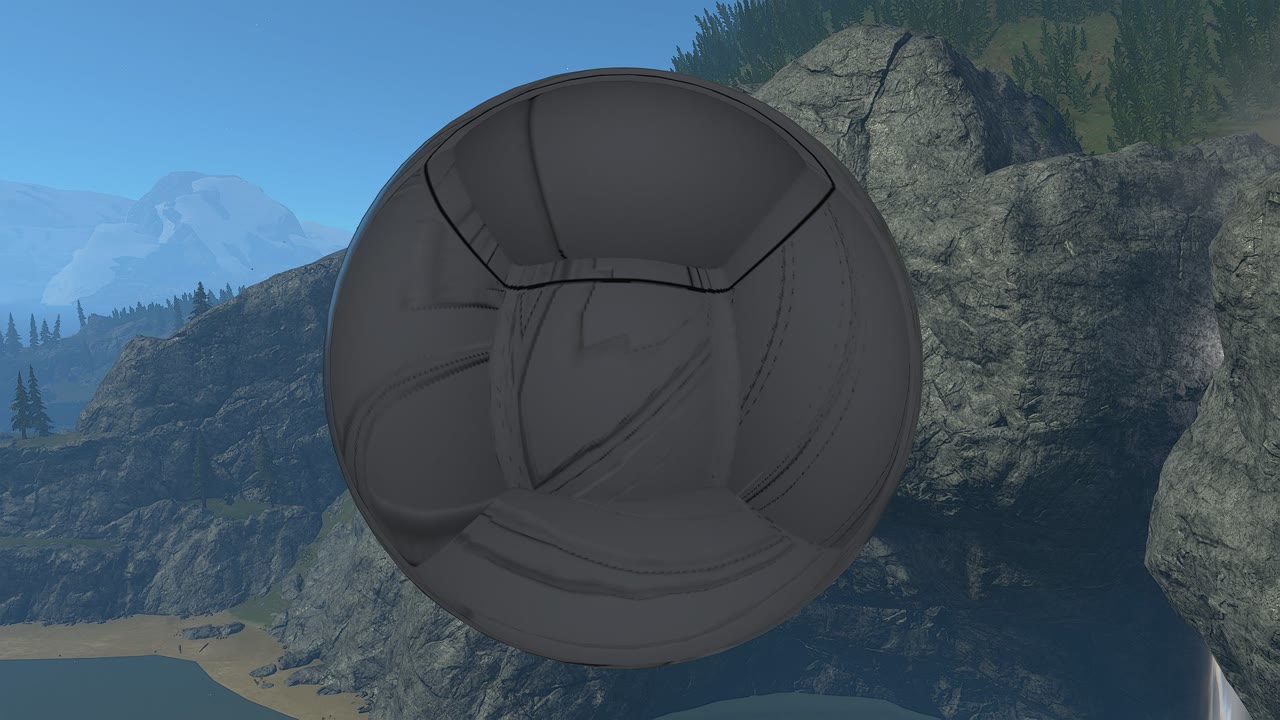
The Halo ring
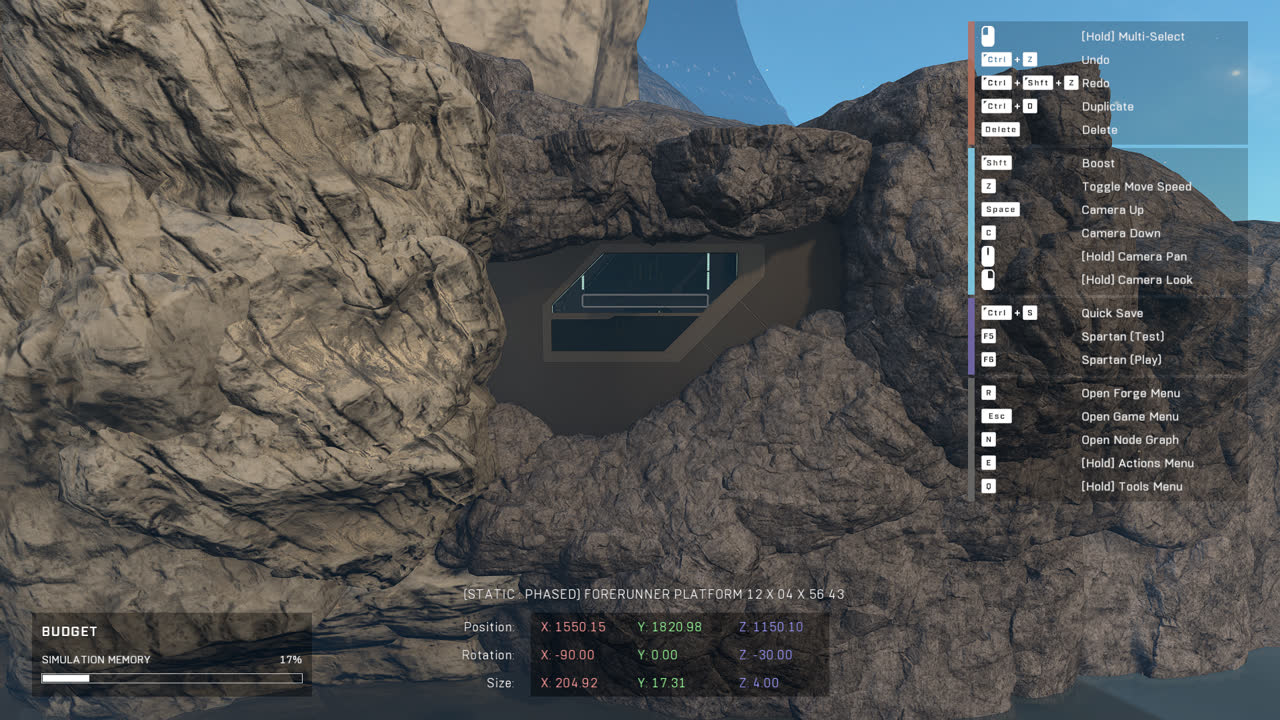
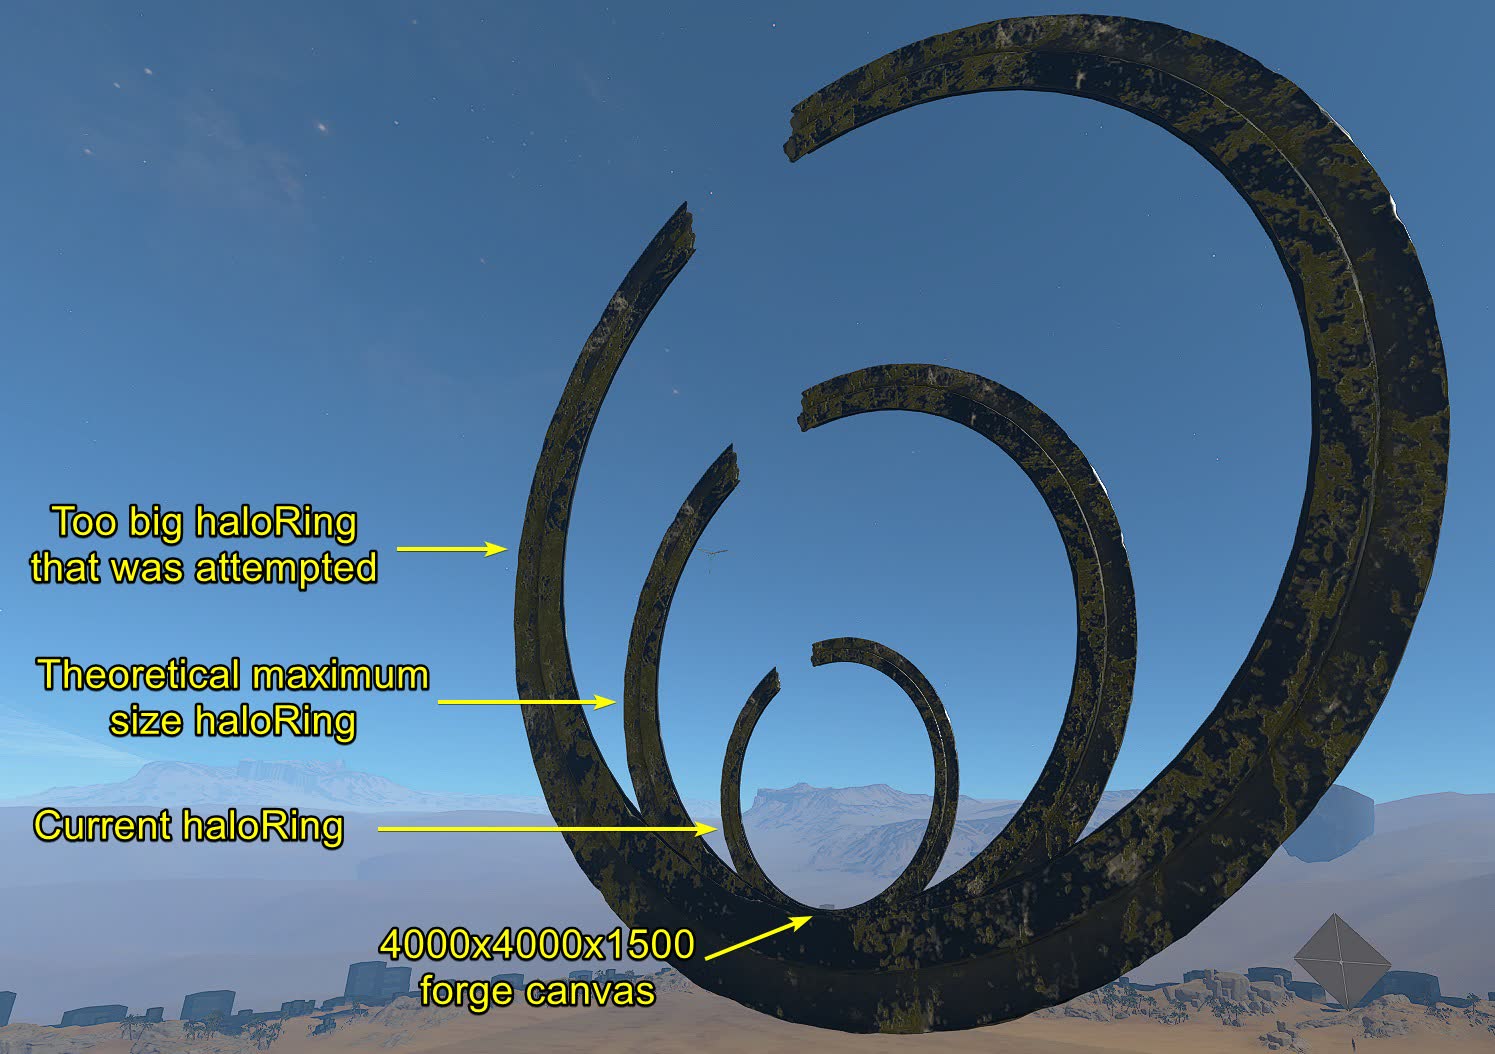
As I moved my focus from the lighting in the playable area to the distant skybox after adjusting the sky color a bit more, I couldn't help but be constantly bothered by the custom Halo ring that felt unrealistic as it was too small and too close to the map. This Halo ring was an object prefab I had made using an exploit known as the "Scale bug" that allows for bypassing the scaling limits in Forge, but the size of it was limited by how far outside the map the object could physically be placed.
In Halo Infinite Forge you can only place objects in a 20250-unit spherical radius boundary from the 0,0,0 point before they will delete after a session restart. You can place objects beyond that point temporarily, but they will disappear if you reload the map; really fun. My Halo Ring prefab is made with an object that has its origin point at the very bottom of the object and this origin point is what needs to stay within those bounds to not get deleted. If I scale bug the object so it looks like a large ring that goes over the entire map, now that origin point needs to be lowered thousands of units below the map. The prefab is also made from multiple thin rings that are angled inwards to give the illusion of it being larger.
I had made a larger version of this ring, but later discovered that it would place the origin point of the large ring object too low under the map, and it would delete after a session restart. If that larger ring could be placed on our Forge World map, it might just about have looked acceptable for me. I did some experimentation with the knowledge I had on how I could make a version in between these two custom Halo Ring sizes, but decided not to pursue it further as I thought of a better way to solve the problem.
Canvas swap
The Forge canvas map we had built our Forge World map on was the "Void" canvas, which is a blank void with nothing else than the blue sky. This decision was initially made as we didn't want any of the other canvases' prebuilt skybox mountains to interfere with our custom-placed skybox rocks. Now though as the issue was the unrealistic Halo ring, there was one canvas that could potentially solve our problems, with a few caveats.
Arid
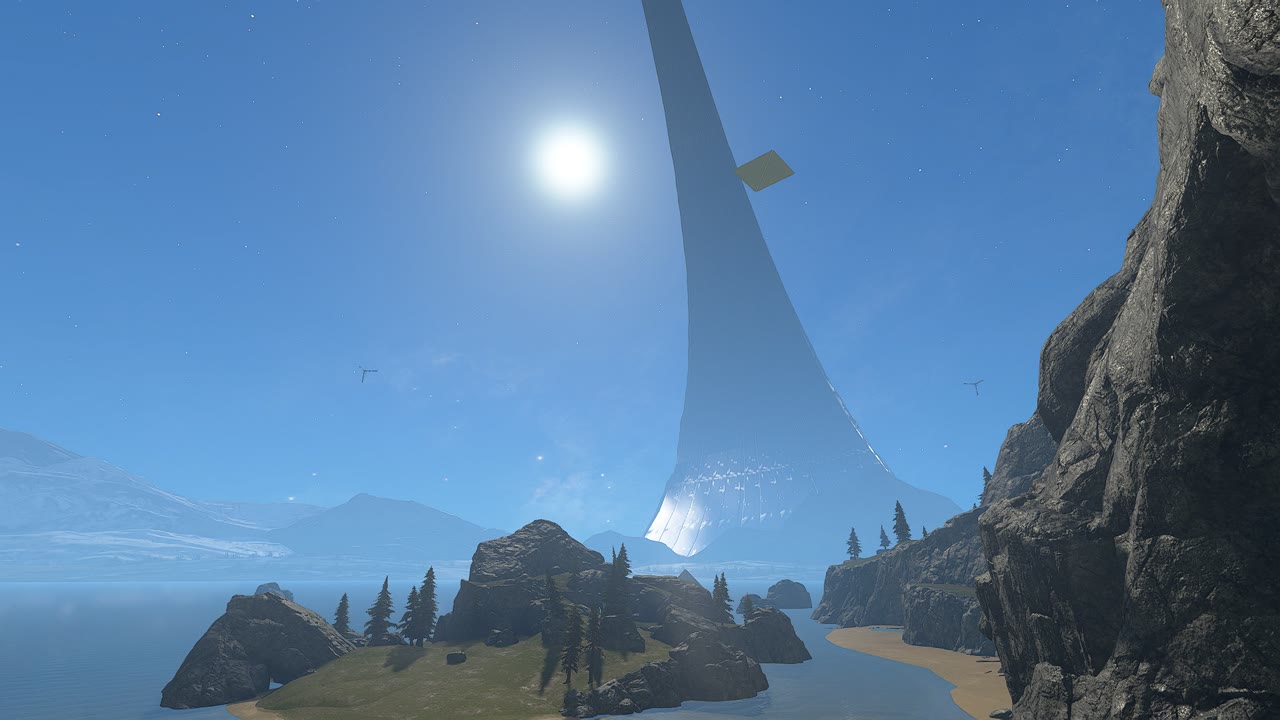
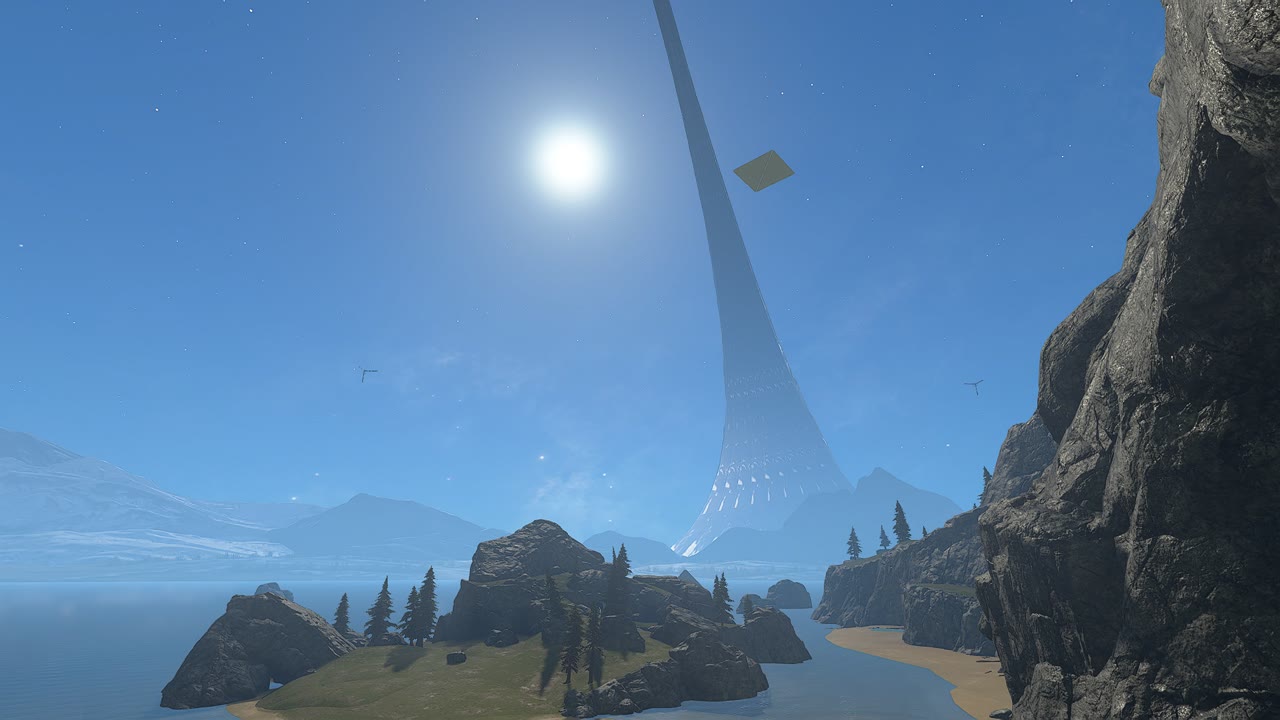
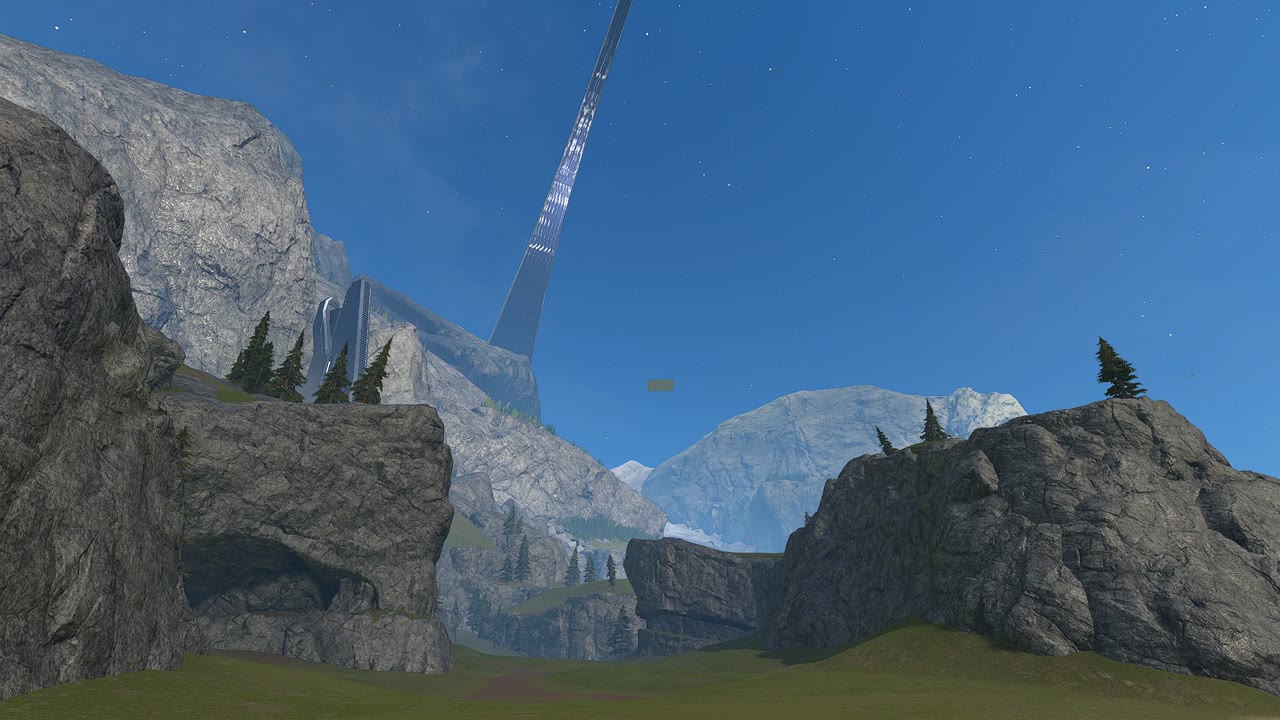
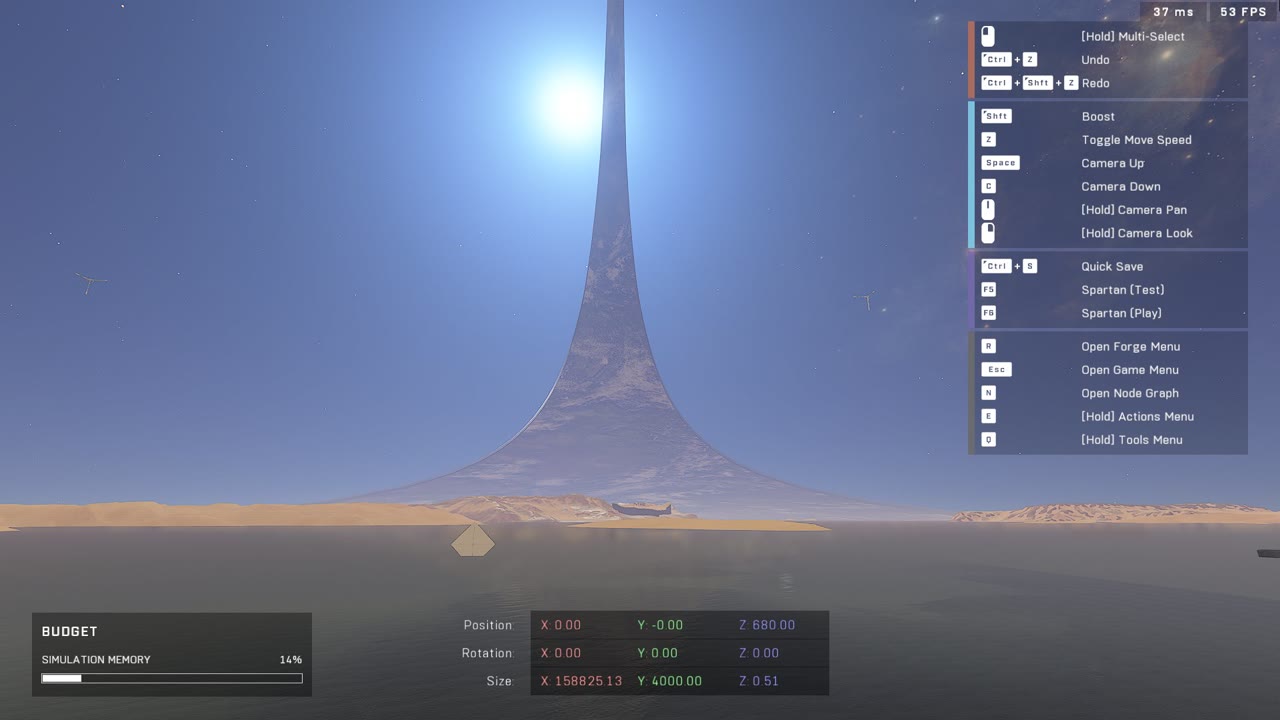
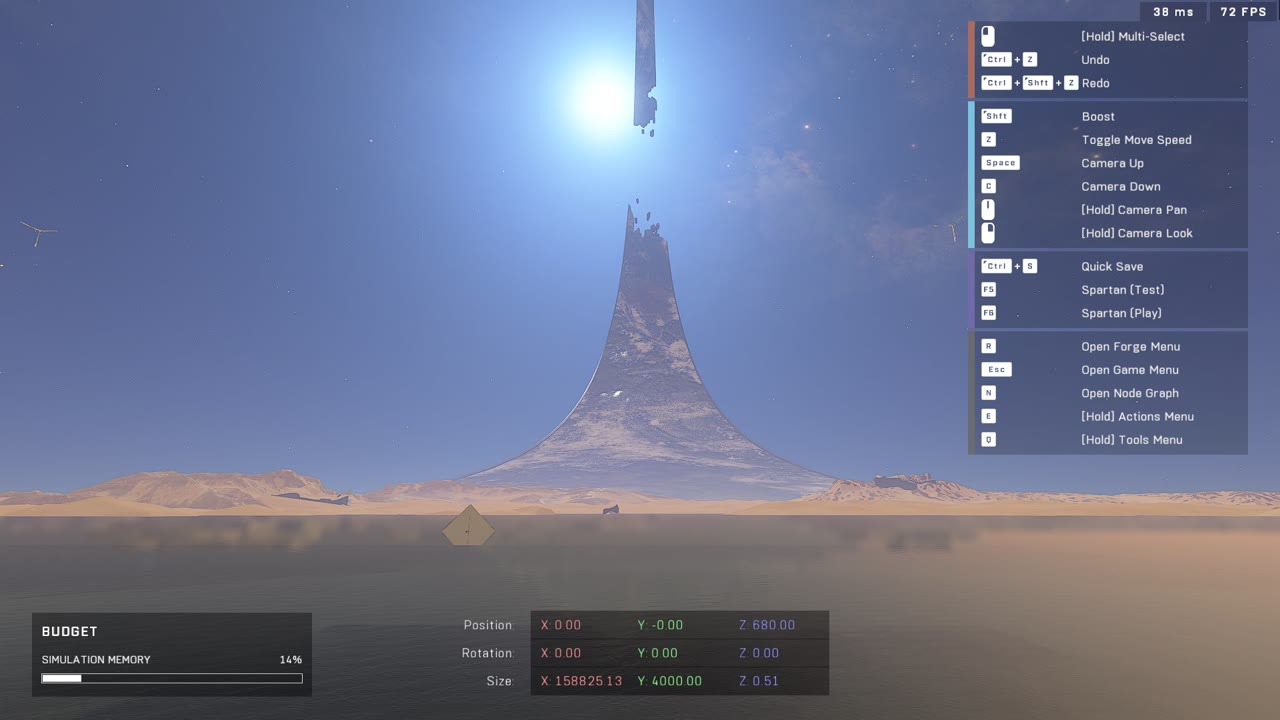
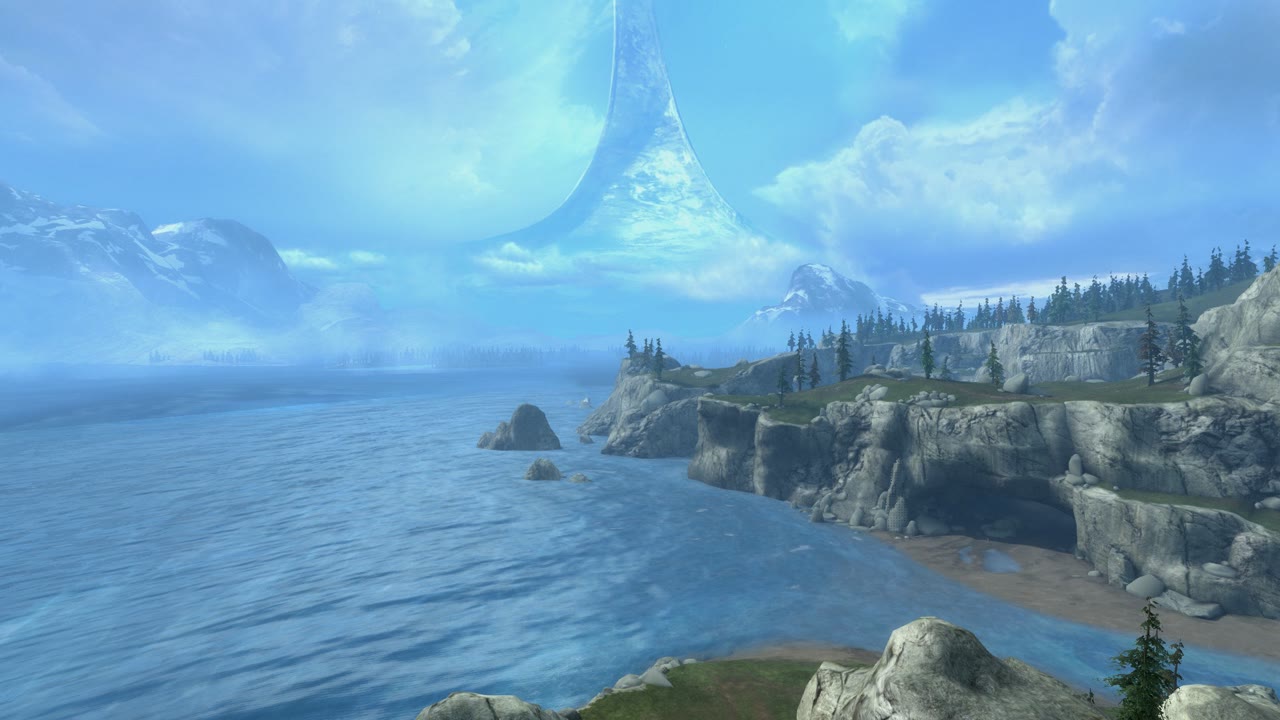
The "Arid" canvas is a desert themed canvas, but most importantly for our case, it's the only canvas with a real Halo ring in the skybox. Forgers often build on this canvas just to utilize the Halo ring in the skybox of the map while ignoring the desert aspect entirely, and that's exactly what I thought of doing as well.
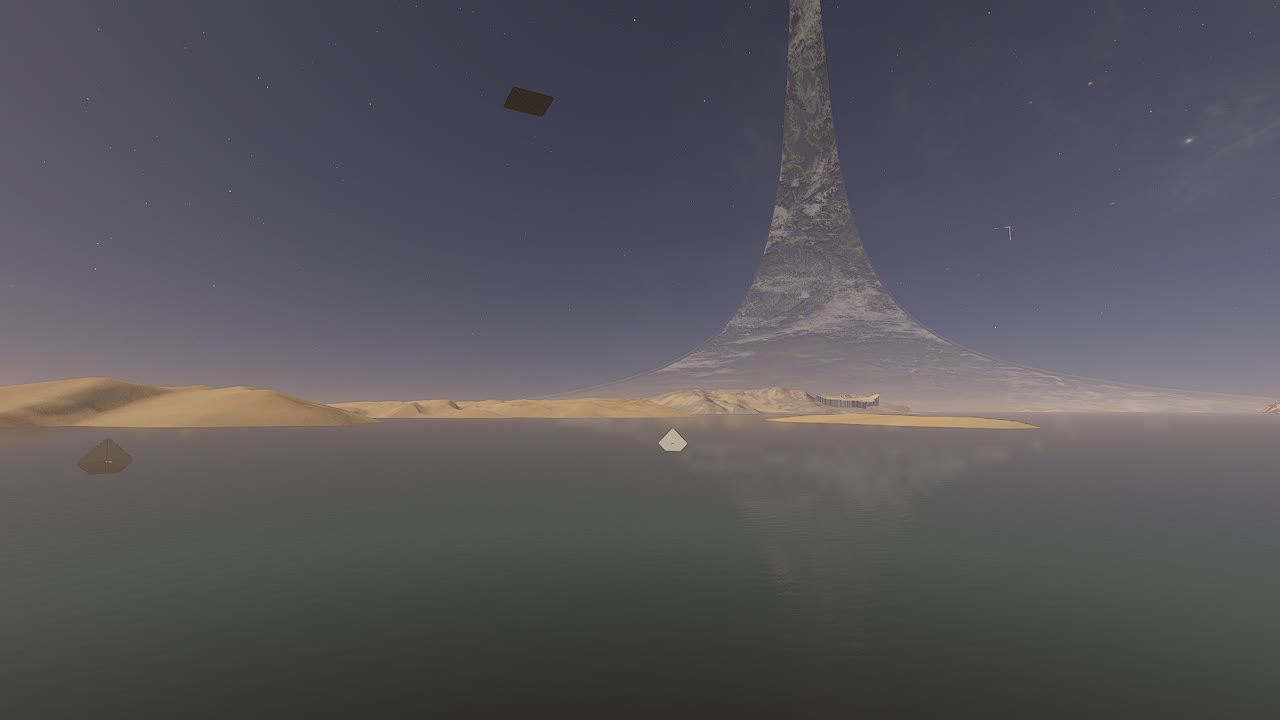
As Forge World has a vast waterbed around it followed by some distant mountains in the skybox, we needed to somehow hide the hex pillars up close and the dunes in the distance while still showing the Halo ring. The solution was to just raise the water level up to the point where it was as low as possible while still hiding most of the problematic skybox. The rest we could hide with some cleverly placed rocks, and luckily, they were about the distance of our skybox mountains anyways. This water level of Z: 680 was only 30 units higher than what we had set it as on the Void canvas, so we weren't compromising on any map height traversability either.
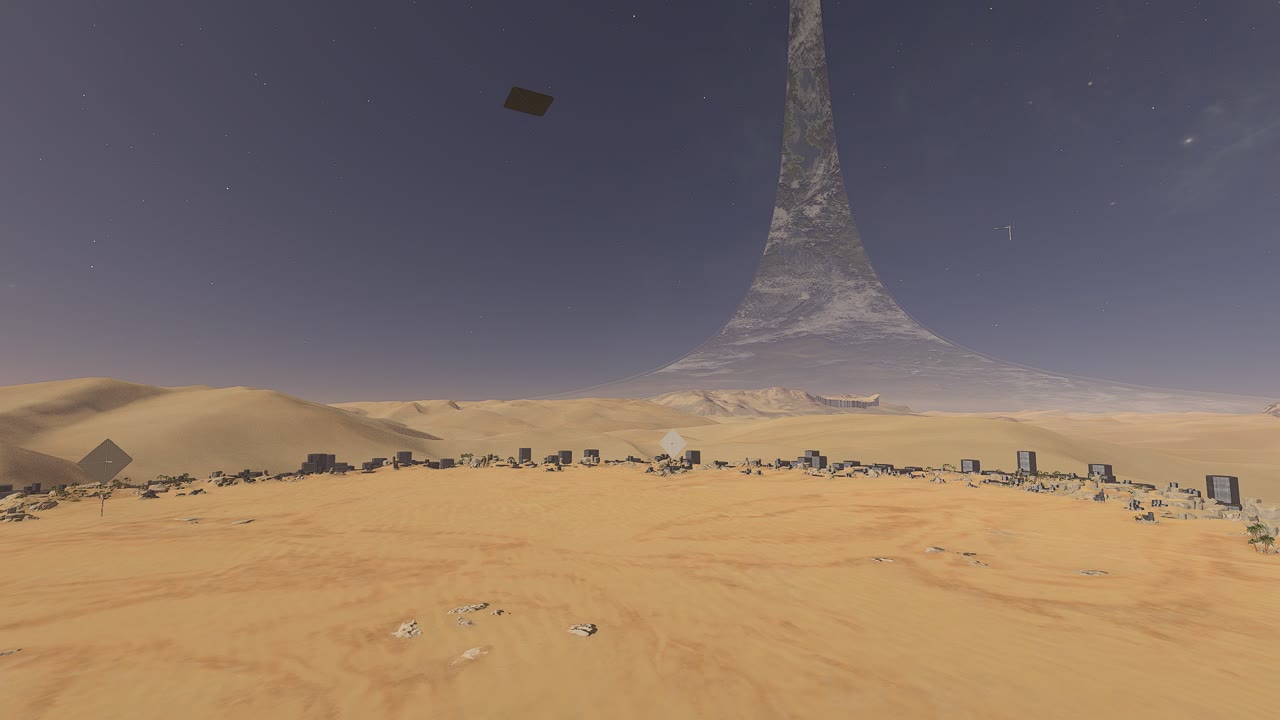
As we couldn't move this Halo ring and the sun on Forge World had to be in a specific spot so the shadows cast the same distance as the original, I was almost let down by how close the sun would have to be to the Halo ring, but in the end, it worked out fine. As the Halo Ring in the Arid skybox has one side intact and one side broken, I also showed the team what the map would look like with the broken part as the hero shot, but nobody was too keen about that.
The geo transfer
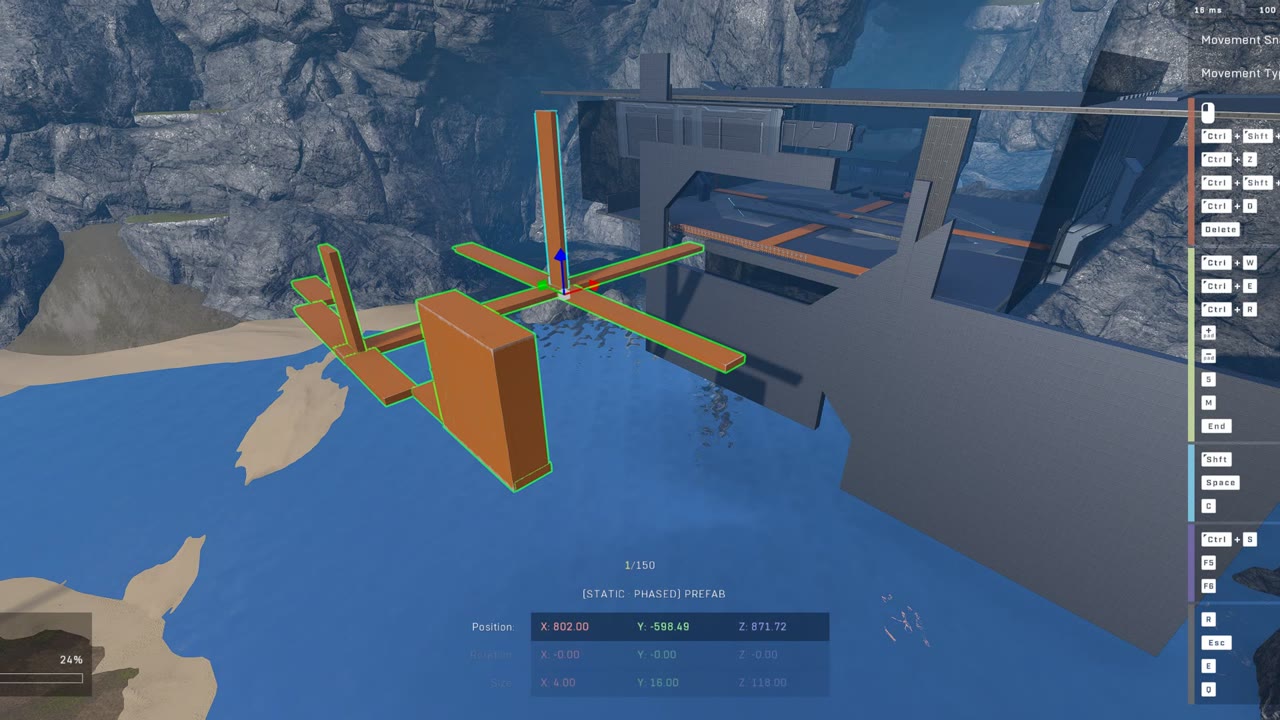
With the switch to the Arid canvas proposed to the team and the majority agreeing it would be the right play; I had to transfer the entire map to a new canvas. Halo Infinite Forge doesn't help us here at all either as there isn't just an option in forge to swap the skybox of a map; we need to actually start a brand-new map file and import all of the objects onto the new map.
I've done this tedious process a few times on other projects so it was trivial for me, but it's actually quite a non-trivial process. The process would be to place around 20 objects in a central location, then make the entire map into separate 150-object prefabs, save those prefabs with the parent object being that central object, and import them on to the new map file at the same location. I go over an example of this process in a guide video I made for the team. With the geo transfer done on a new Arid canvas map, I sent some screenshot of how it would look like and was given the go-ahead to continue.
Sky light refinement
With some tedious adjustments to the sky light settings, I was able to mostly match what we had painstakingly refined to be the natural looking blue sky and realistic light bounce on the previous Void canvas. As the base color of the sky on Arid was more purple and the underlying light bounce a different tone than on Void, it took some fine-tuning, but in the end, I was satisfied with the initial sky light pass on the new canvas.
I also showed the possibility of the broken Halo ring being the hero shot to the team one last time, but it was so distracting that we felt it broke (no pun intended) the flow of the skybox too much. The way I even did this test in the first place was by rotating the entire map by 180°. Luckily it was relatively straightforward as I had the whole map in 20 or so prefabs.

After some improvements to the skybox color with the help of Huber, we landed on what would closely resemble the final color for the map, but there were still adjustments to be made later.

Cameras And Terrain Fixes
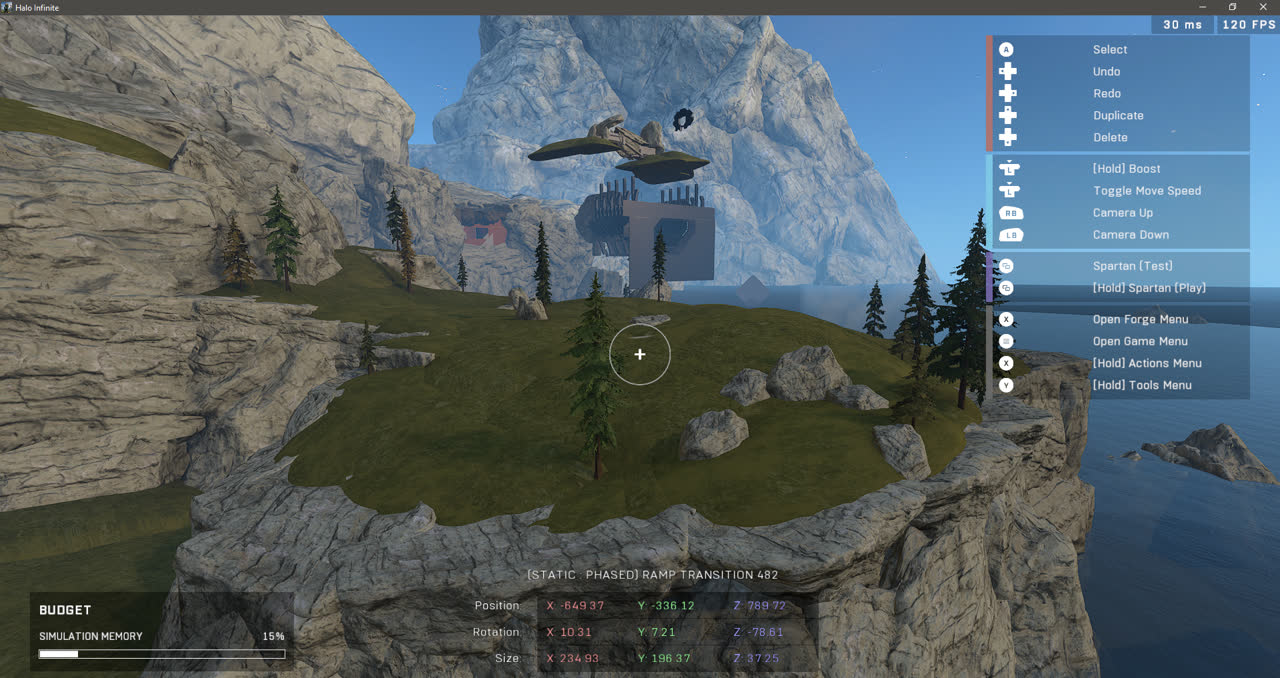
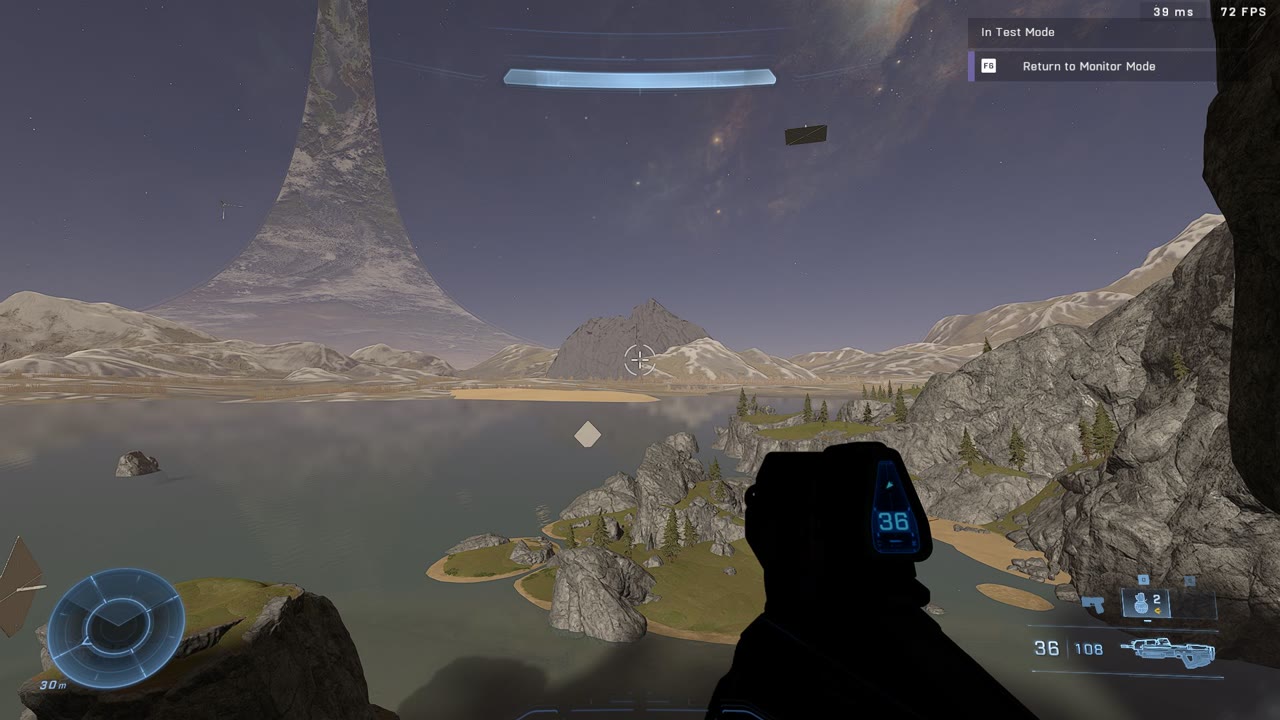
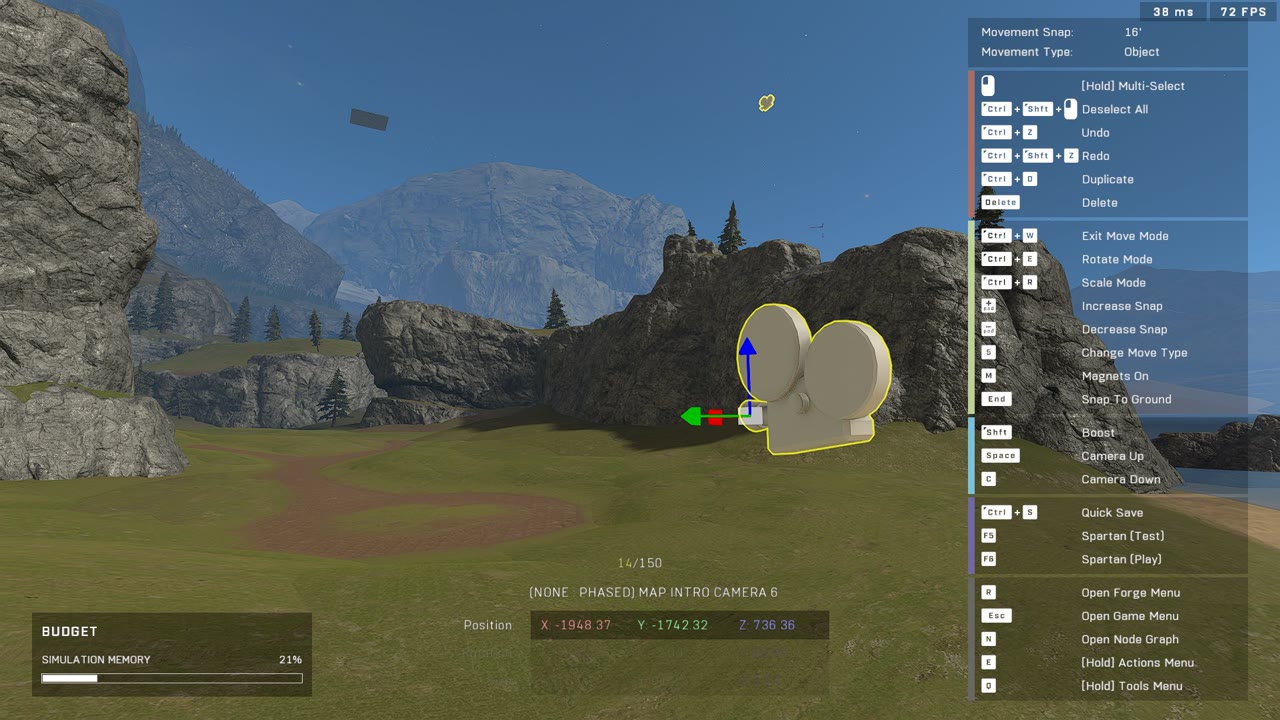
With the map ported to a new canvas and the sky light settings looking close to final, it was time to finish up some aspects of the gameplay area. I took the time to set up 10 pairs of Map Intro Cameras on the map as well as create a pretty outro camera scene with a 3-point lighting setup to make the Spartans pop out.
Map Intro Cameras
Map Intro Cameras make up the shots that cycle when a map is being loaded. The standard is to have at least three pairs of these on a map, but for Forge World I wanted to place more in order to have a pair of cameras for each major section of the map that forgers could use right away. I added seven pairs of these cameras in places that I think showcase the map entirely, and also serve as adequate cameras for any creations made on the map if the forger forgets to adjust them.
Outro camera
For the outro camera I wanted to use an uncommon, but clever technique to make it look better using custom scene lighting. As the outro camera uses an object that can be placed anywhere—even outside the map—it could be placed in an area not visible in gameplay and have custom lighting set up around it to make the composition look great and make the players pop out in the shot.
I had seen this method be used on the map "Gyrefight" where the outro camera was placed in a Pelican outside the map along with a 3-point lighting setup and some fog effects. These brought the 4-second outro scene some extra life, rather than just having it be placed in the open inside the gameplay space like most other maps.
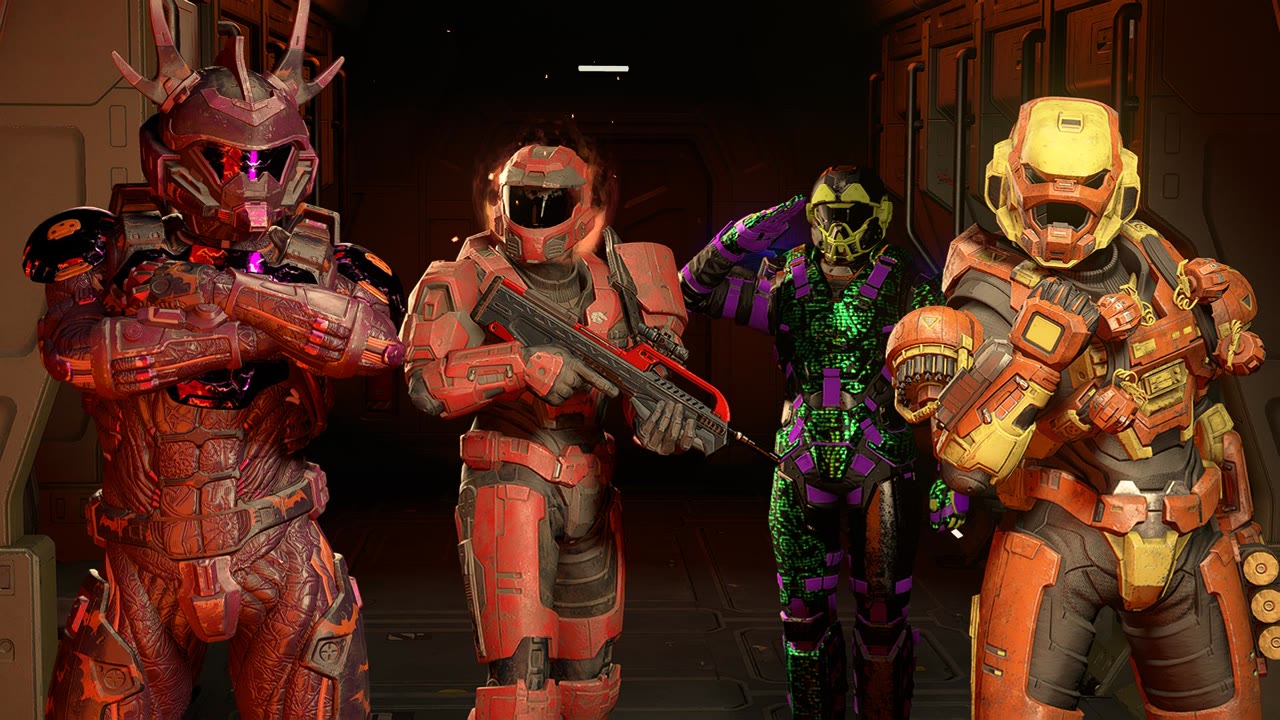
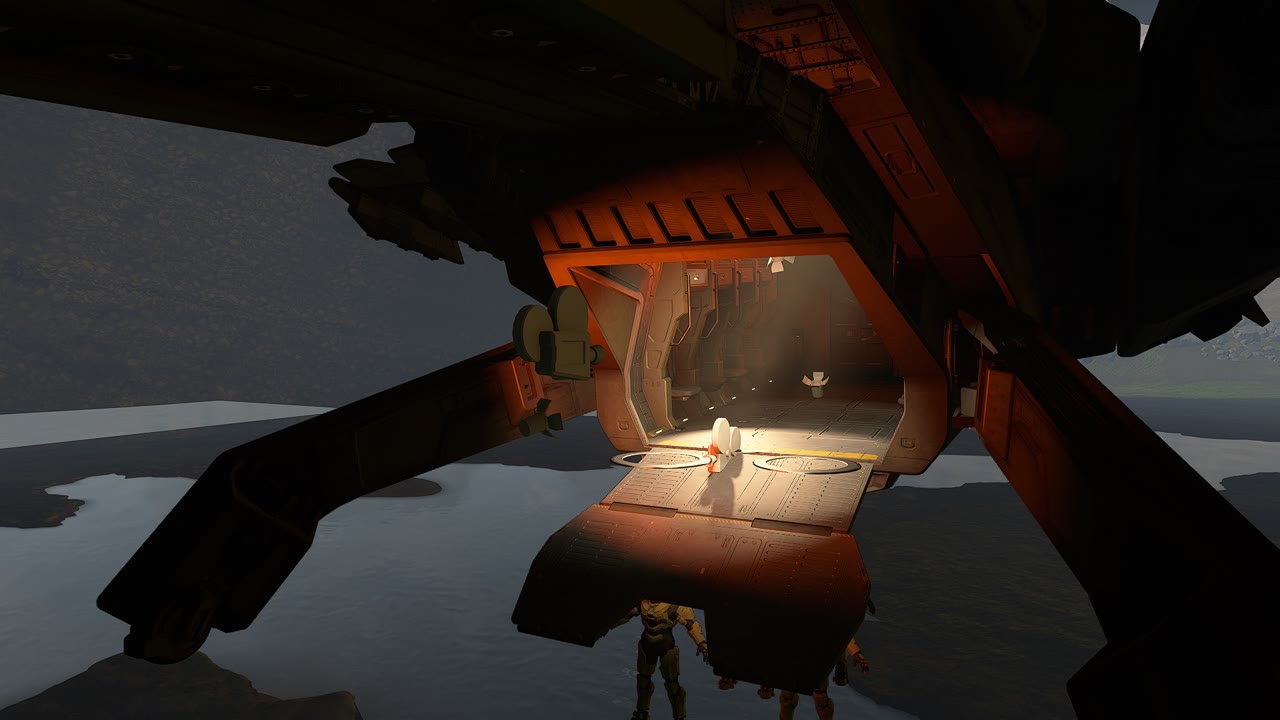
I copied the outro camera light setup from Gyrefight and adjusted the light color to fit for the color palette of Forge World. As these lights would be rendered during a game, I couldn't have the outro camera be within the gameplay space, as random floating lights would look weird.
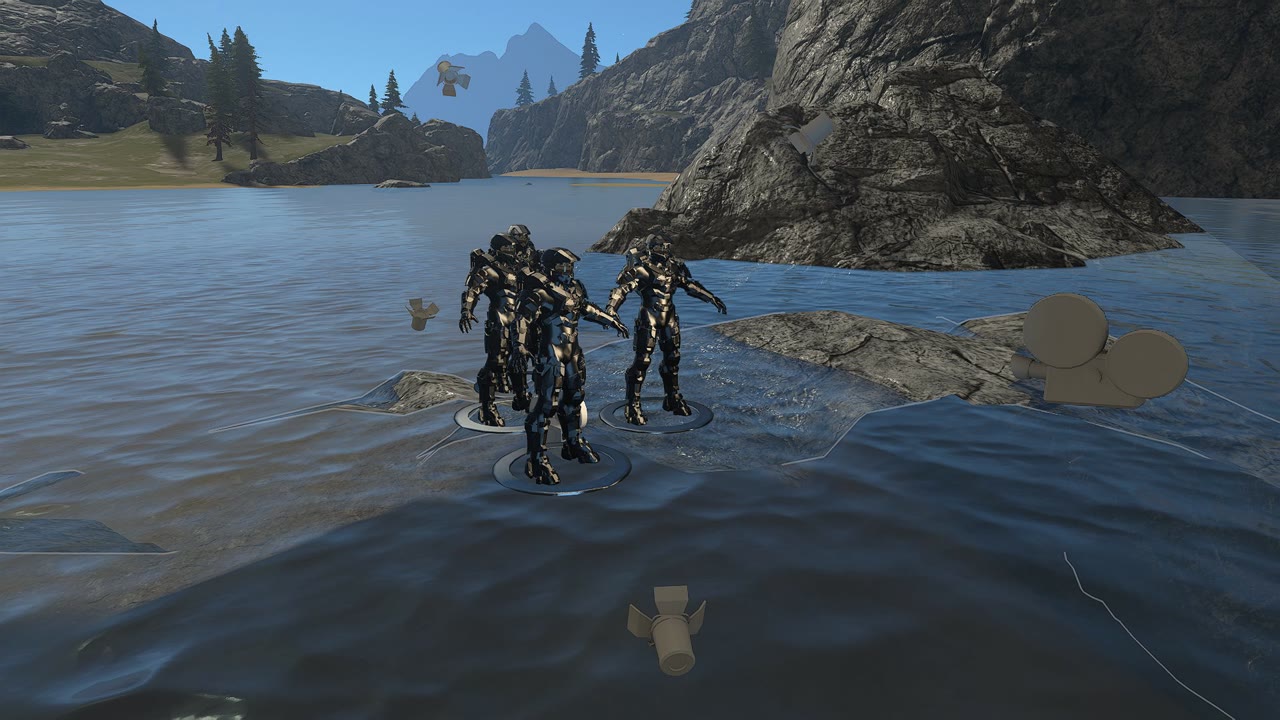
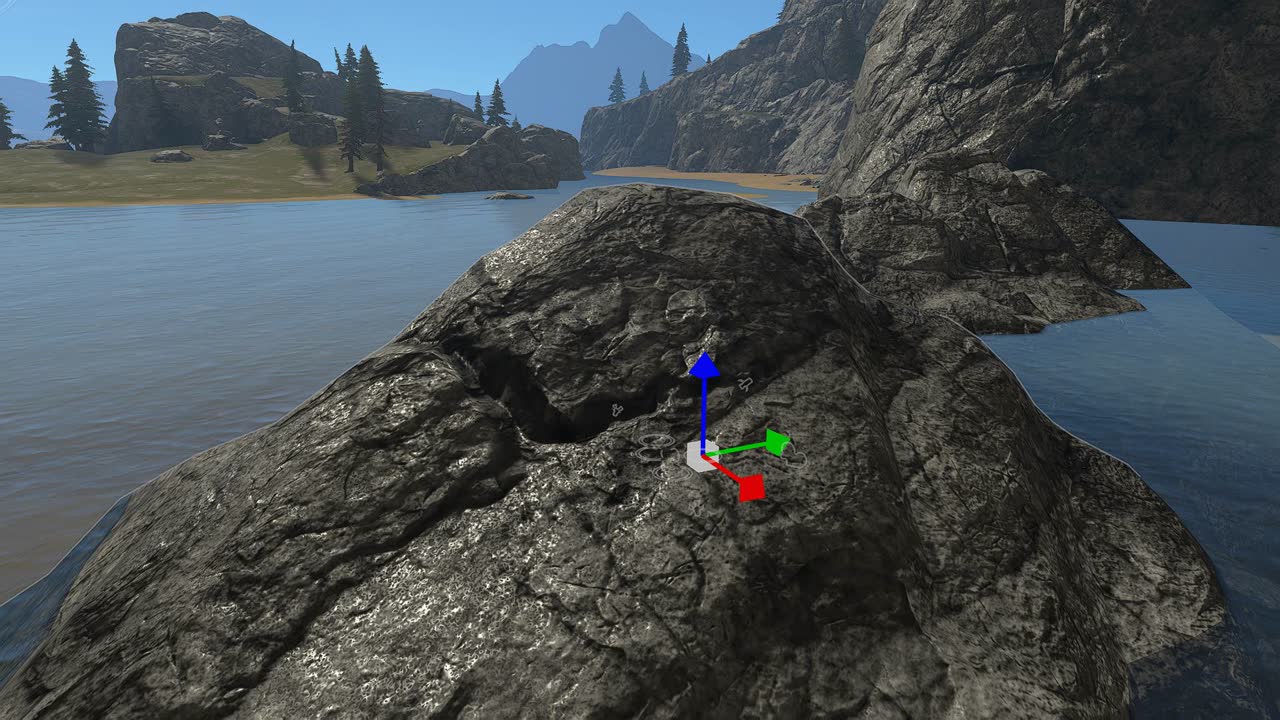
After some trial and error, I landed on positioning the outro camera inside a rock under the Cove with the camera facing towards the Island. As the texture of the rock object is not rendered from the inside, it would not be apparent that the whole shot was taken inside a rock! As for the standing on water part, I like to imagine they are just standing on a tiny rock. The scene had to be positioned at a low point as it couldn't be tilted and I wanted to include a variety of the color palette of the map in the background.
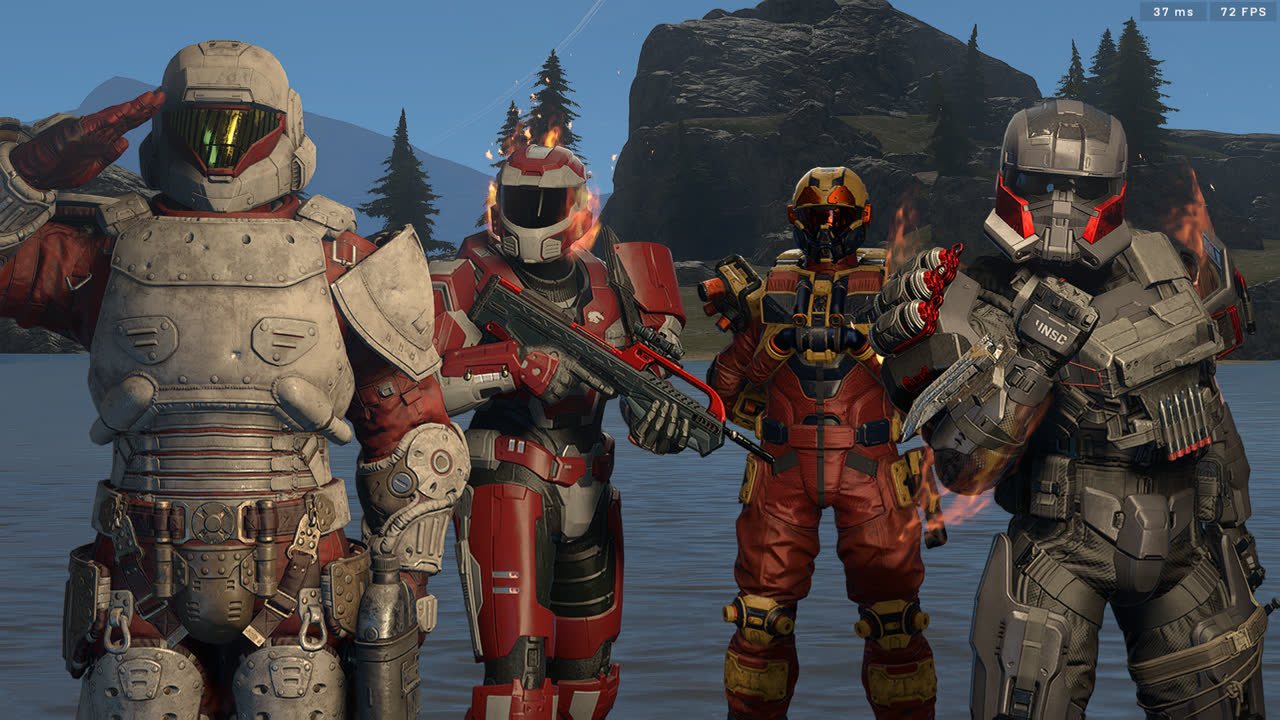
I used a light blue color for the back light and fill light to mimic the light bouncing from the water, then used a tan color for the key light that resembled a slightly warmer color of the sunlight. I also added a secondary backlight coming from the top at the angle of the sun which was a closer representation of the sunlight color. These lights combined created a believable setting and was much nicer to look at than if the shot would be lit by just ambient light.
Terrain adjustments
After I was finished with the technicals surrounding the canvas swap and the formalities around it, the file was once again available for the other collaborators to continue work. Hamish took this opportunity to tackle the remaining sections of terrain that were still bumpy and bring them up to his immaculate smoothness standards.
Following Hamish's terrain updates on the remaining areas, Scrub added some small rocks to the terrain by eyeballing where similar rock clusters were located on the Reach map.
Terrain color update
During my sky light adjustments I had noticed that the grass color was something I just couldn't get to look right, but ultimately didn't bring it up as an issue since I knew how tedious it would be to replace the color on all of the various terrain pieces; they'd pretty much have to be replaced one-by-one.
On Dec 14, 2024, Scrub also took notice of this inaccuracy in the grass color and proposed a change for it to be closer to the original. Surprisingly Hamish agreed to tackle the tedious task and after some tests with the color palette, we all agreed on a new green color which Hamish started steadily replacing on the terrain objects for the entire map.

Skybox overhaul
After I had invested significant time into the project with a large portion of it dedicated to ensuring the look of the original map was being followed, I couldn't help but be bothered by the skybox that was at best eyeballed and at worst deviated majorly from the general outline of what it should've looked like.
When I initially did my Blender blockout tests of Forge World in 2023, the plan for me all along was to also block out the skybox as you need all the reference geo possible if you're looking to remake something accurately. I felt now was the last chance to make a call on this and do the skybox properly from scratch.
Understanding the limitations
When thinking about creating a skybox for a level, one might think to just grab some rock objects, scale them extremely large, push them thousands of units into the distance and call it a day. But Halo Infinite's Forge has some very, very annoying limitations for this specific situation that would need to be overcome to reach the same outcome.
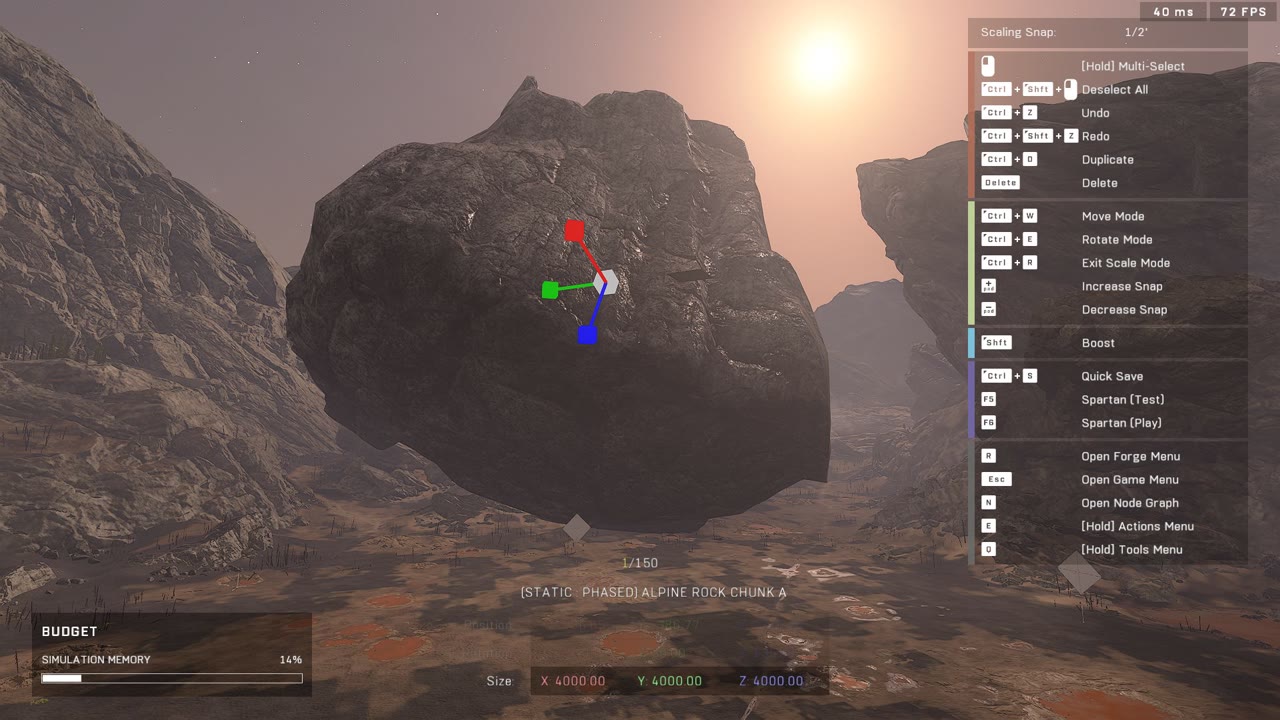
Object scaling limits
Objects in Halo Infinite Forge have a limit to how small or large they can be scaled. For most objects—including the ones we would be using—the lower limit is 0.5 units and the upper limit is 4000 units on all axes. The height or width of most of the mountains for this skybox would over 10000 units, which were past the scaling limits. Now one could argue to just place multiple 4000x4000x4000 rocks next to each other to make the mountain shape, but that would lead to repeated and noticeable patterns as well as being inefficient when we had 29 Alpine rock shape variants to choose from. The solution to this would be to bypass these scaling restrictions with an exploit.
The Scale Bug
The "Scale Bug" works by queueing a scaling change to an object and forcefully applying it with a bug in order to bypass scaling restrictions. Note that only n-1 available axes can be scale bugged as one axis needs to stay under 4000 units. So e.g. a Water Plane object with only two scalable axes can have only one axis scale bugged.
The steps to performing the Scale Bug on mouse and keyboard are as follows:
- Scale two of the axes to a desired starting amount and set the remaining dummy axis size to 0.5
- Set the Scaling Snap to a high value like 8' or 16'
- Drag all axes at the same time in the desired direction for increasing or decreasing the scale
- Let go of the axes and drag the dummy axis in the desired direction for increasing or decreasing the scale
- The scale of the two axes should now change to be a multiple of their initial size
- The multiplication of the Scaling Multiplier is affected by the initial size of the dummy axis; lower starting values cause larger multiplications of the scaled axes. So, an initial value of 0.5 will lead to a larger end scale than an initial value of 100 on the dummy axis.
- I didn't know at the time how to get a perfect 10x multiplier, but I've now discovered if you set the initial dummy axis size to <scaling snap> / 9 such as 0.888... for 8', the output scale will be a perfect 10x multiplier. This would've saved me some time had I looked into it a bit more.
Scaling multiple objects
Halo Infinite Forge doesn't allow for scaling multiple objects at a time, so anything that would require that workflow had to be done in Blender and then the output printed into Infinite via the B2FP.
Object placement limits
Physical limits
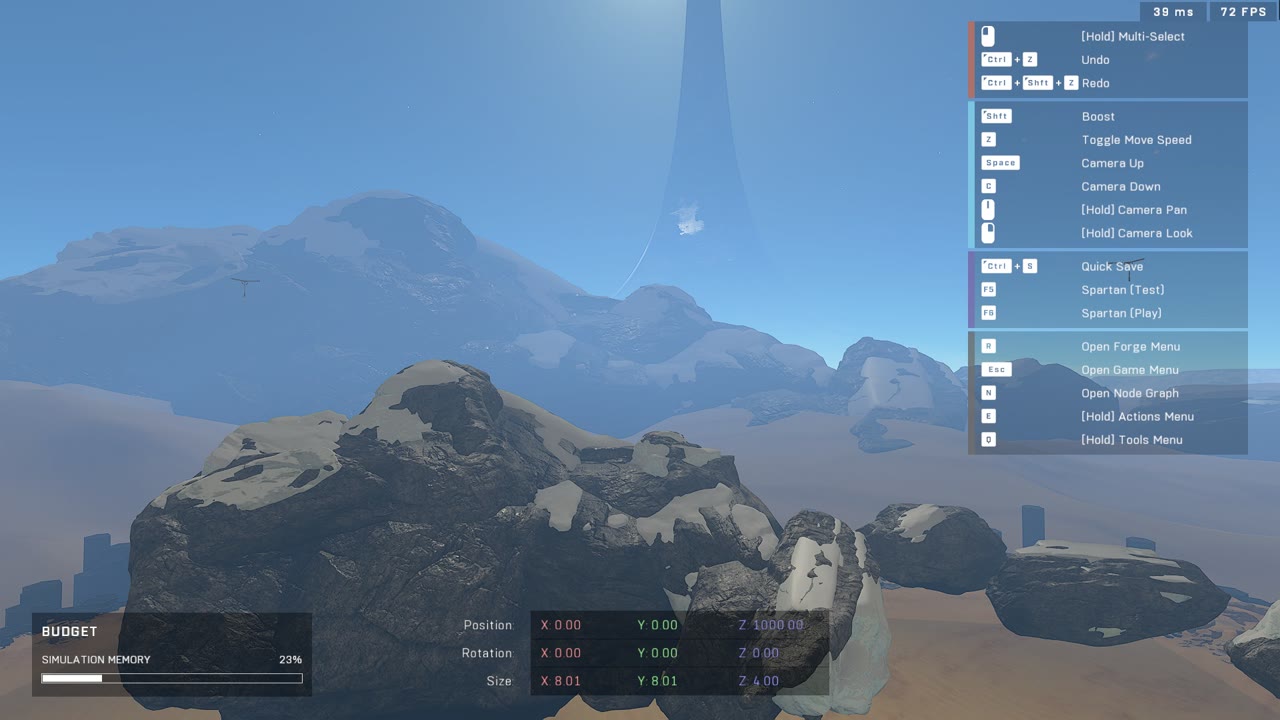
Placing objects in Halo Infinite can only be done up to a certain point before a hard barrier is reached. This barrier is around a 40000x40000x30000 unit cube, meaning ~20000 units in each direction from the 0,0,0 point except vertically where the limits are a bit different.
The funny part is that even though you can place objects in the corners of the cubical boundary, those objects will delete if the Forge session is restarted. See, there is a separate boundary, which is a 20250-unit radius sphere from 0,0,0 that is not mentioned anywhere, but placing objects beyond it will make them delete after a session restart. Fun!
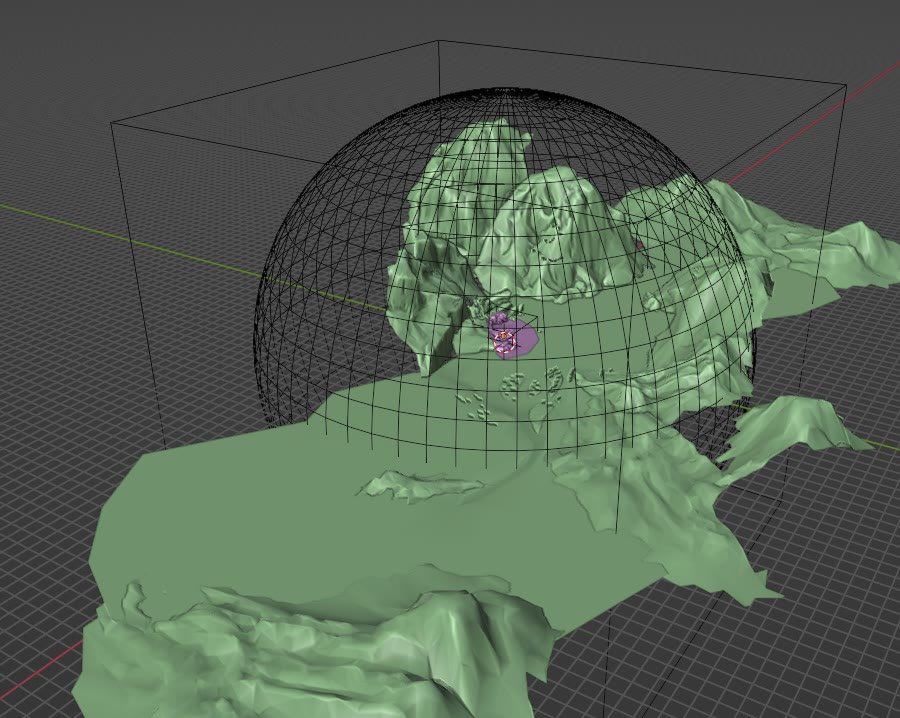
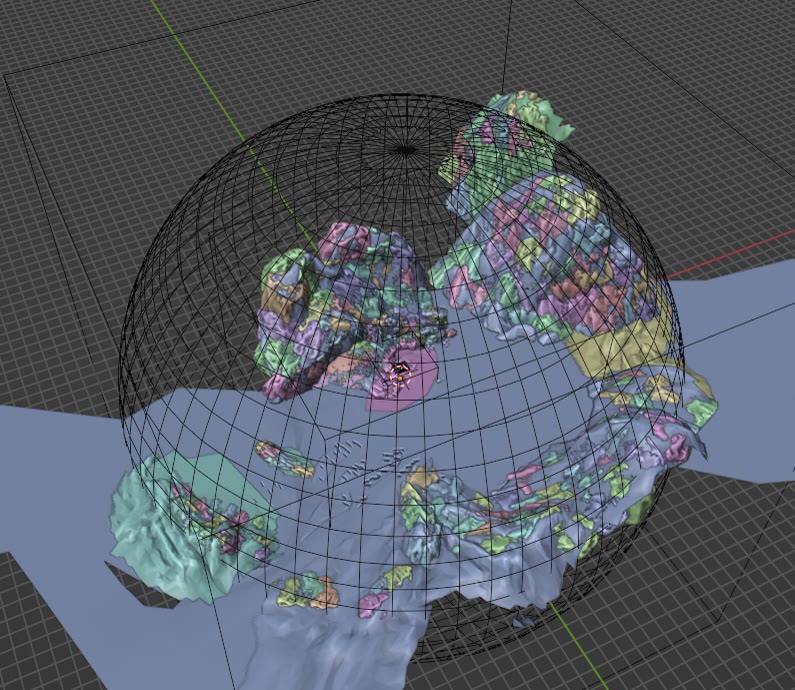
Looking at the skybox mountain blockouts (covered later) in Blender now with the spherical boundary visualization made me realize how lucky we were with how the mountains curved perfectly along the limits of the boundary for them to not delete. We did run into issues of the one distant mountain deleting constantly (I can now see why), so we had to pull it closer in Forge.
UI limits
Ok so we can drag an object by its gizmo axes to nearly 20000 units while keeping in mind to not have it pass an invisible spherical boundary so it won't disappear after a session reset; we can handle that. But we can't place it accurately that way, as we can only move the Forge monitor within the 4000x4000x1500 canvas, and moving a gizmo 15000 units away from your physical position leads to jumping hundreds of units per the slightest of movement.
Alright no problem, just input the position manually in the UI. Not possible; Halo Infinite's Forge interface only allows you to type in coordinate values between -9999.90—9999.90 for an object so even if you knew an exact position—let's say X: -15300—to place an object at, you couldn't do it just by typing that value in because of UI limitations!
What has to be done for an object to be placed exactly at X: -15300 is:
- Place the main object at X: -9999.90 (UI limit)
- Spawn a dummy object and place it at X: 0
- Group both objects together into a prefab and set the dummy object as the parent object
- Move the prefab to X: -5300.10
- Ungroup the prefab
- Delete the dummy object
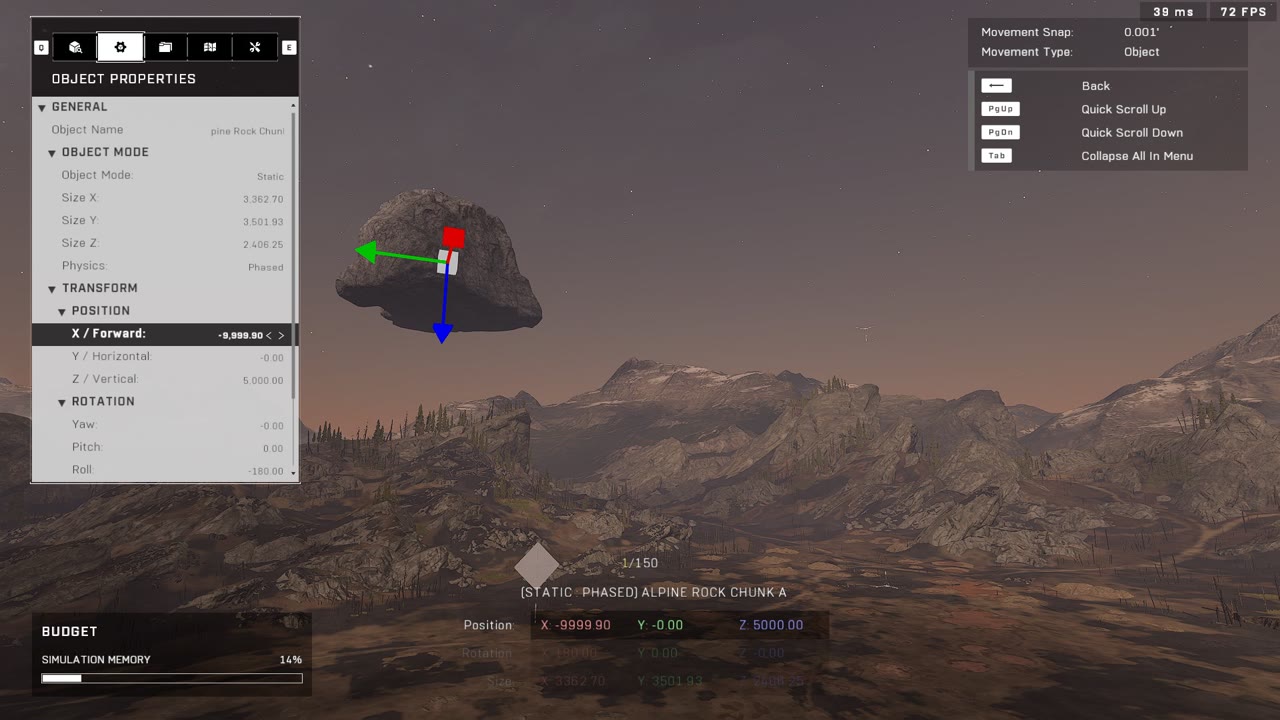
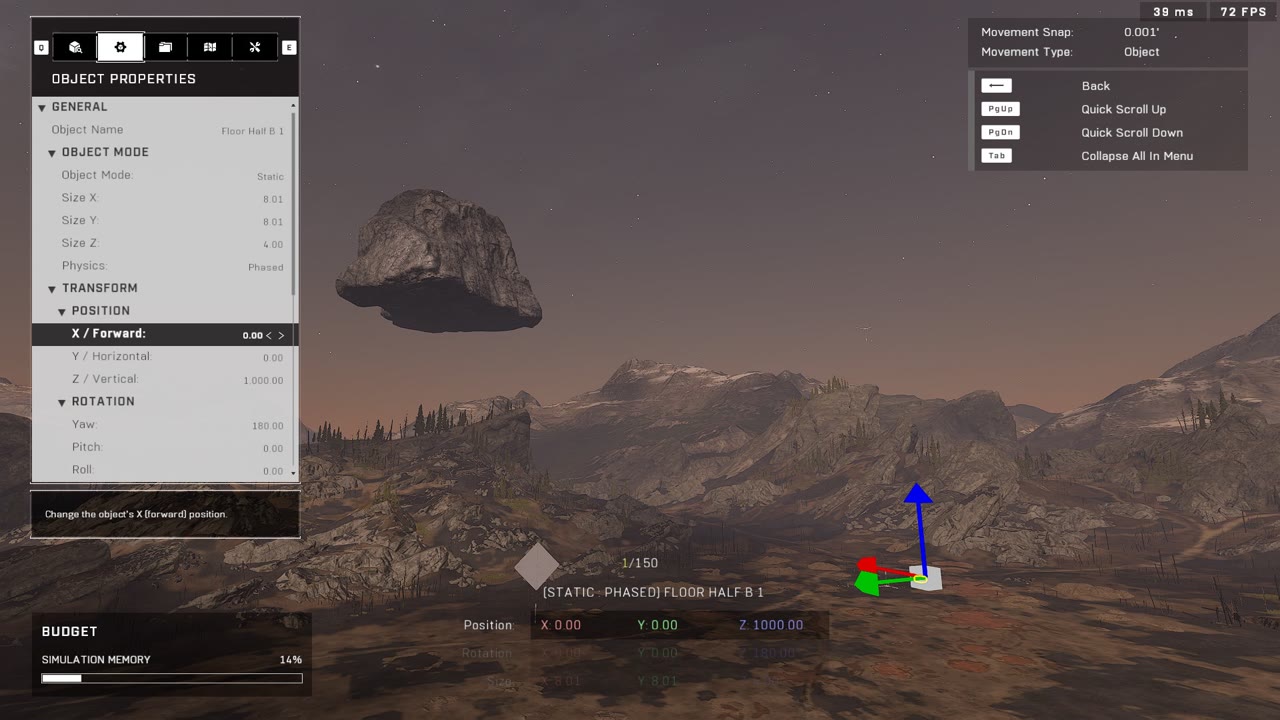
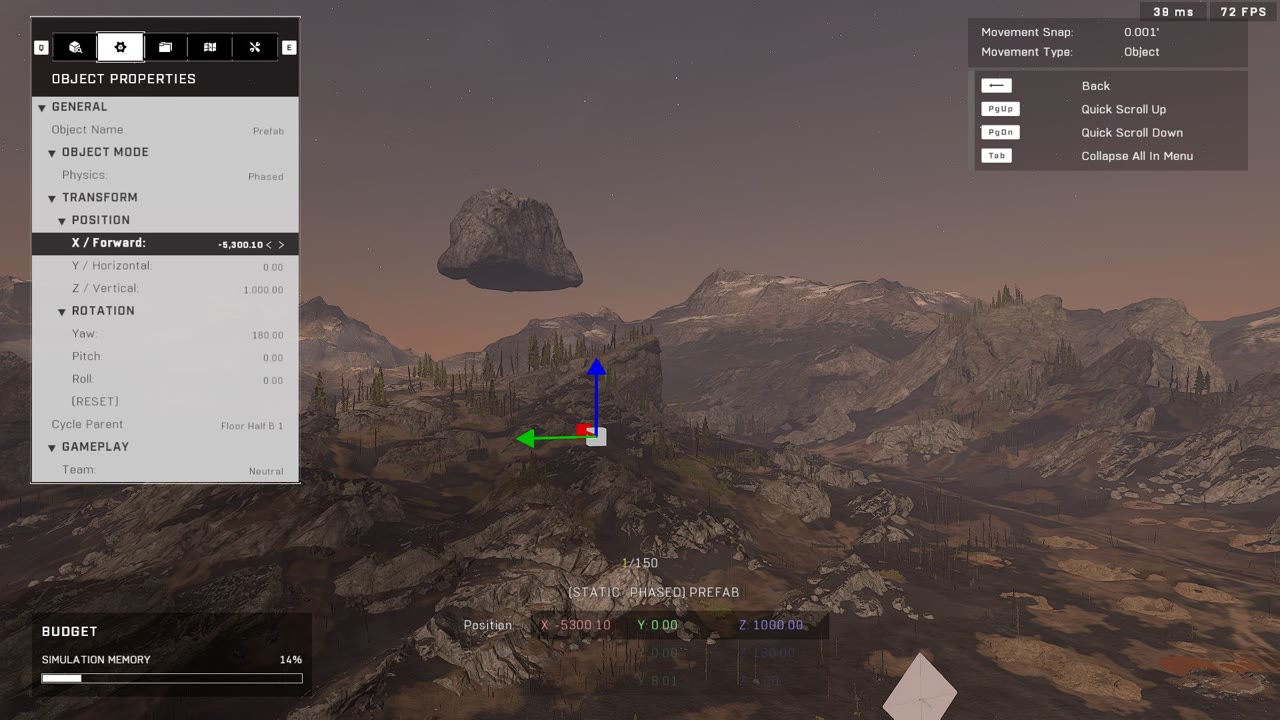
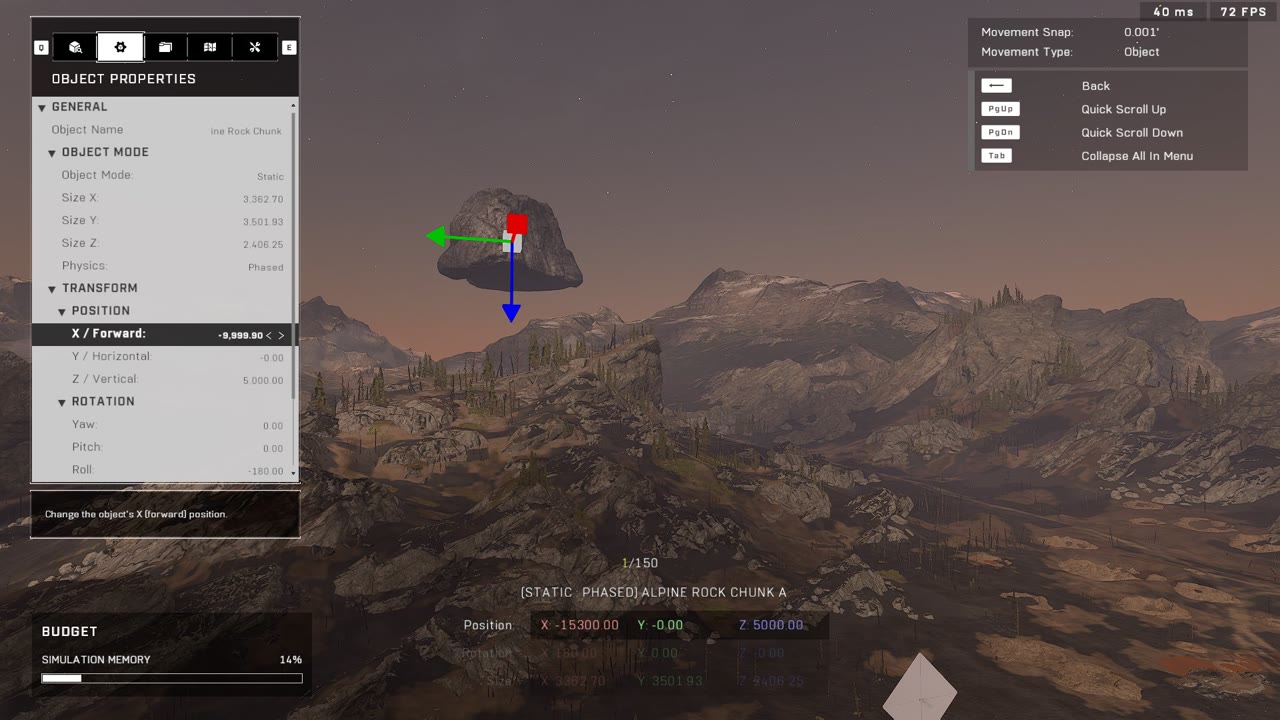
All of this just to move an object far away accurately.
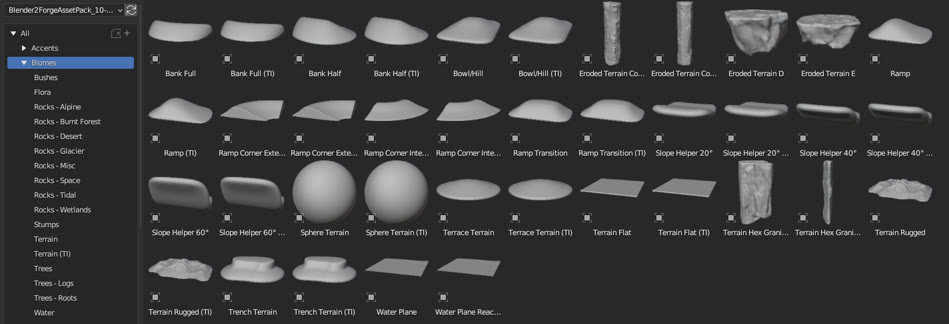
Blender asset library objects
At the time of the project, B2FP did not have the Alpine rocks in the selection of Infinite assets ported to Blender, so I had to use the Eroded Terrain D rocks to outline the shape of the mountains and then let the artist place the Alpine rocks in Forge over the Eroded Terrain D rocks.
Blender object print limits
As Infinite's Forge UI doesn't allow placing objects further away than 9999.90 units per axis, the blocked-out mountains in Blender had to be dragged within the map just so they could be printed under 9999.90 units, otherwise the input would be invalid. For the Blender template used for B2FP blockouts, we've restricted each object's position to stay within the placement boundary.
Forge World original skybox geo distance
An issue with the map model itself was that some of the mountains in the skybox were past the 20250-unit radius object placement bounds of Halo Infinite, so if they were somehow forcefully placed outside that, they would just get deleted after a session restart. Due to this I had to bring some of the mountains closer to the map while scaling them down at the same ratio and rely on a perspective trick to keep the mountains looking correctly positioned in relation to a central point of the map.
The plan
Knowing the limitations, I had a hypothesis for how to execute the skybox geo creation properly with the tools available and the restrictions in place. The idea was to:
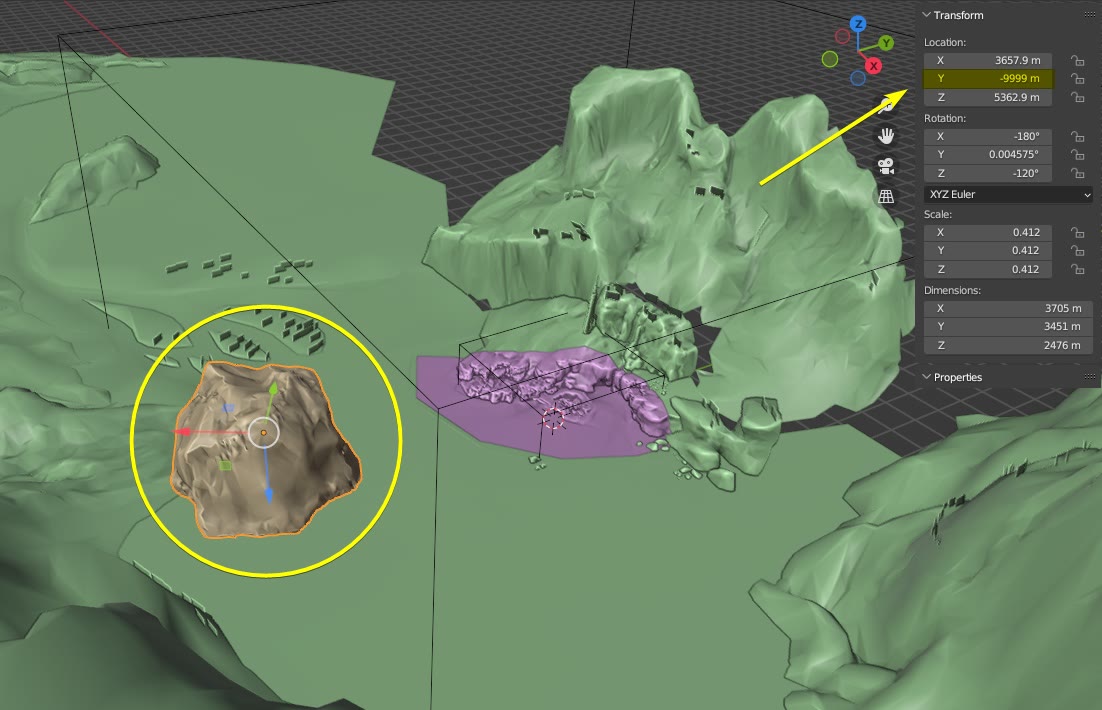
- Blender: Separate each skybox mountain from the main mesh so they can be individually scaled
- Blender: Scale down and bring some mountains closer to the playable space using a central object so they can fit within the object placement bounds of Infinite
- Blender: Block out the mountains in their newly adjusted positions
- Infinite: Print the mountain blockouts to Infinite and confirm they work in the positions
- Blender: Scale the blockout mountains to 1:10 scale with the origin point of the object group being the central point on the map
- Infinite: Print the miniature scale mountain blockout to Infinite
- Infinite: Art the miniature mountains with better rock objects
- Note the positions of each art rock object
- Infinite: Copy each miniature art rock object and scale bug the copies to 10x scale
- Blender: Place points at the noted positions of the art rock objects
- Blender: Scale the points 10x with the origin point of the object group being the central point on the map so they scale back up to the correct positions on the actual mountains
- Note down the new positions of the scaled points
- Infinite: Place the scale bugged rocks at the scaled positions
This whole process would probably take 100 times longer than if there were none of the scaling and positioning restrictions in place to begin with, but the choice was either to do it or to complain and not do it. So, I got to work.
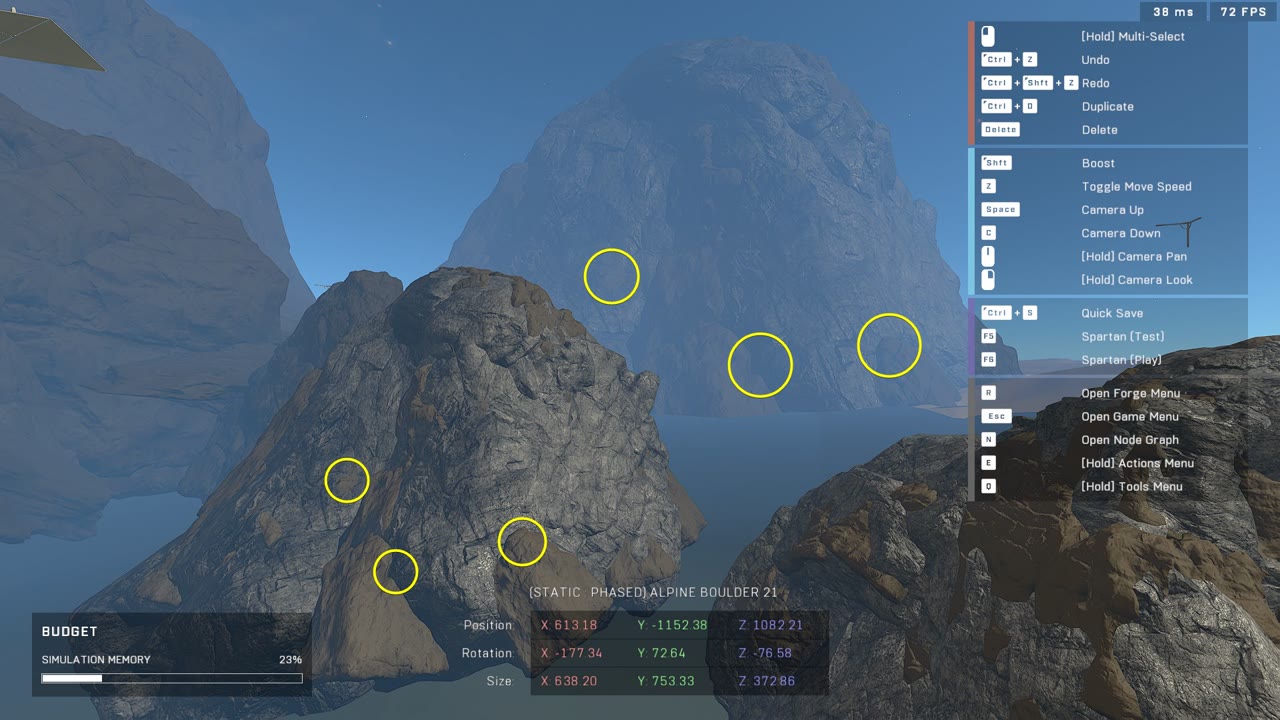
Skybox mountain reposition and block out
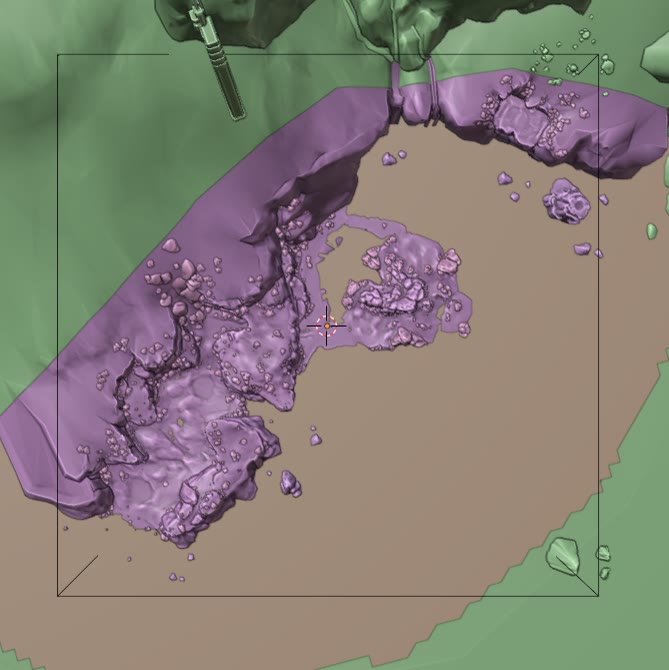
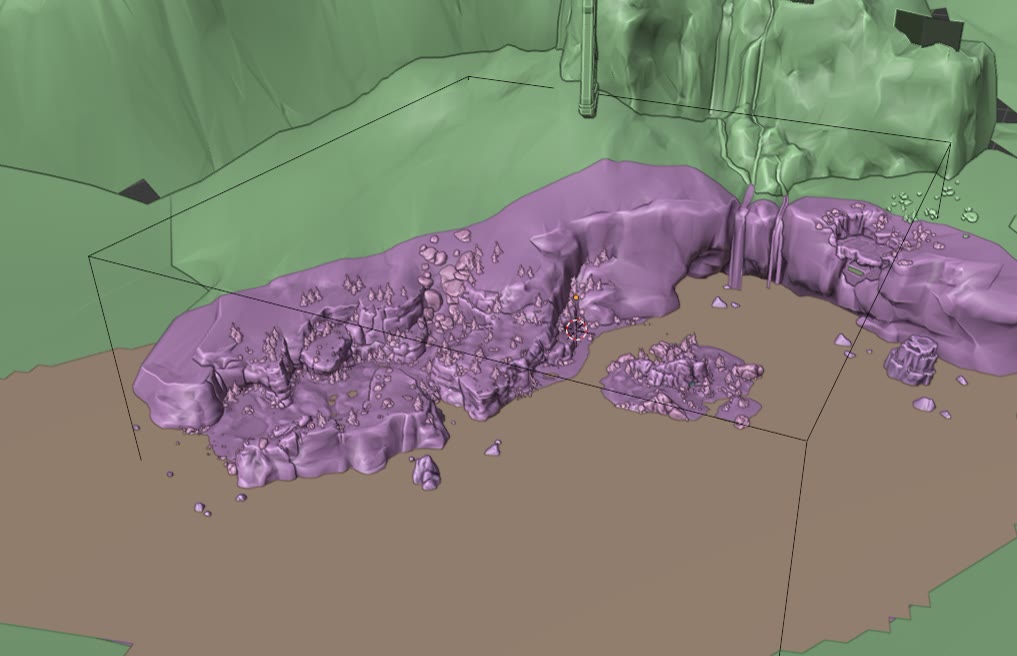
First, I evaluated which mountains would have to be brought closer to the canvas and then did the scale perspective trick on them. As some of the mountains were so close to other mountains after scaling and repositioning them, I decided to just not include them as they lost their depth.
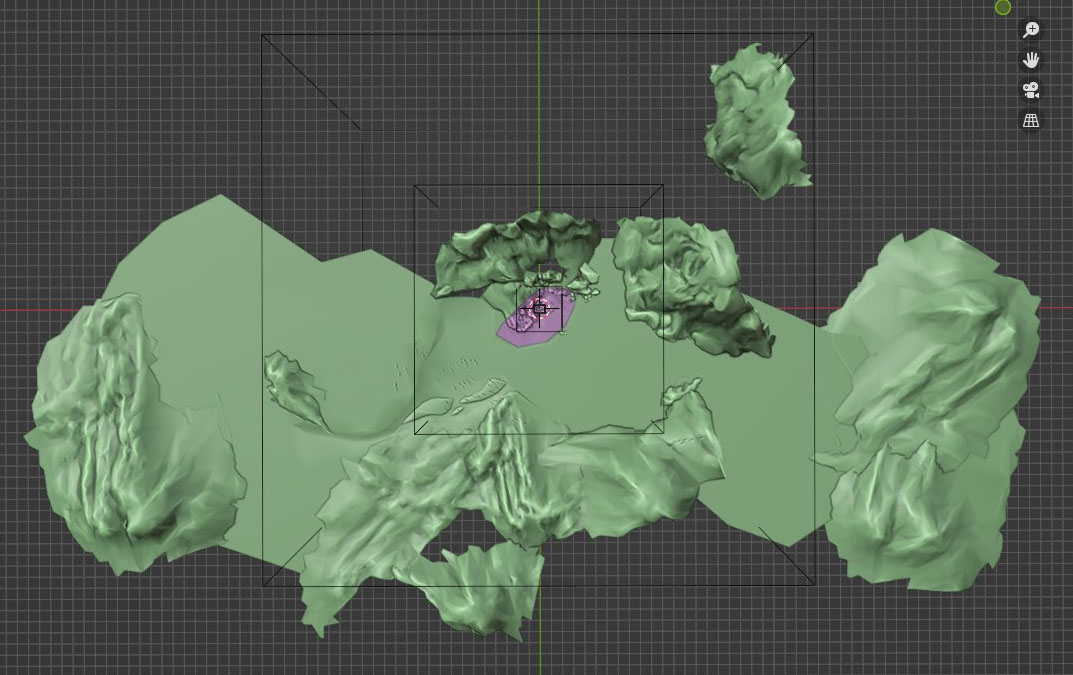
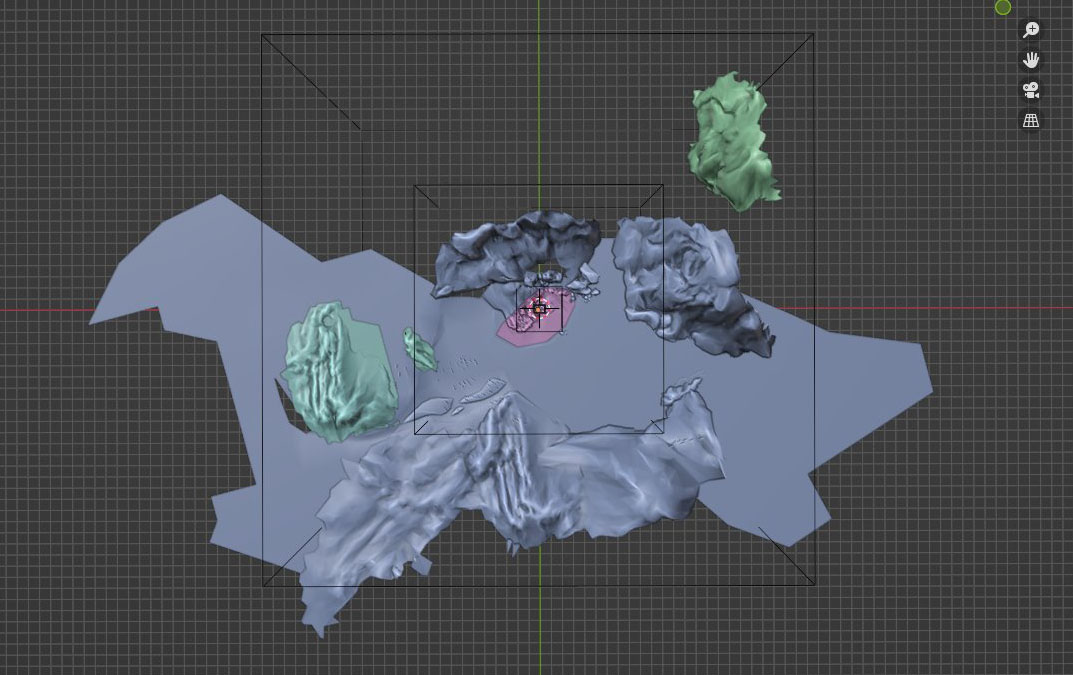
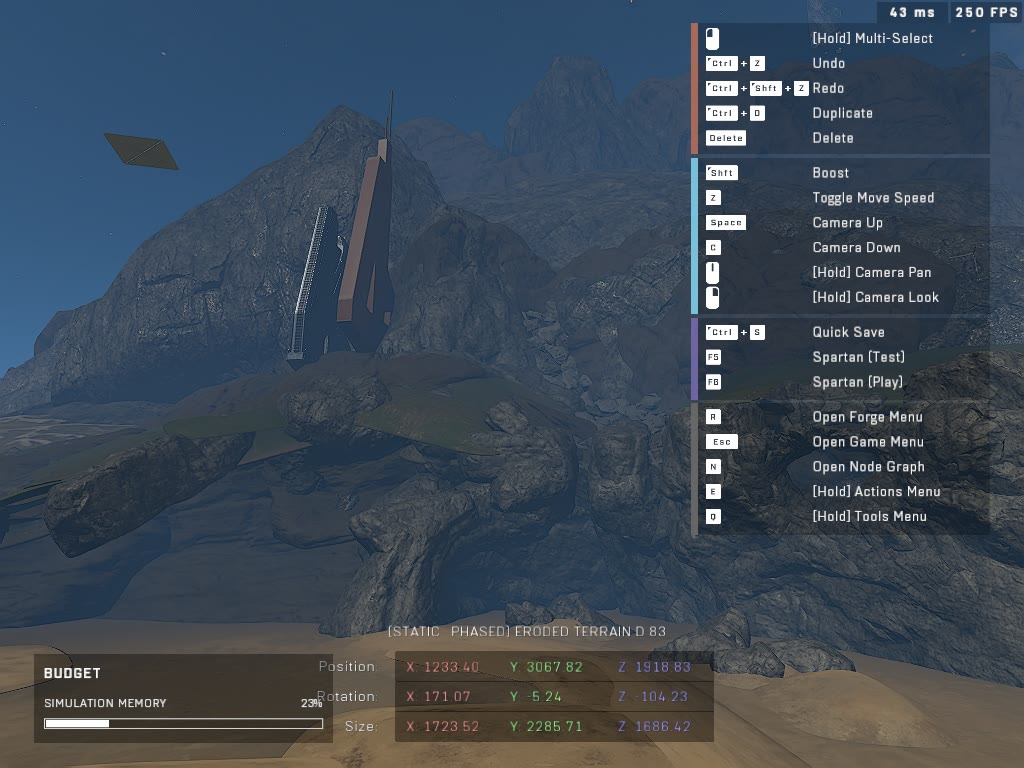
When the mountain geo was brought within the Forge canvas object placement bounds, I blocked them out with max-size Eroded Terrain D objects in order to get the reference geo for them into Infinite. As these were distant skybox mountains, I just had to get the outline shapes mostly correct since they wouldn't be inspected from up close.
After blocking them out, I had to move most of the mountains inside the print limits of 9999.90 units before printing them into Infinite. I then moved them to the correct locations with the prefab position method and confirmed that they weren't disappearing after a session restart.
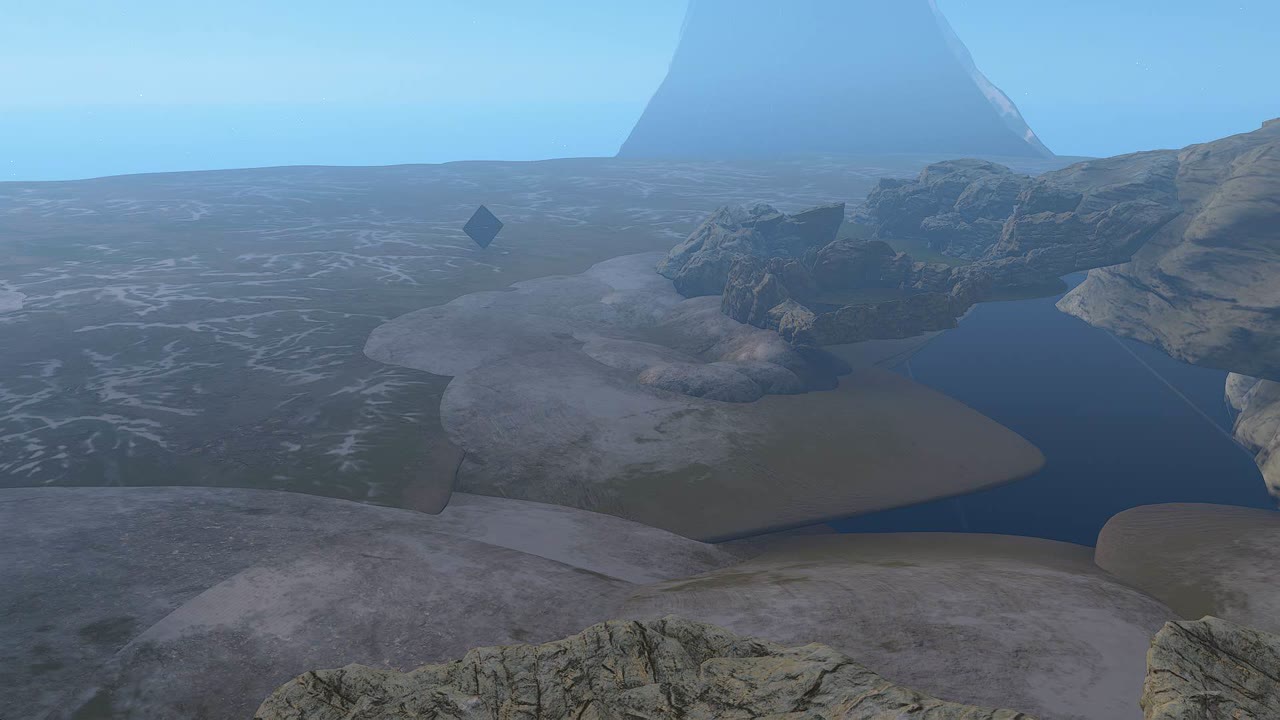
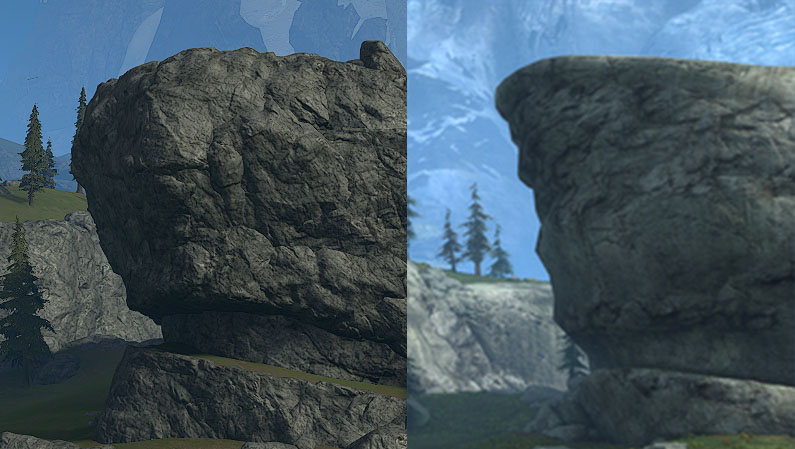
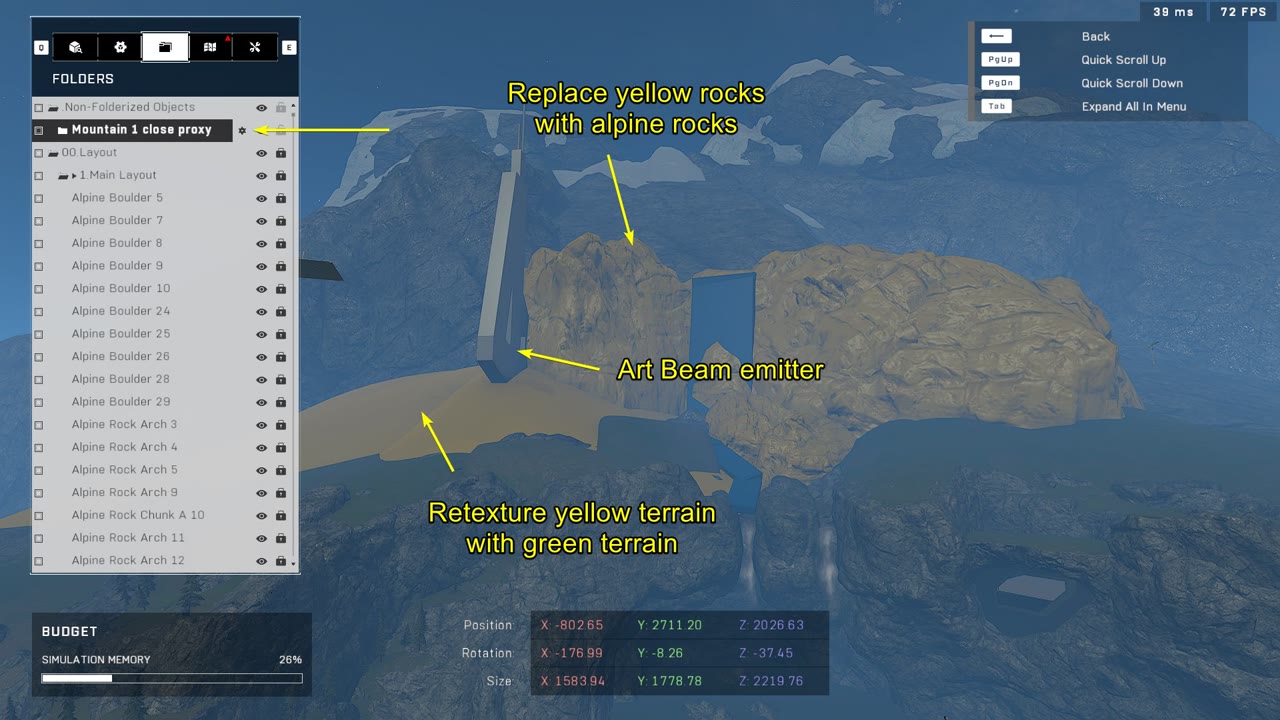
At the same time, I redid the beam emitter close to the map as it was eyeballed earlier both in its shape and position. The comparison images below show just how much the old skybox was off. The brown rocks are new; ignore the geo missing inside the map.
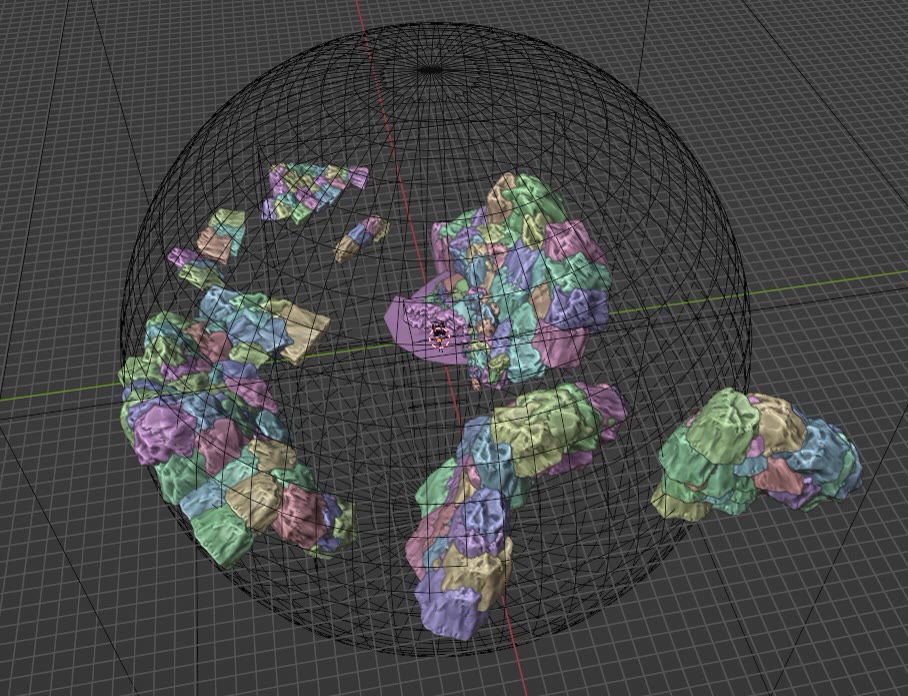
Miniature mountains
After confirming that the mountains worked at those positions, I went into Blender and scaled them down to 1:10 scale towards a point in the gameplay area located on top of the central Island rock. The intention of this method was twofold:
- Allow arting of the miniature model with rock objects without worrying about object scaling limits.
- Allow for easier arting due to enabling movement around the miniature mountains; you can't traverse past the 4000x4000x1500 Forge canvas where the large mountains would otherwise be placed.
The reason for a 1:10 multiplier was so the eventual upscaling via the Scale Bug wouldn't require pulling out a calculator every time, as I could just add a zero at the end of each axis' size and aim for that scale.
Mountain arting
I printed the miniature mountain blockouts into Infinite and let the team know that I'd need someone to art the mountains, and luckily Scrub agreed to do it. The arting of the miniature mountains would be straightforward, but there was one guideline that Scrub had to follow: One axis of each rock object could not exceed 400 units. The reason for this was due to the Scale Bug requiring one axis to stay below 4000 units, so when I would later scale these objects by a factor of 10, a size of 400 would become 4000, which was the maximum value I could still input via the UI.
This would still allow the Scale Bug to effect two of the axes of the rock object, leading to some very large rocks and efficient piece usage for the skybox.
Scrub took the time to art the miniature mountains with Alpine rocks, making sure not to exceed 400 units on one axis so the Scale Bug workflow would work as intended. It didn't take him long to art up the mountains, but what was on the plate next for me was the tedious part.

Upscaling the mountains
At this point all of the rocks from the miniature model mountains would have to be individually Scale Bugged to be 10 times their size. If we take a step back and look at the limitations we're trying to overcome with this exploit, you can appreciate the effort put into it a bit more:
If there were no scaling limitations in the first place, all that could be done is for the correct scale to be input in the field for each rock, after which the job would be done. In an editor like Blender, you could even just type <size> * 10 in the input field would actually do the math inside the input field and output a 10x multiplied value. Halo Infinite's Forge puts an upper limit of 4000 for these objects, so we need to bypass that with the Scale Bug, which is an unintended exploit.
As I had to later note down the positions, and match the rotations of each rock object, I numbered the miniature model rocks and then duplicated them all. These duplicates would be the rocks to Scale Bug. I hid all other copied rocks than the one I was going to be working on and started the Scale Bug process.
I would note down the starting size of the rock and then aim for a scale of 10 times the original with the Scale Bug. I used a pattern of 8' snap with a low scale on the dummy axis for some broad upscales until I got close to the final size or if I went over it once. If I went over it, I would undo the scale and increase the scale of the dummy axis so the jumps in scale would be smaller.
I got this process refined quite well at the end where I'd start with a dummy axis scale of 0.5–5, increase it to 50, then 100, 200 and even 1000 in some cases when I needed to make sure I was getting a very accurate end scale. I also adjusted the Scaling Snap down for these final refinements. Most of the time I was fine with a tolerance of 100 units from the desired end scale, which wasn't distinguishable at such a large scale.
Positioning the mountains
After all of the rocks were scale bugged, I had to move them into the right positions in the distant skybox since at this point, they were just inside the play space covering literally the entire canvas and more. Before I could move them into position, I needed to know those positions first, which I had a process for getting the exact values for.
I noted down the positions of the miniature arted rocks for each mountain and placed dummy objects in Blender at those coordinates. I then selected all of the dummy objects and the central point on top of the Island rock in Blender and scaled them up 10x. As I had previously downscaled the mountains 10x using this same central piece, I was now just upscaling some objects back up to the mountains at the same scaling ratio, which would move the dummy objects to the positions where the Scale Bugged rocks would have to be in the skybox on Infinite.
The process for placing the Scale Bugged rocks in the distant skybox wasn't just copying the positional values from the dummy objects to the rocks either as some of the values were over 9999.90 or under -9999.90, and couldn't be typed into Forge's UI as a valid position. To overcome this, I had to use the prefab position method to accurately position these rocks.
Nearly every rock had one axis that had a five-digit positional value leading to more time spent doing the accurate position workaround, but in the end, it was worth it and I was pretty confident that nobody had done something like this in a Halo Infinite map before. The result of this odd workflow full of exploits and jumping between software were some piece-efficient and accurate skybox mountains that literally pushed the limits of what could be done in Halo Infinite.
Mountain snow
A day later I had asked Scrub to do one more art pass on the miniature mountains to add a layer of snow on them. In our case, snow on top of mountains would be created with objects from the "Glacier" rocks palette, which had the same shapes as the Alpine rock palette, but with a snow texture instead. The same Glacier rock shapes would be used as the Alpine rocks that made up the mountain tops at the same position and scale. Then the Glacier rocks would be moved up ever so slightly and possibly scaled down in order to only show the top part of them, which looked like a layer of snow.
After Scrub had put in these Glacier rocks, I went through the entire process again with the Glacier rocks that I did for the Alpine rocks, and finally after hours of work, I was really happy with the outcome.
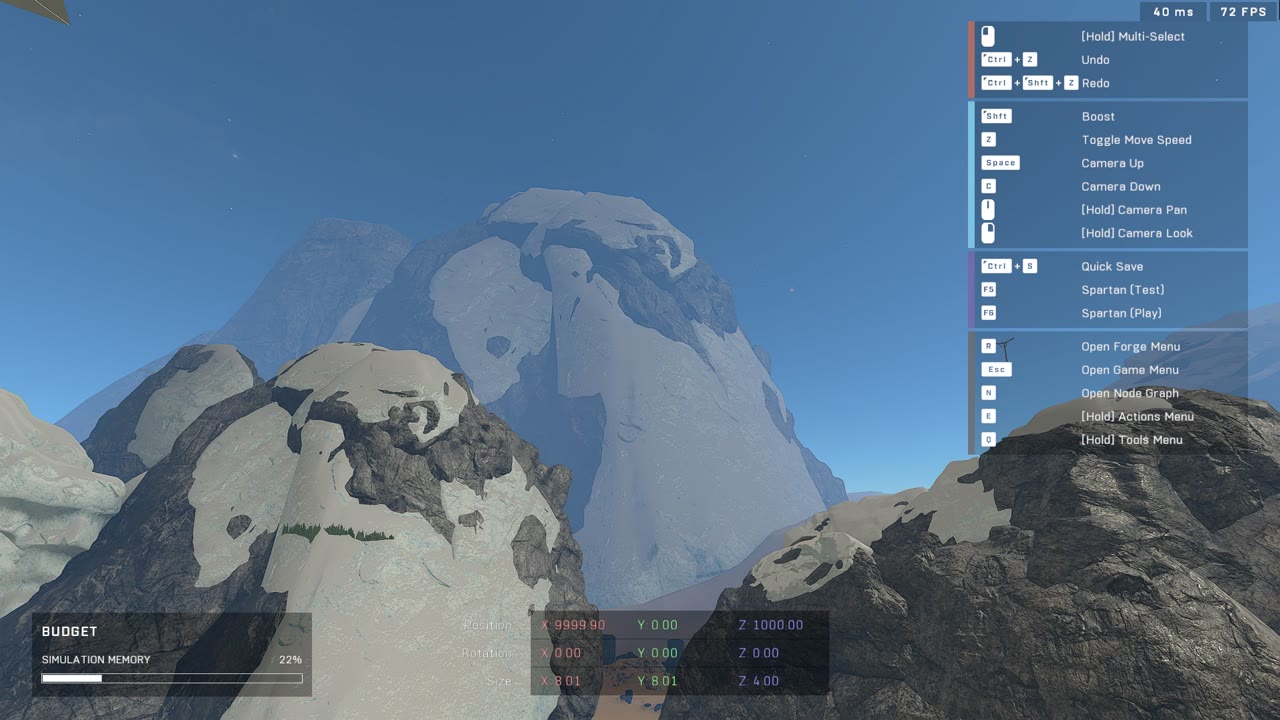


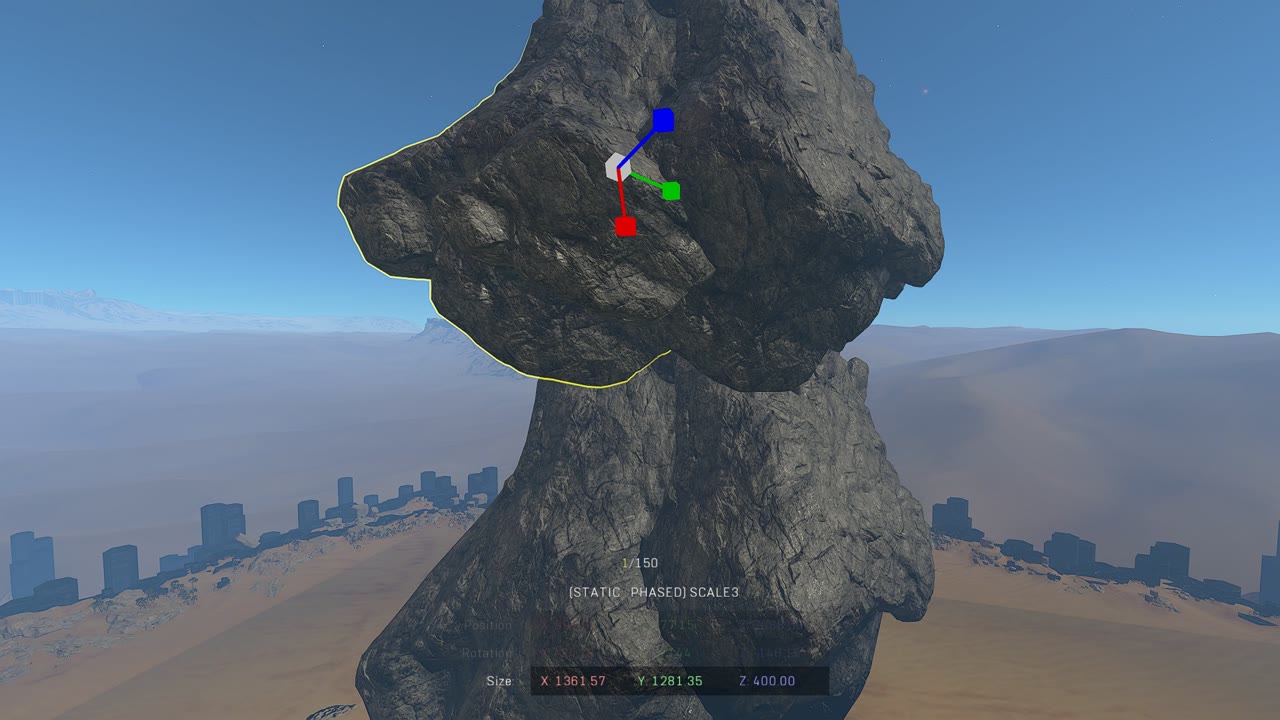
Monkey mountain
While initially not planned, Scrub took the extra effort while adding the snow layer to somehow create a shape in the mountain resembling the facial shape of a monkey. This was a reference to there being a noticeable skull shape in the same mountain on Halo Reach, but recreating the skull detail for us was out of scope.
It's unclear whether the skull shape in the mountain on Halo Reach was intentional or not, but many people try to look for it on our Forge World remake, which tells me that it was worth it to include a reference to it. Keeping the geo close to 1:1 as well as bringing these old features and easter eggs back was a priority for us after all.
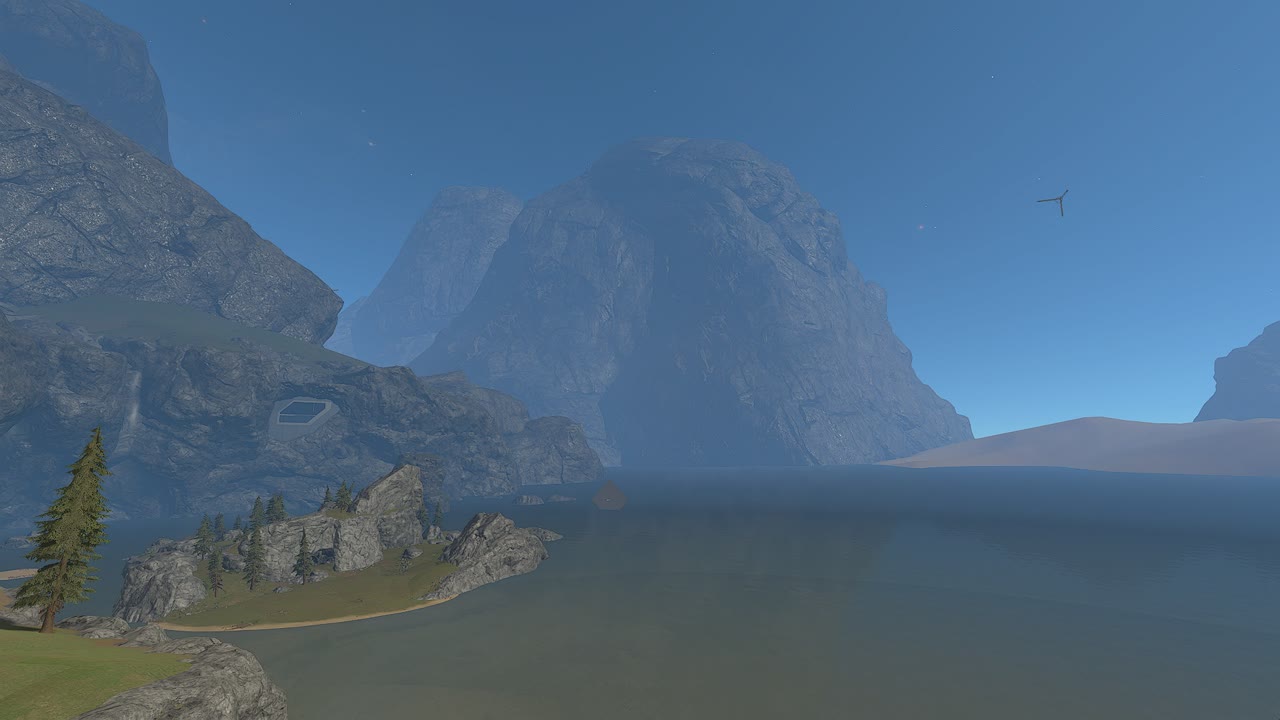
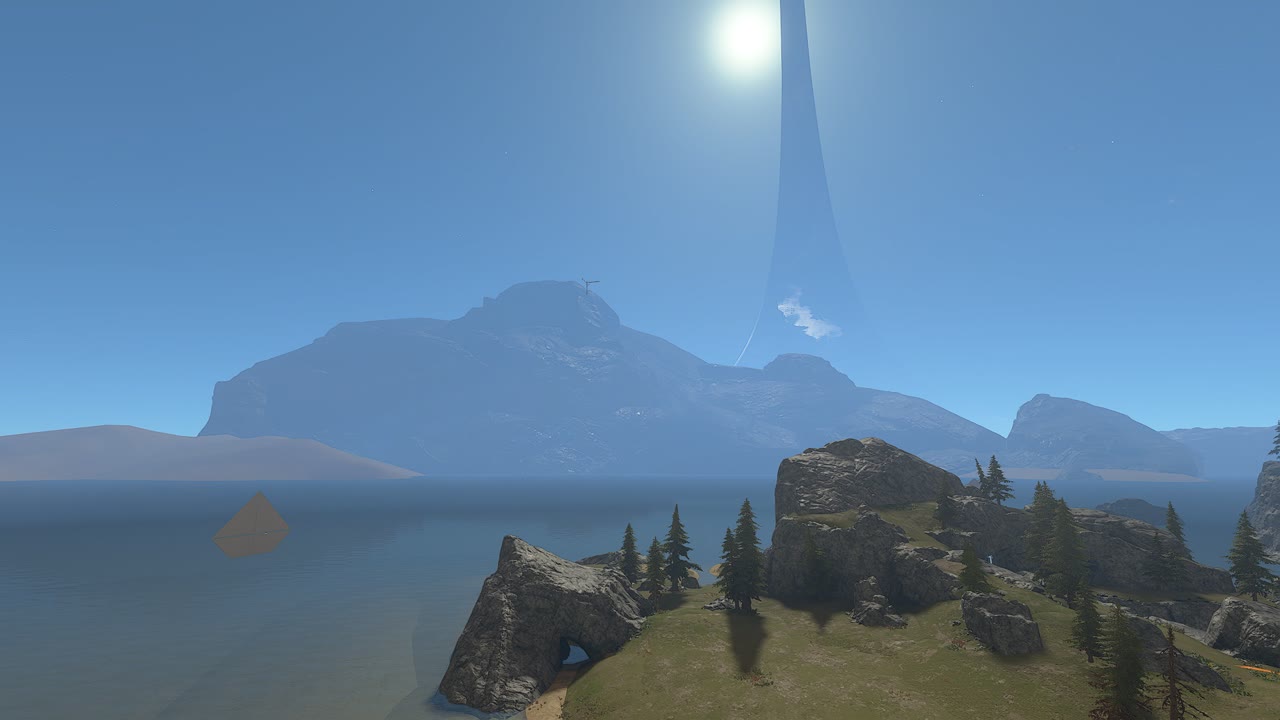
Sky lighting finalization
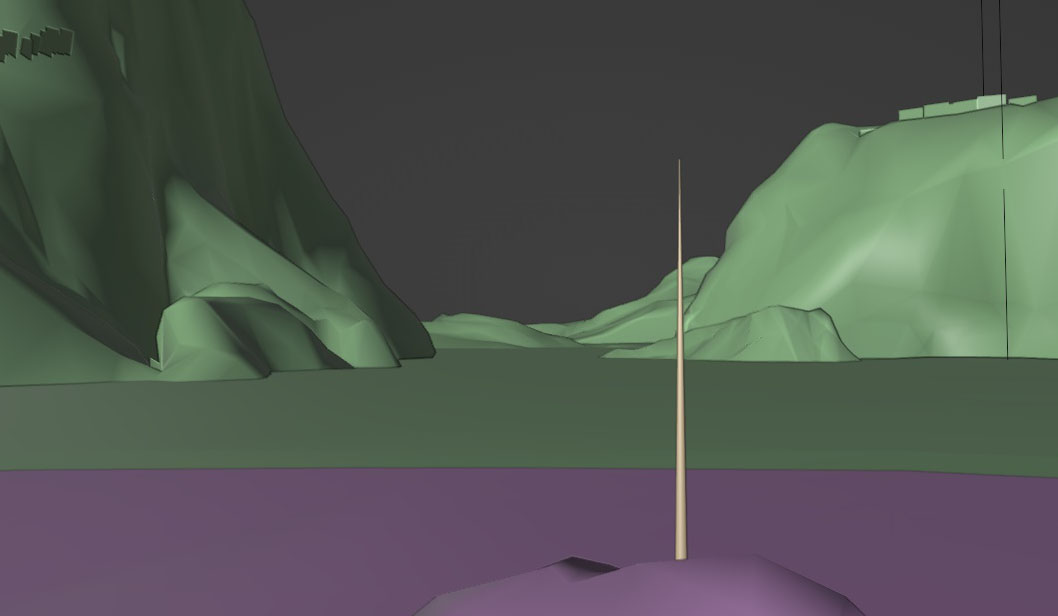
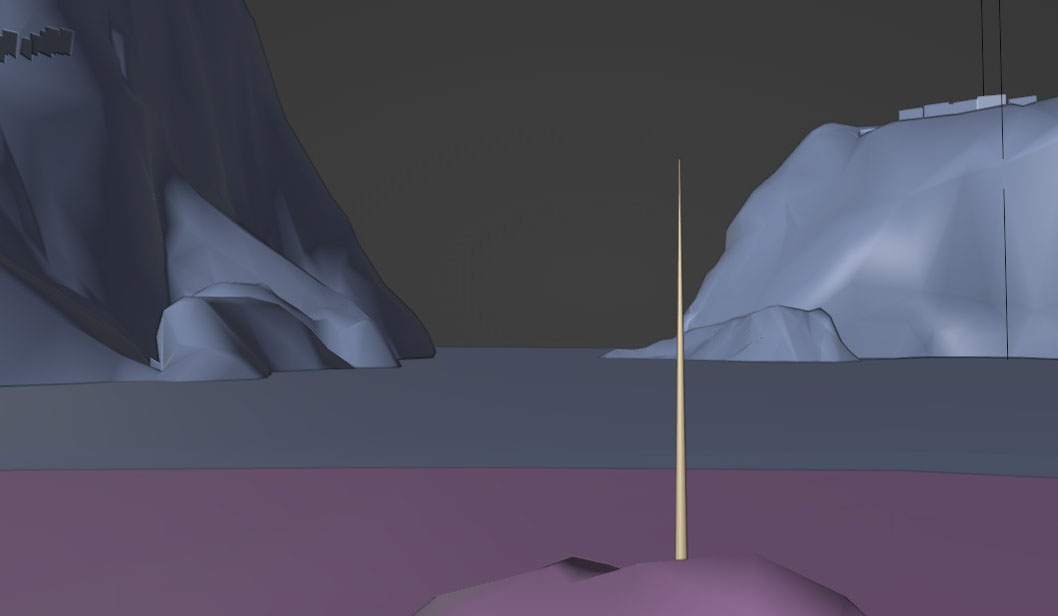
With the updated skybox geo done, I took the opportunity to finalize the sky lighting as we could now accurately determine the fog amount since we knew how far the skybox mountains were. This would be considered the last major adjustment of the sky light settings.
The major change here was changing the whole tint of the map to be more blue than before which definitely made the map look closer to Reach's lighting. The second was adjusting the distant fog to be thicker now that I could use the new mountain geo as a reference for how far it would need to extend. It's easiest to just let the pictures do the talking:
Custom reflections
Commonly overlooked
Reflections in Halo Infinite are often overlooked by forgers, but they can have a major impact on how the map looks. A reflection image can by itself determine whether a reflective surface like the side of a metallic object looks realistic or unrealistic. A common issue on Halo Infinite maps is that people ignore the need to adjust reflections in a map, which often results in unrealistic surfaces.
The most common form of this I've seen are maps with no altered reflections, a bright sky and lots of metallic surfaces that clearly show the reflections. Those surfaces will reflect the bright sky reflection on them regardless of their position, often making them look off from the ambient lighting around them.
Now I won't fault the forgers for not realizing how their map looks bad like that; they probably don't know it's caused by the reflections, and there is no official documentation from Halo Studios about how the reflections in Forge work, so all of this info has just been learned through years of Forging and word-of-mouth in the community.
Reflection types
There are three types of reflections in Halo Infinite: The Global Reflection, Reflection Volume object reflections and dev-made reflections. All reflections except the dev-made reflections are always rebuilt client-side when you load into a map, so whatever the reflection sees at that moment is what its reflection image will become.
Global Reflection
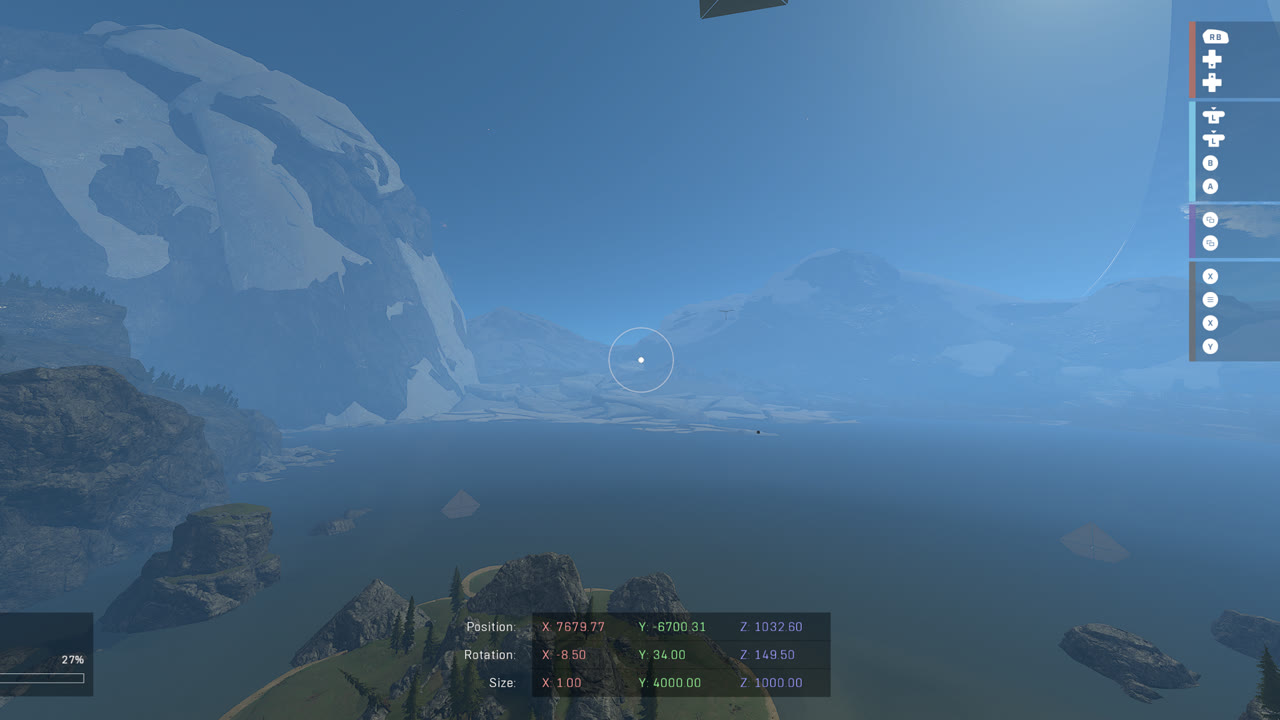
In order to not cause confusion later, we need to immediately discuss the Global Reflection, which is considered the default reflection on a map. The Global Reflection is an image taken from the "X: 0, Y: 0, Z: 1000" coordinate on all Forge maps. The reflection image taken from this point is what is shown on all surfaces unless a custom Reflection Volume object is set to override it.
Having custom textures around this point allows forgers to apply a different reflection to the entire map as the default reflection. This point will always be the same and it can't be moved; building a map in the wrong spot on the canvas may result in this spot being covered unintentionally, resulting in the entire default reflection of the map looking weird if you're unaware of the Global Reflection's existence.
Knowing how to manipulate the texture shown on the Global Reflection can save tons of confusion and manual Reflection Volume placement work. Often just adjusting this default reflection may be all the reflection work required on the map.
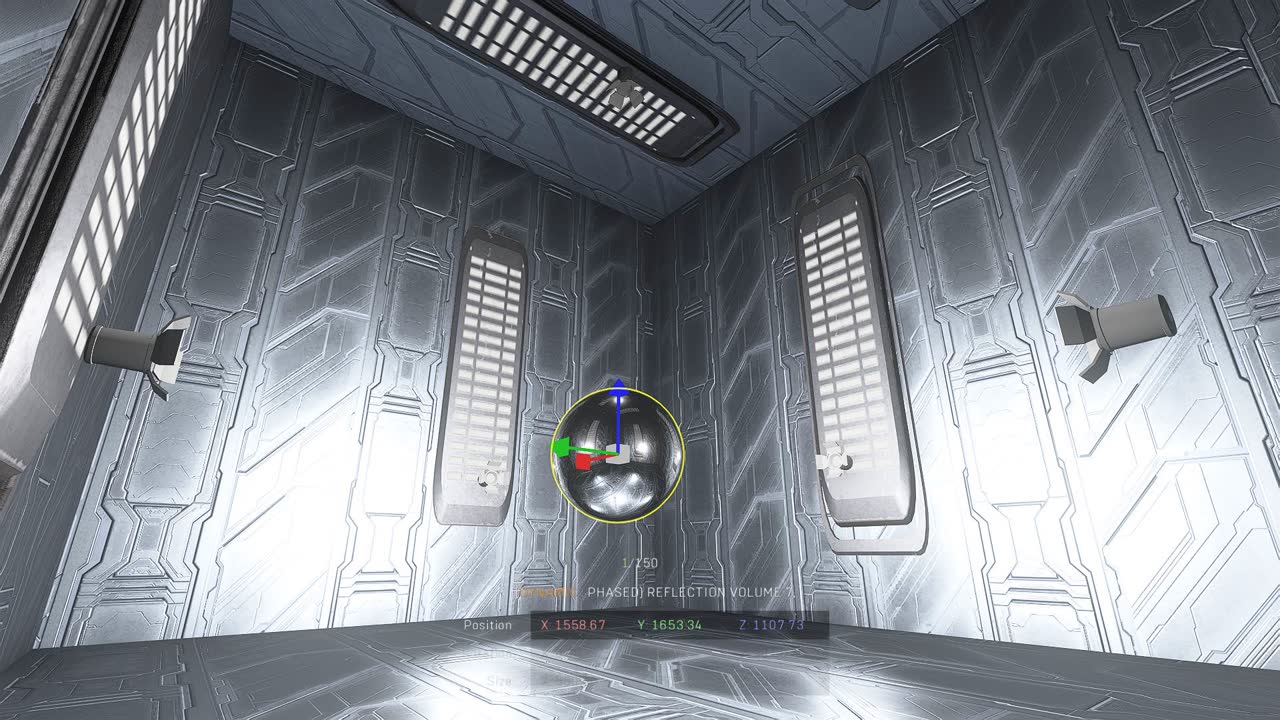
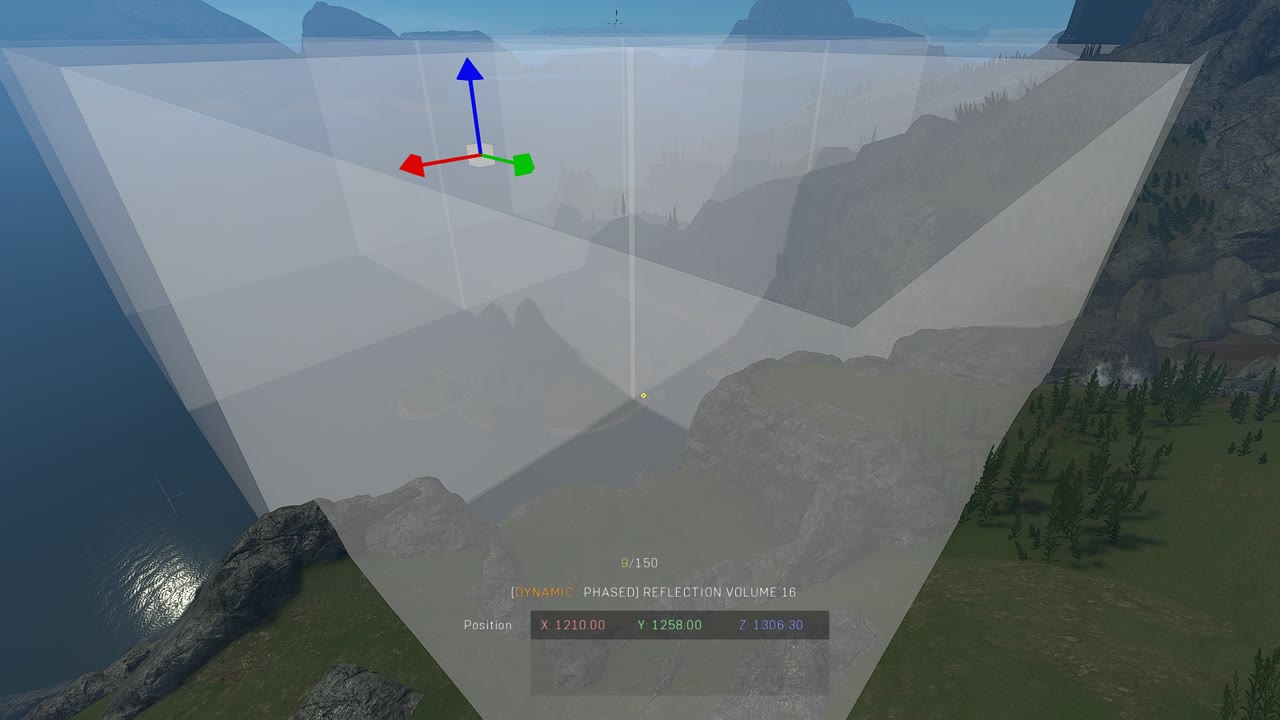
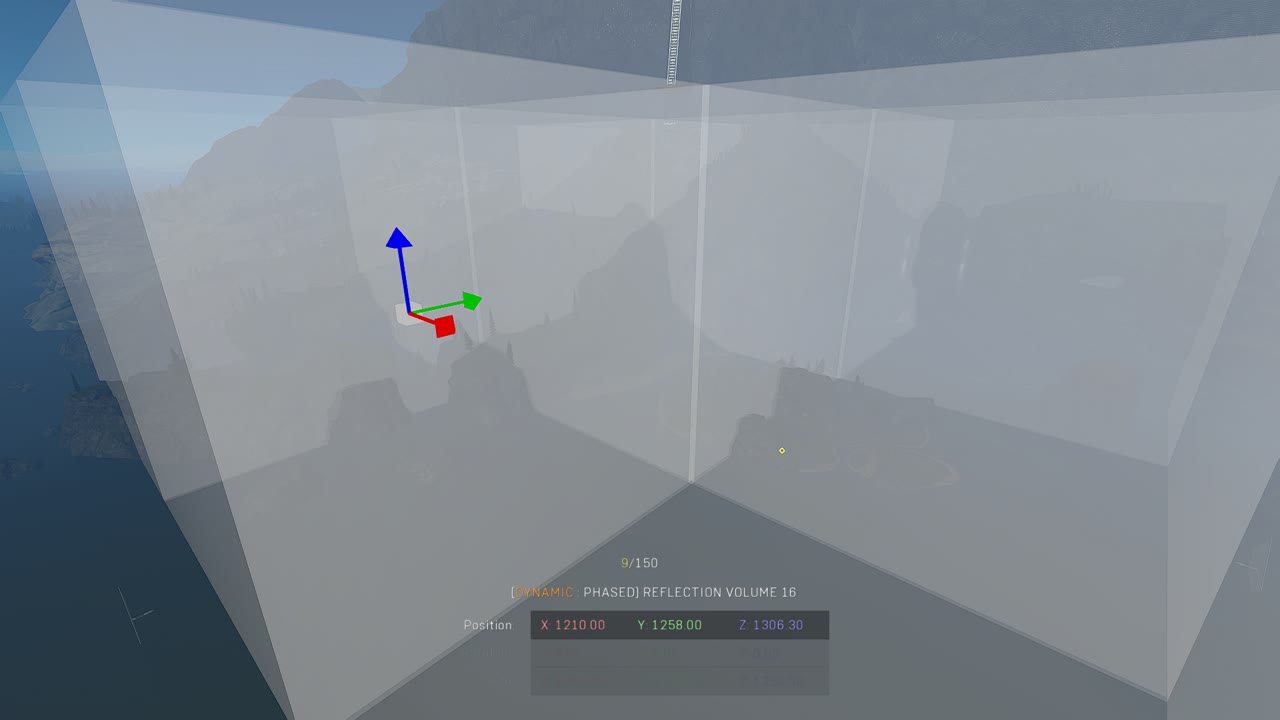
Reflection Volume
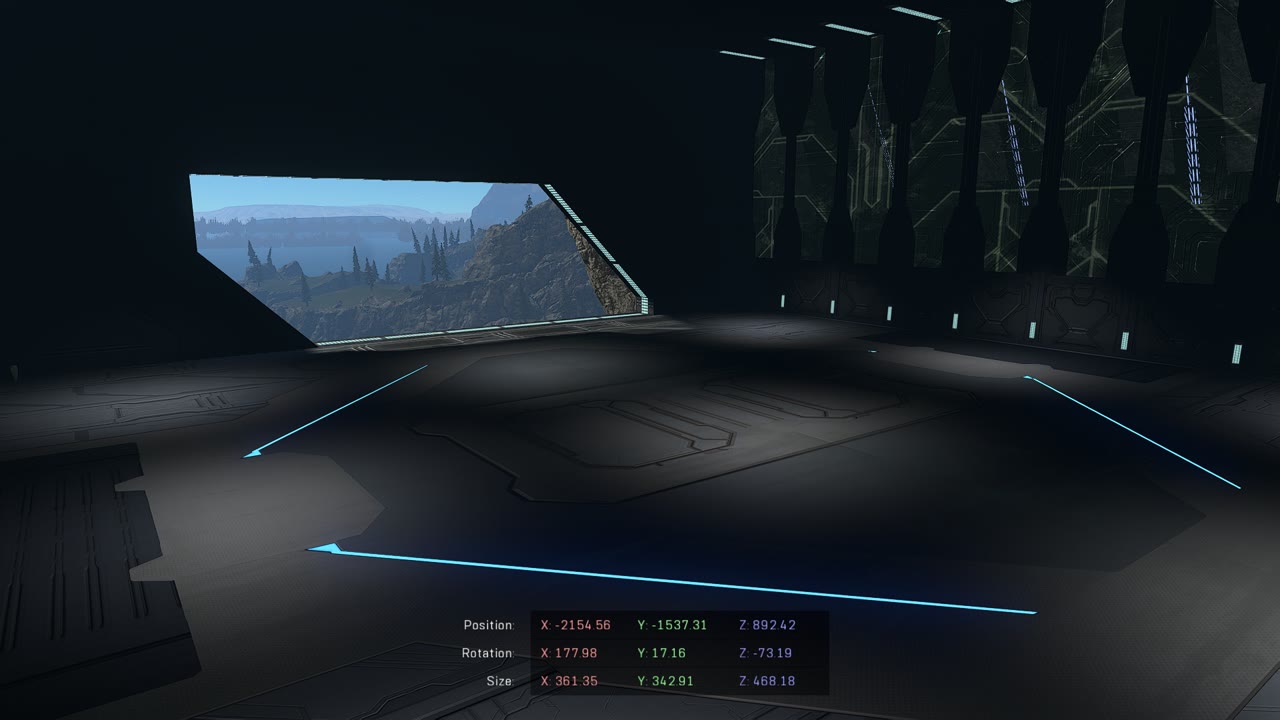
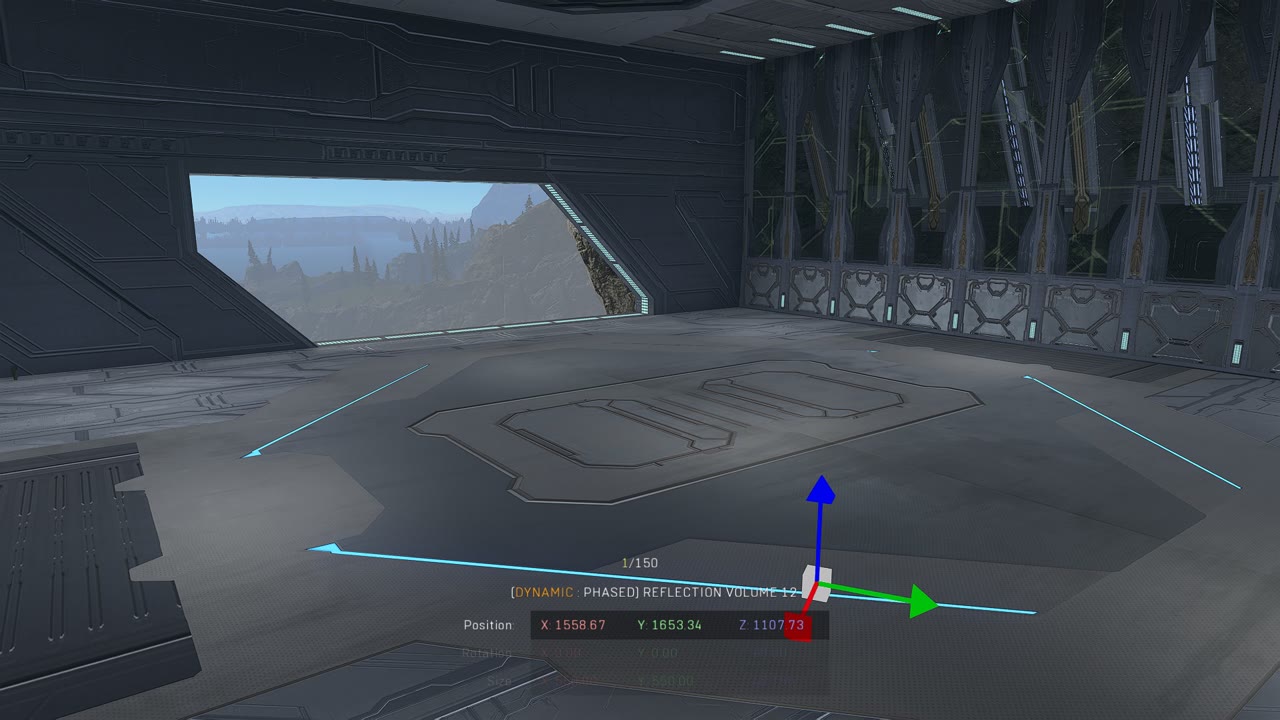
If a specific area of a map requires a custom reflection, a Reflection Volume must be used. The Reflection Volume is an object in Forge that allows you to create a custom reflection in an area within the boundary of the object. The reflection used within this boundary is taken from the origin point of the object and is then applied to all surfaces within the boundary. There is a maximum of 15 Reflection Volumes that can be placed on a map, the boundary of the object can't be rotated and the maximum size of the boundary is 1250x1250x1250.
Typically, Reflection Volumes are made to cover large areas of a map where the reflection should change from the previous section. This ensures that the reflections stay consistent and realistic. A good Reflection Volume setup example can be seen on the map "Kusini Bay".
Reflection Volume tricks
As the reflection is just an image taken from the origin point of the object, it can be modified by surrounding the origin point with textures that you want the reflection to have. This trick is useful when you want a custom reflection in a room, but an image from the room itself doesn't produce adequate results. A limitation of this technique is that since the origin point of the object is always in the middle of the boundary, the origin point will have to be hidden from view to prevent players from seeing the custom textured geo around the object.
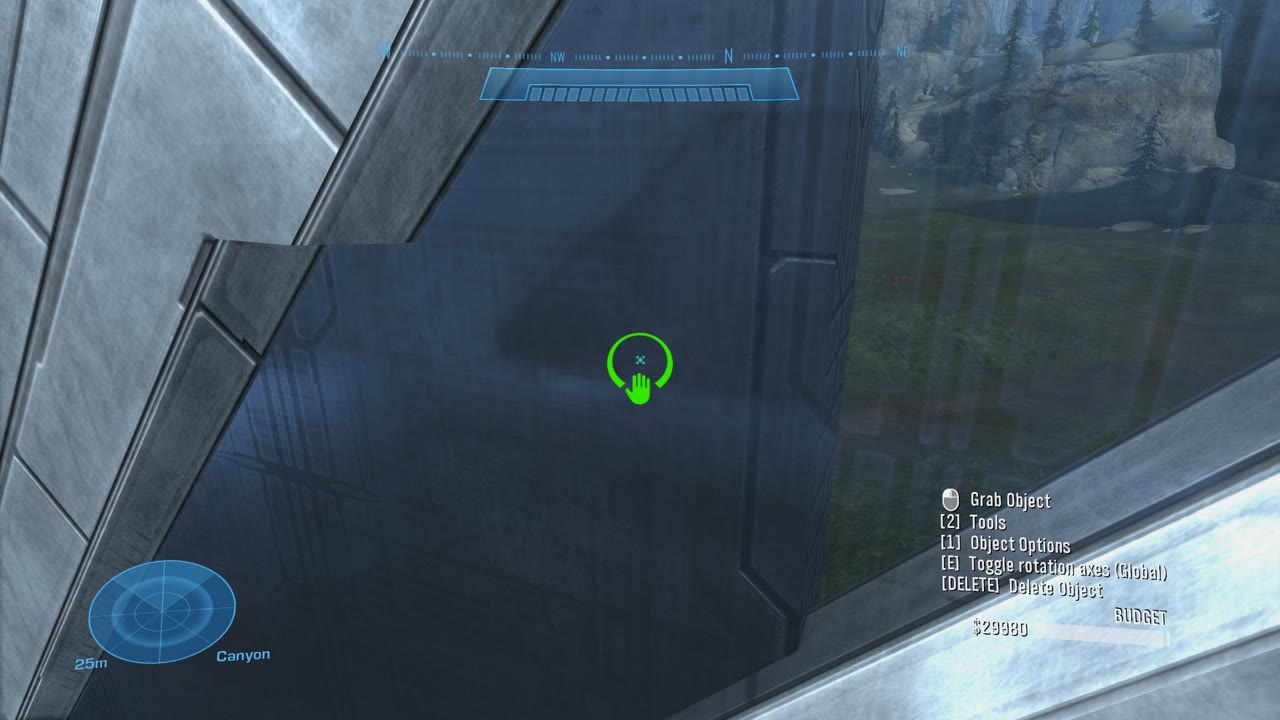
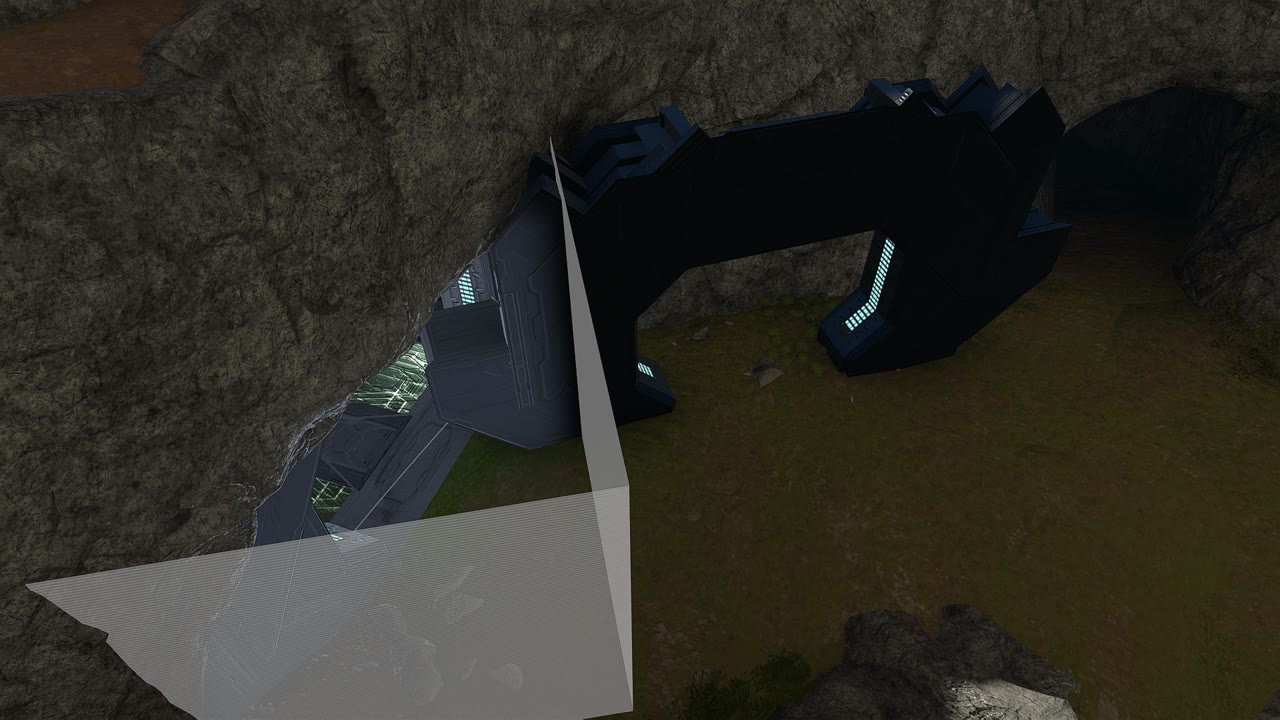
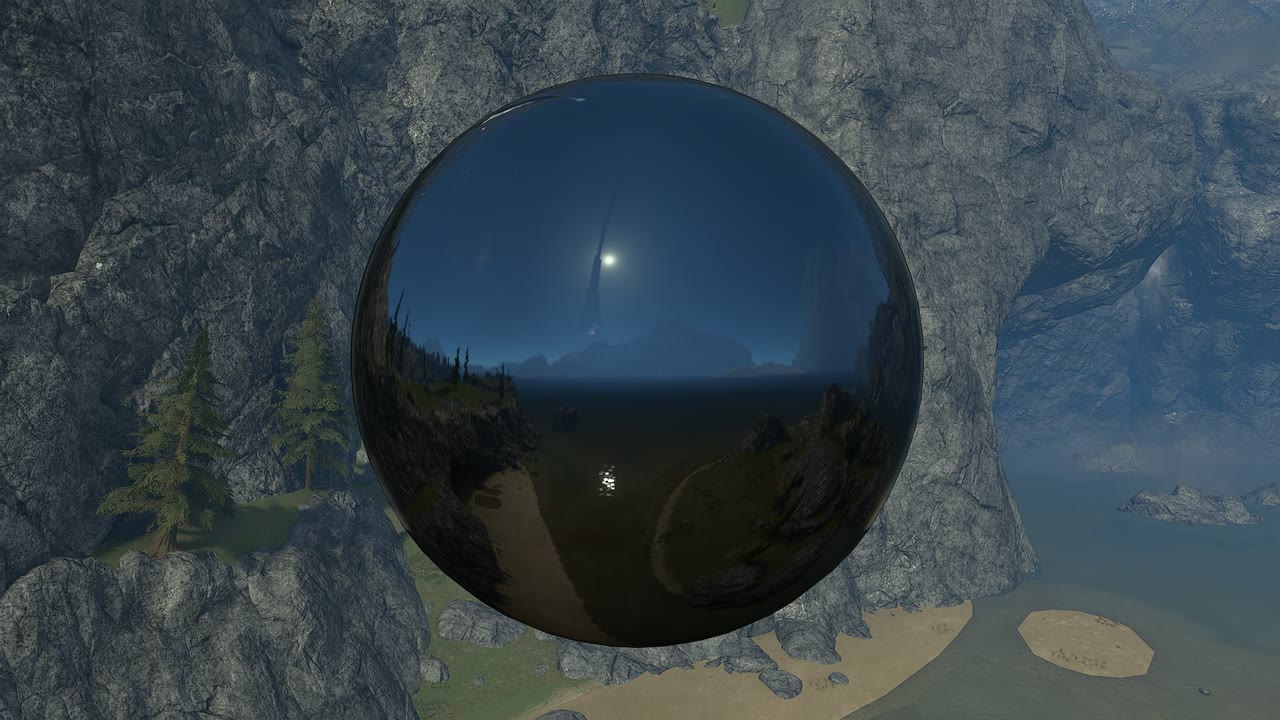
Dev-made reflections
Dev-made reflections are prebuilt reflection images baked in to dev-made levels that can't be adjusted in Forge, nor created on Forge maps. These can be inspected by moving a highly reflective object around the map until you find one. Funnily enough these baked-in images are often taken from a pre-release version of the map and sometimes show blockout pieces, a different art style or debug visualizations present in the map, as the devs forgot to update them before releasing the map.


Custom images like this cannot be baked in to the reflections of Forge maps, as these were made with internal tools that aren't available in the Forge toolset.
Reflections for Forge World
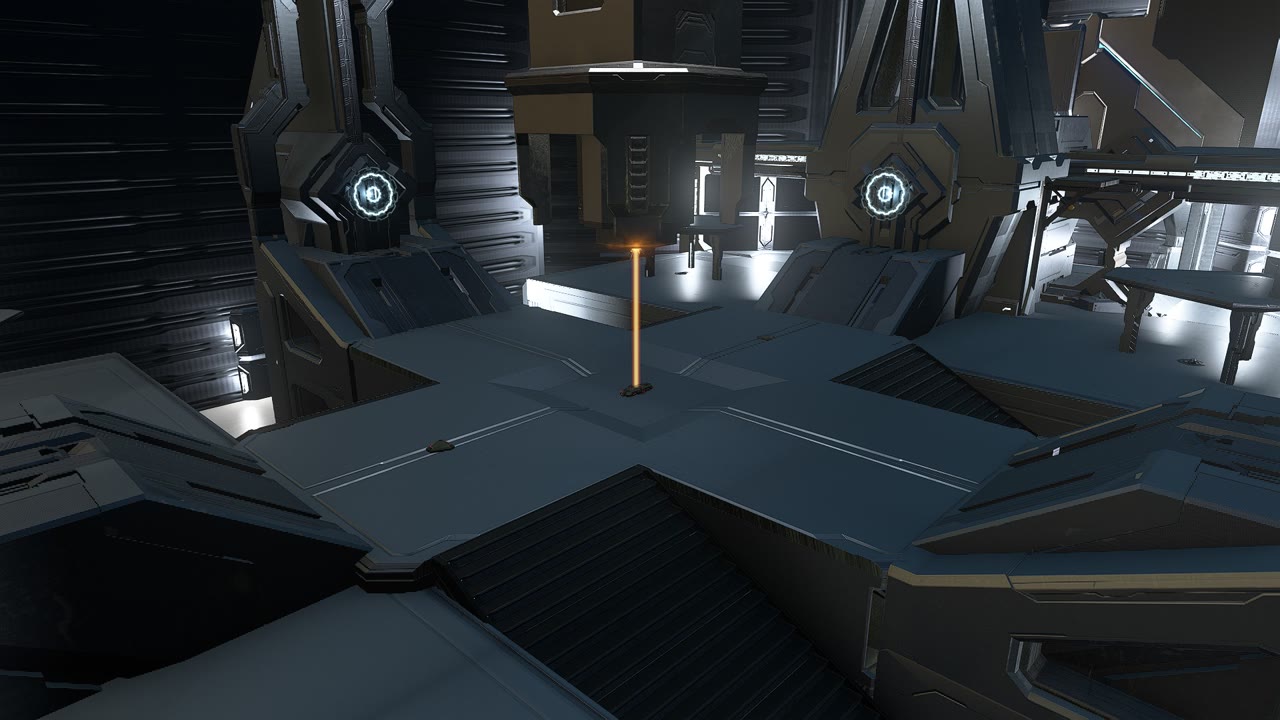
Looking at Forge World on Halo Reach, we can see that the objects have a baked-in reflection regardless of where they are placed, which gives them a consistent look anywhere around the map. The object palette of Halo Reach is also primarily made from objects with a Forerunner metallic material. Attempting to recreate a similar look for them in Infinite would require detailed attention given to the reflections shown on them, to ensure a bad reflection doesn't ruin the look of the metallic surface.

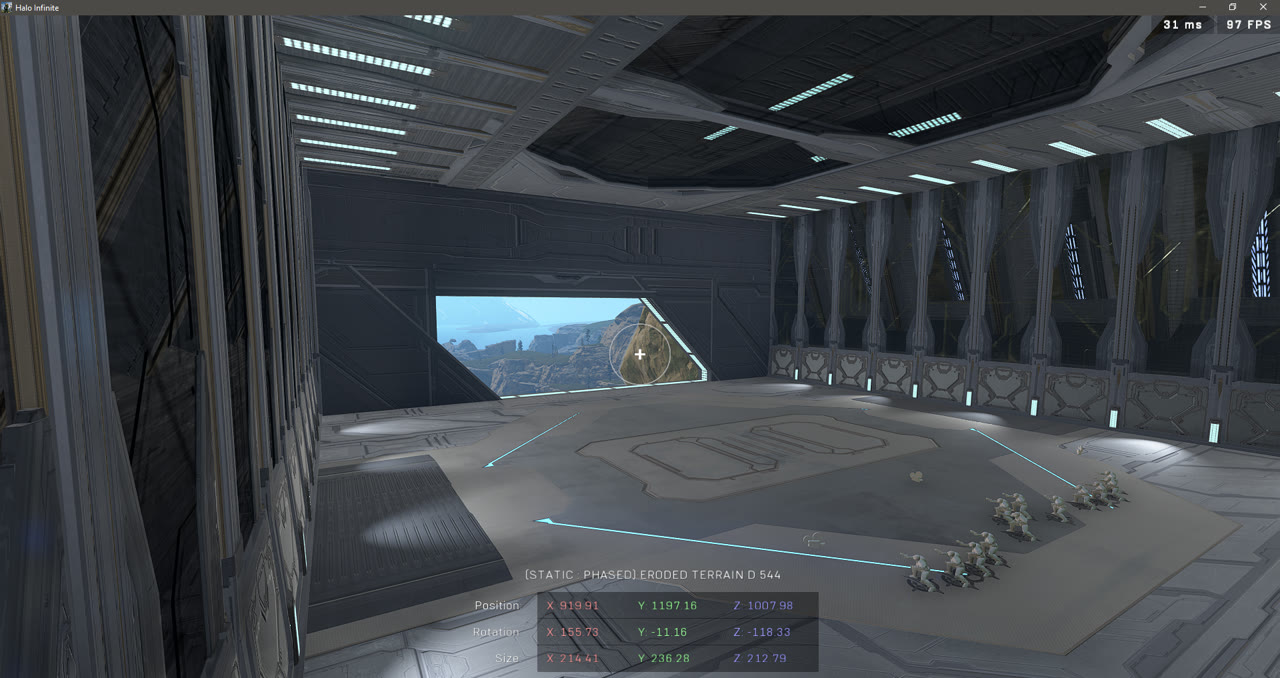
Scrub and Virus had realized how the default Global Reflection affected the Coliseum and Forerunner Tunnel, which were mostly made out of Forerunner metallic materials, and had created two custom reflections for these using Reflection Volumes under each structure.

The issue was that these custom reflections were only used in these two areas, so if players were to build a reflective Forerunner structure elsewhere, the Global Reflection would be used on that structure, making it have a different reflection.
Custom partial Global Reflection
I realized this was a major issue as a goal for us was to hand out the map as a canvas to the forge community in a form where players could build structures on it and expect them to look similar to how they did in Reach. To achieve that, I had to come up with a solution where the default reflection on the level would be a generic Forerunner grey color that worked for these kinds of structures, just everywhere on the map.
As reflection images can't be baked in to objects on Halo Infinite, my immediate thought was to utilize a custom texture placed around the Global Reflection in order to apply the same default reflection to everything on the map. The issue was that this default reflection would also be used for the water, which caused it to tint.
Well, if the water is the only problem, then we can just adjust its tint with some cleverly placed Reflection Volumes right? In many cases yes, but in the case of Forge World, the water extends beyond the forgeable canvas space where the Global Reflection will take over again, so the custom water tint would only apply as far as the boundary of the Reflection Volumes can reach, which is not nearly enough as would be needed. Also, the player's draw distance settings will start culling custom reflections even at the highest settings.
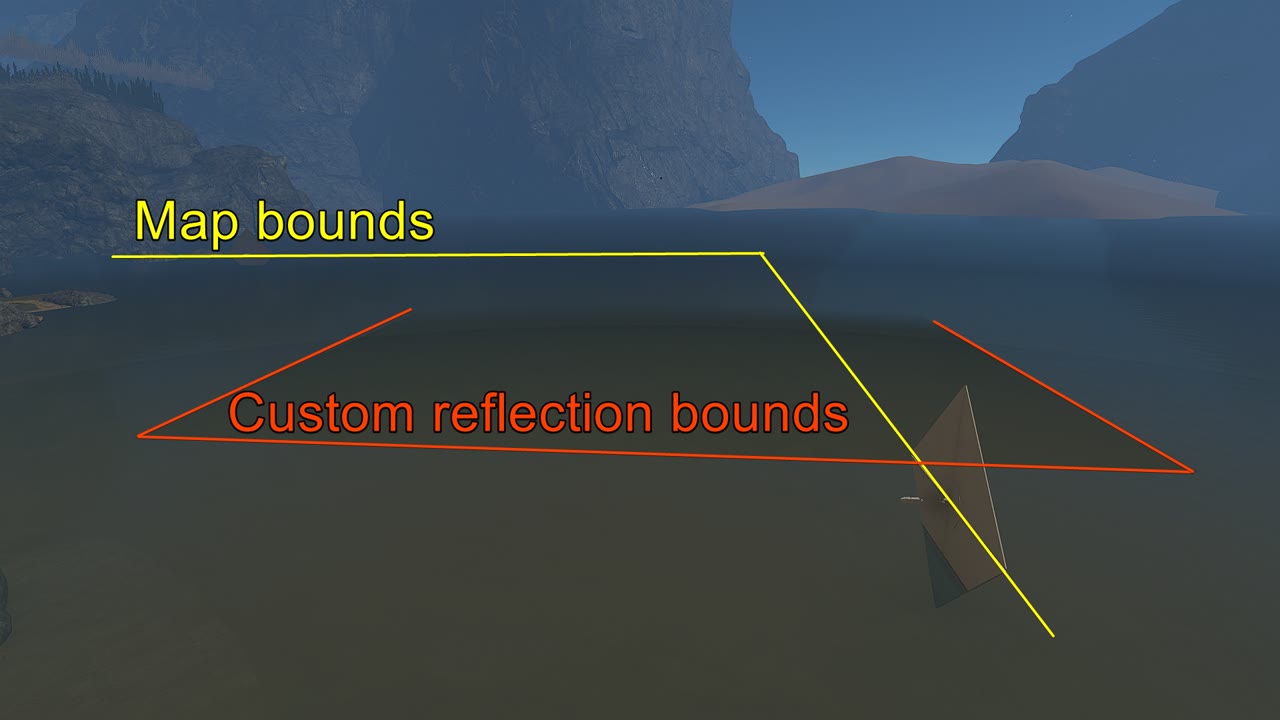
Instead, what has to be done is the same logic, but flipped. Rather than relying on the Global Reflection as the custom reflection and tinted Reflection Volumes for the water, we need to make a neutral Forerunner texture reflection image for the entire map except the water using multiple Reflection Volumes and let the Global Reflection take over everything at the sea level and beyond the canvas bounds.
Custom Global Reflection dilemma
Another reason why I wanted the water reflection to come from the natural Global Reflection is that the water color would look right, as it was taken from the sky color. Using a custom-colored reflection texture on water in Halo Infinite works from some angles, but it will not work consistently if it's viewed from different angles.
If you would cover the Global Reflection with a blue texture that mimics the bright blue water in Halo Reach, it may look good from a 45° angle, but getting close to the water level would reveal its true tint which would be much brigther. Also, artificially adjusting the Global Reflection would often look weird on not only water, but even the sides of cliffs, where an unnatural blue tint would now show that differed from the sky color.
Reflection layers
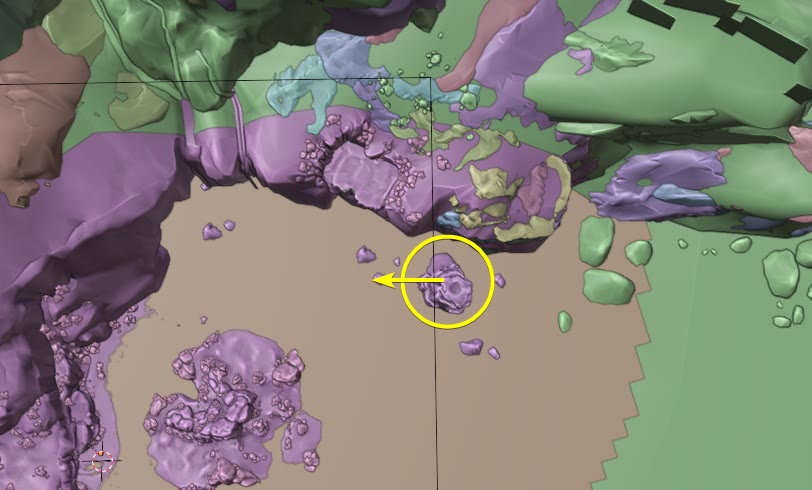
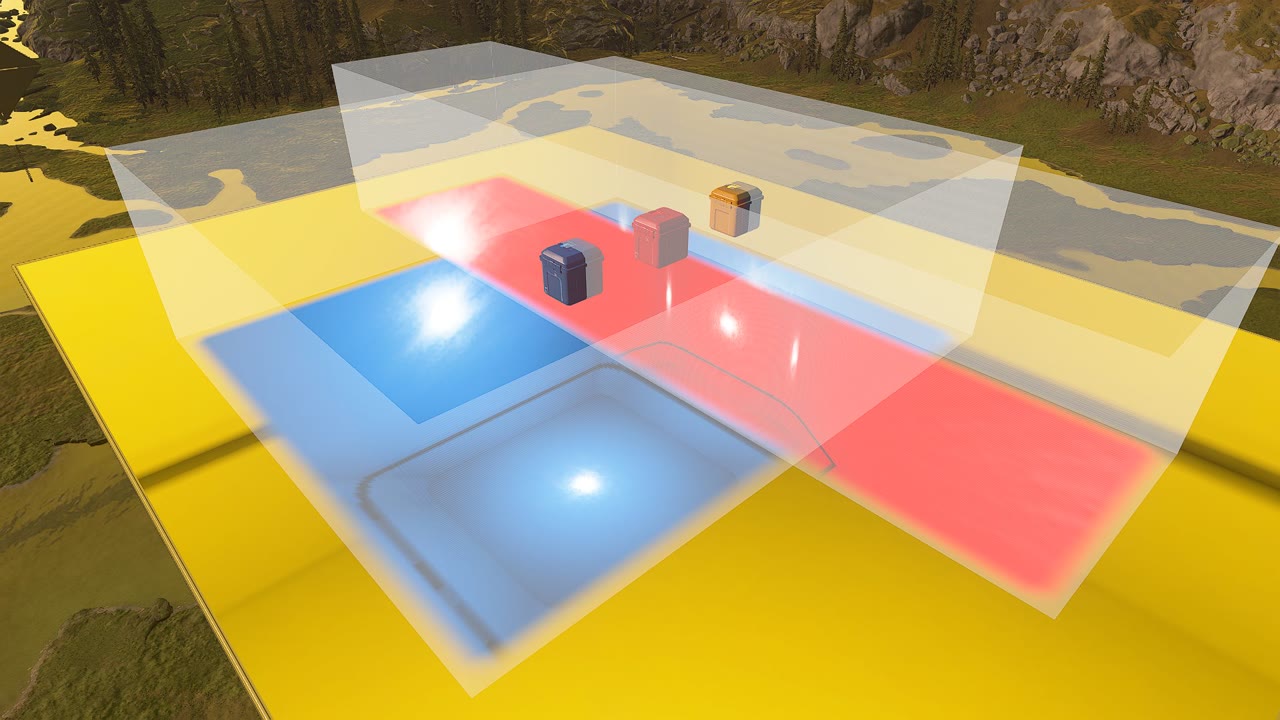
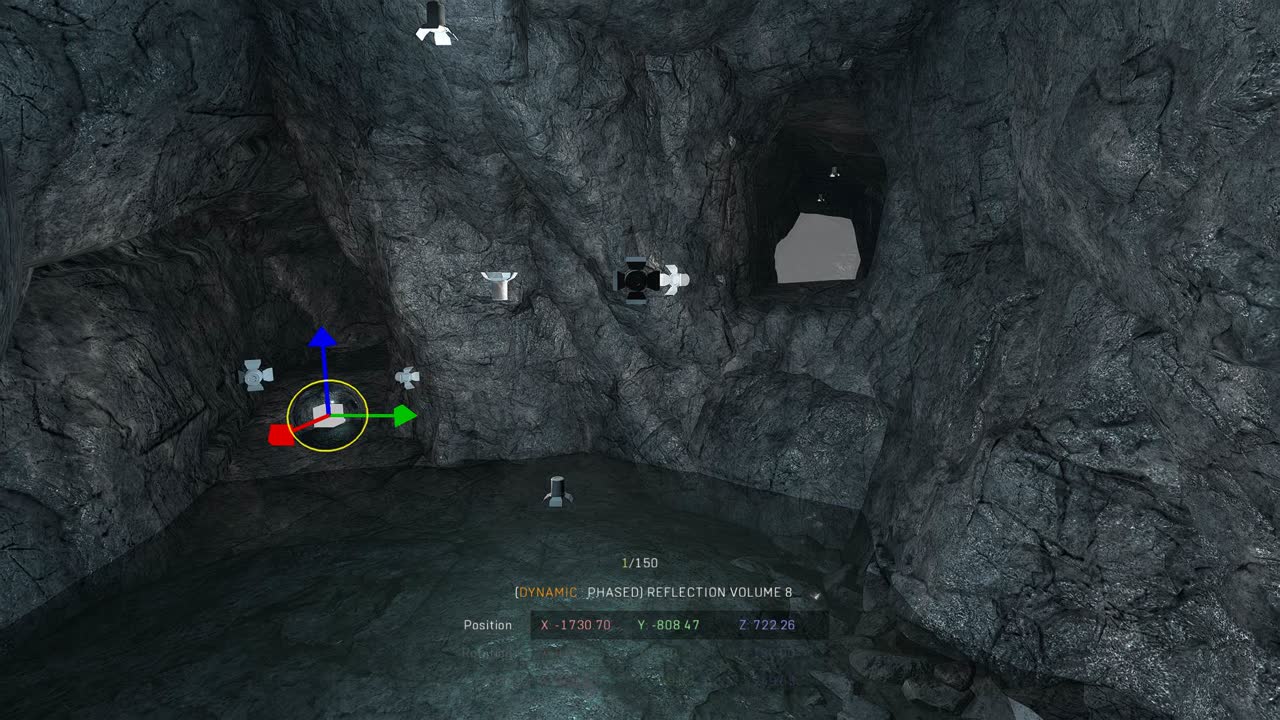
If we're going to cover the entire map in Reflection Volumes, wouldn't that result in not being able to have custom reflections anymore for things like a dark cave as there would already be a large Reflection Volume covering it? Luckily no, as an option "Blend On Top" in the Reflection Volume settings allows for the Reflection Volume to blend on top of all other Reflection Volumes.
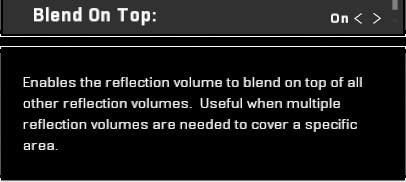
Due to this option, we can have three layers of reflections in one spot, but still have a specific Reflection Volume be the one shown. The order of priority is:
- Reflection Volume, Blend On Top: On
- Reflection Volume, Blend On Top: Off
- Global Reflection.
The large Reflection Volumes that cover the entire map would be set to "Blend On Top: Off", which would still allow a secondary Reflection Volume on top to take priority over it with the setting "Blend On Top: On".
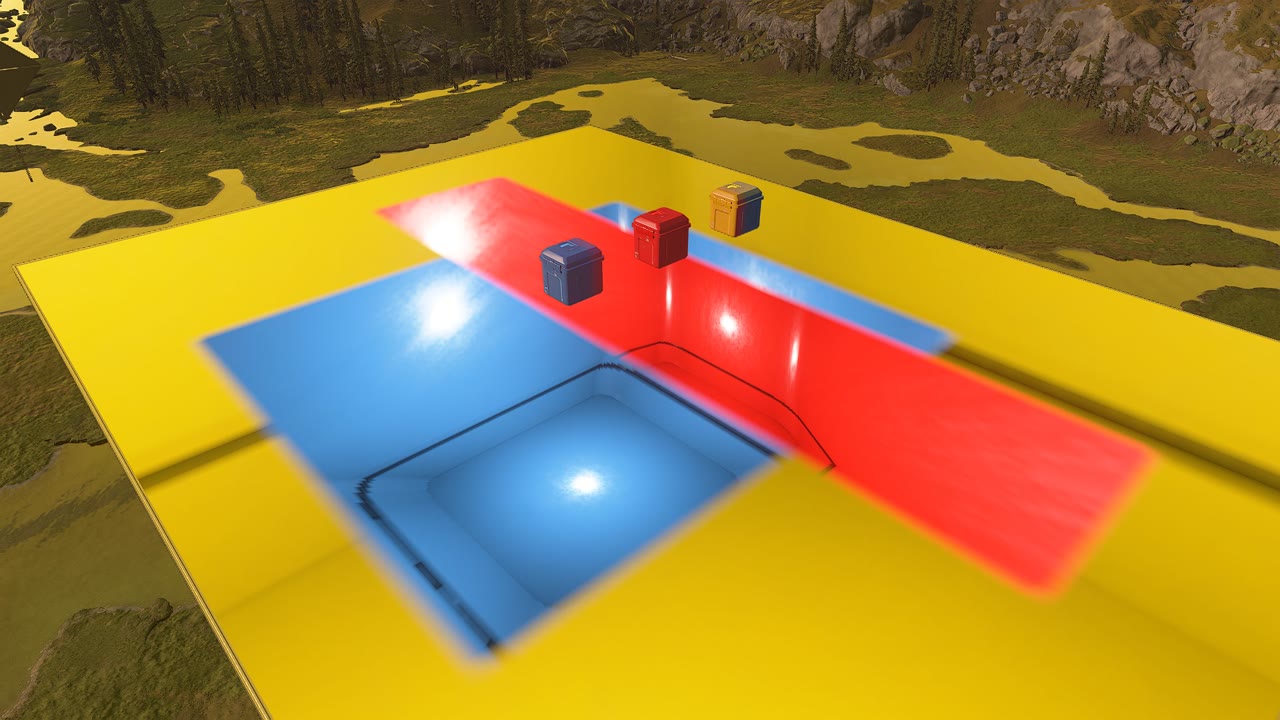
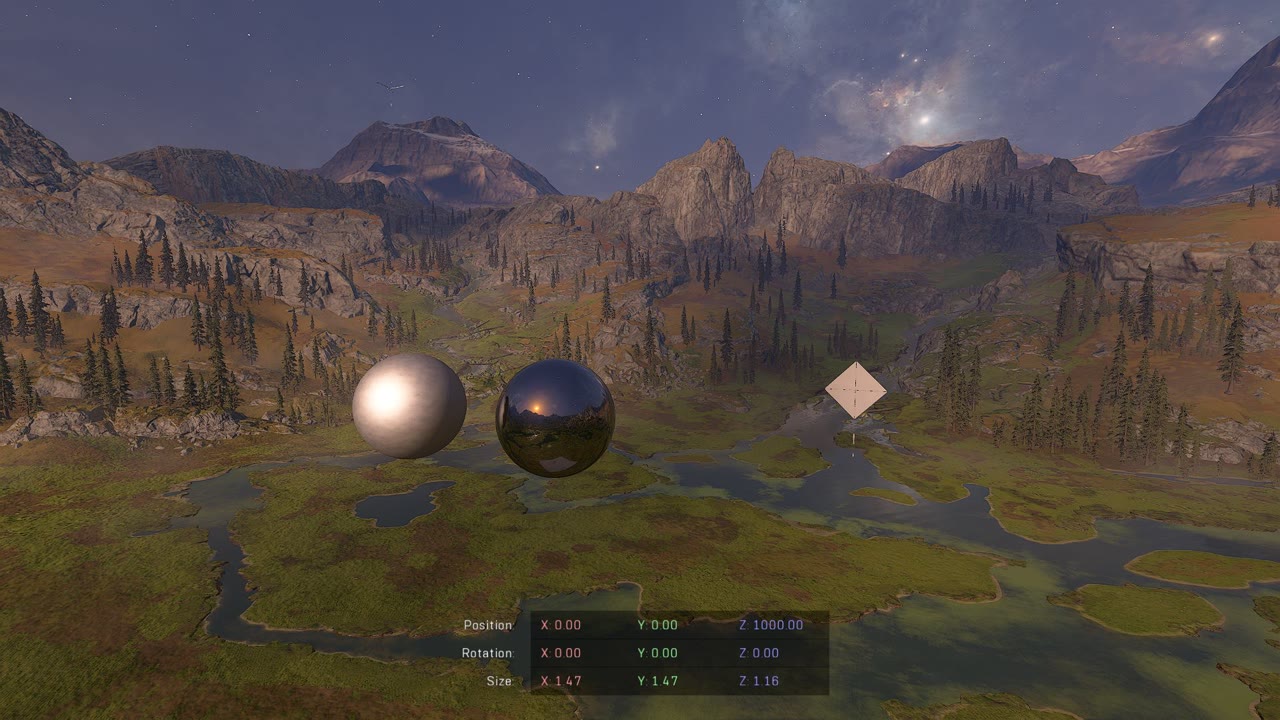
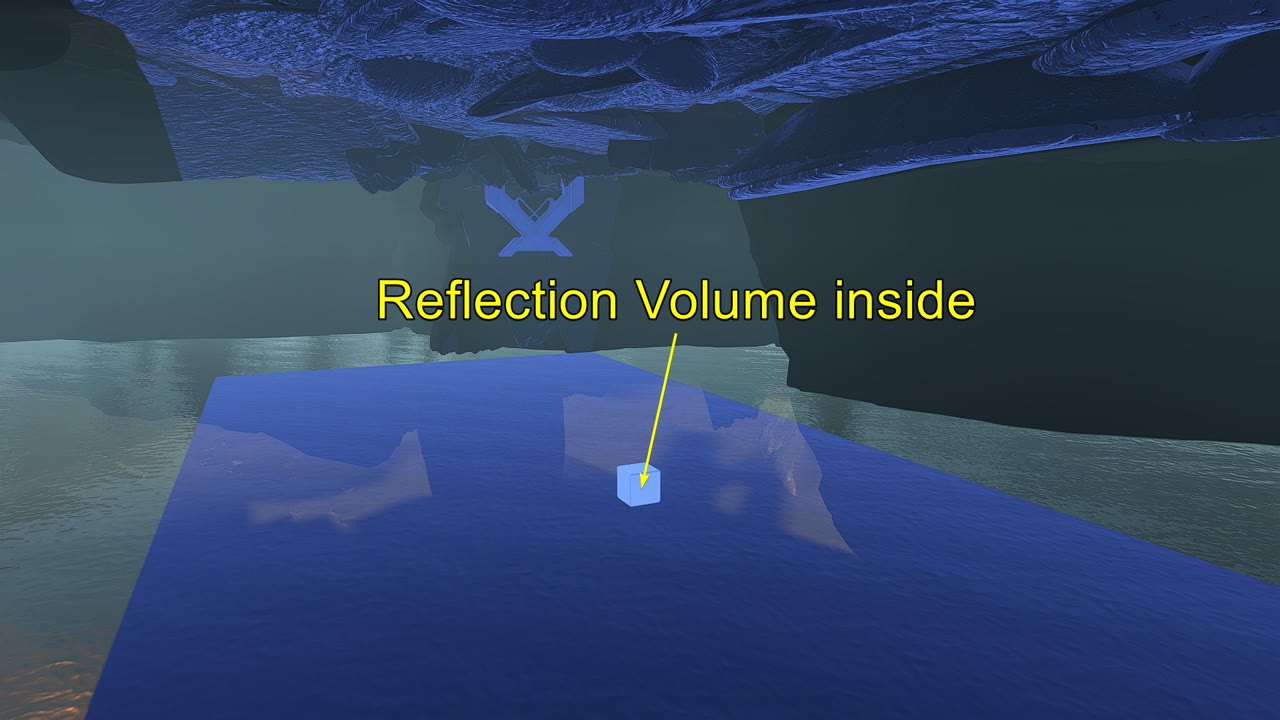
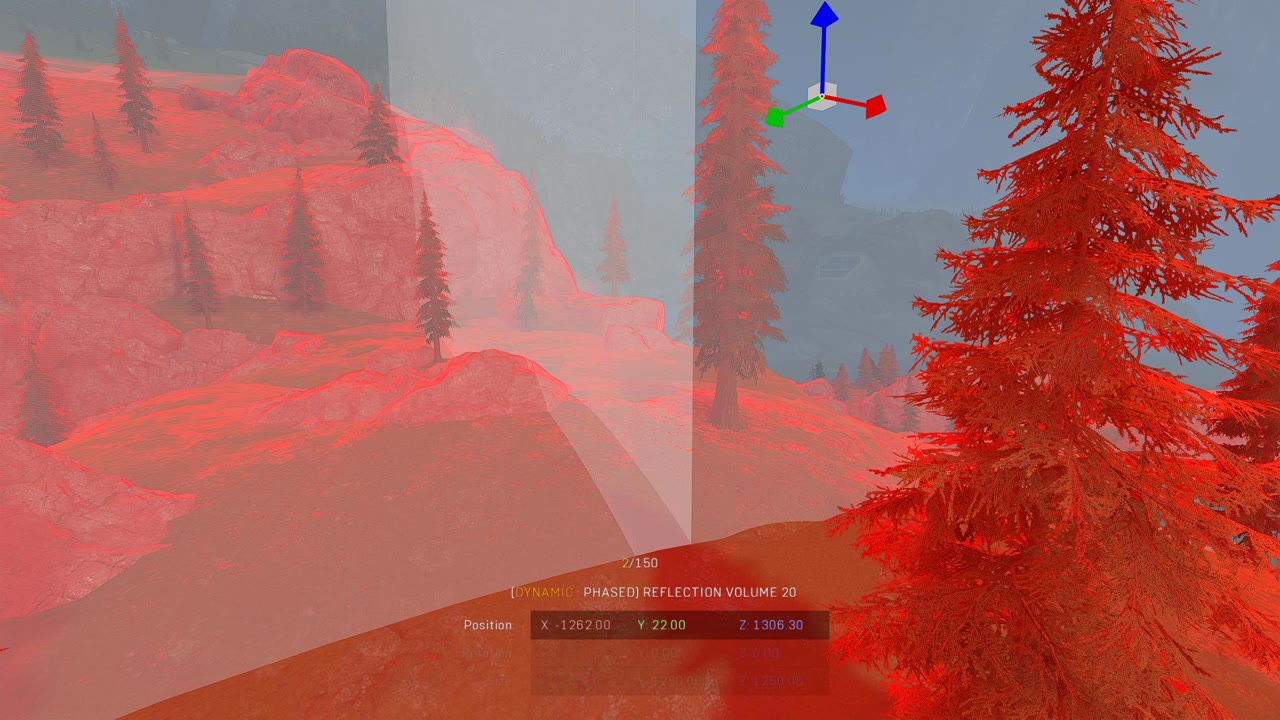
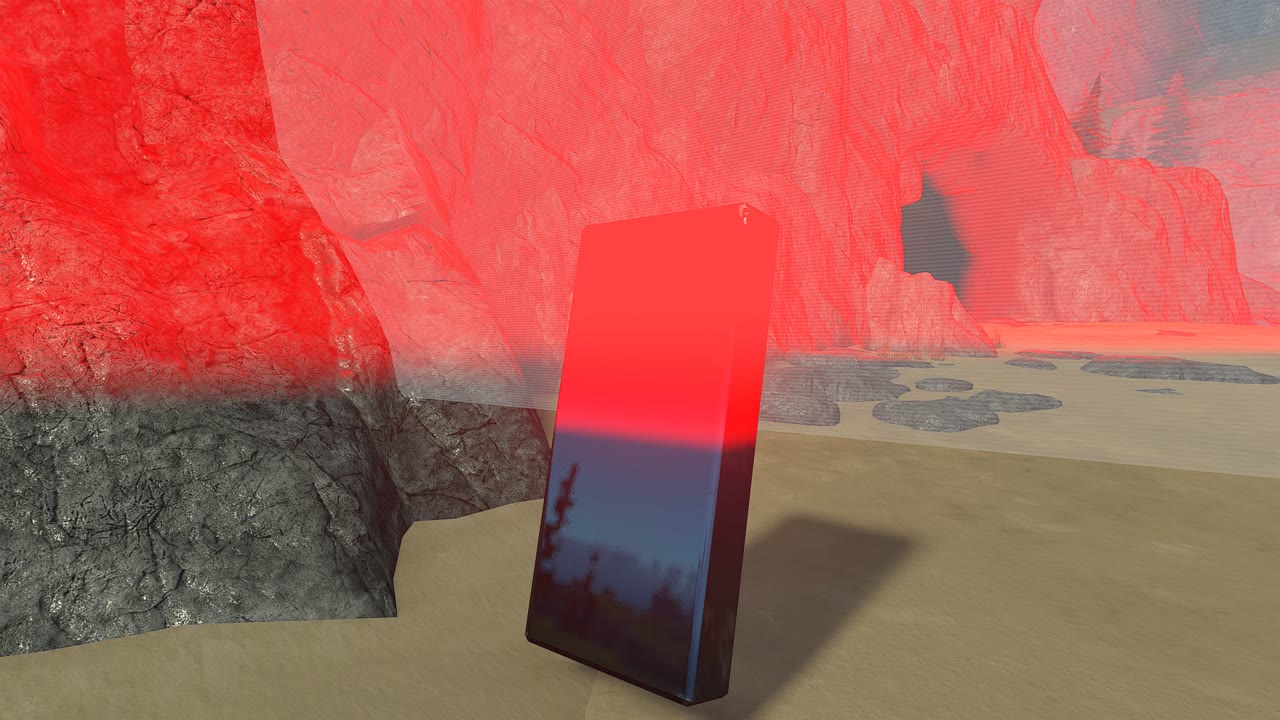
- Red = Blend On Top: On
- Blue = Blend On Top: Off
- Yellow = Global Reflection
Custom reflection implementation
I had not seen something like this ever done on a Halo Infinite map before, and I believe to be the first to implement something like it, so I had to do some experimenting first to ensure it would work.
Forge World Global Reflection
A crucial part of having this reflection setup work is us luckily having a great Global Reflection in the first place. This was something that I had in mind when building the map in Blender, but due to the sheer size of Forge World which took up the entire forgeable canvas, there wouldn't have been any other options to position the map based on the location of the Global Reflection at 0,0,1000.
So luckily that coordinate happened to be out in the open with a clear view of the skybox mountains and the sky, which would be integral to the water reflection working out so well in the end.
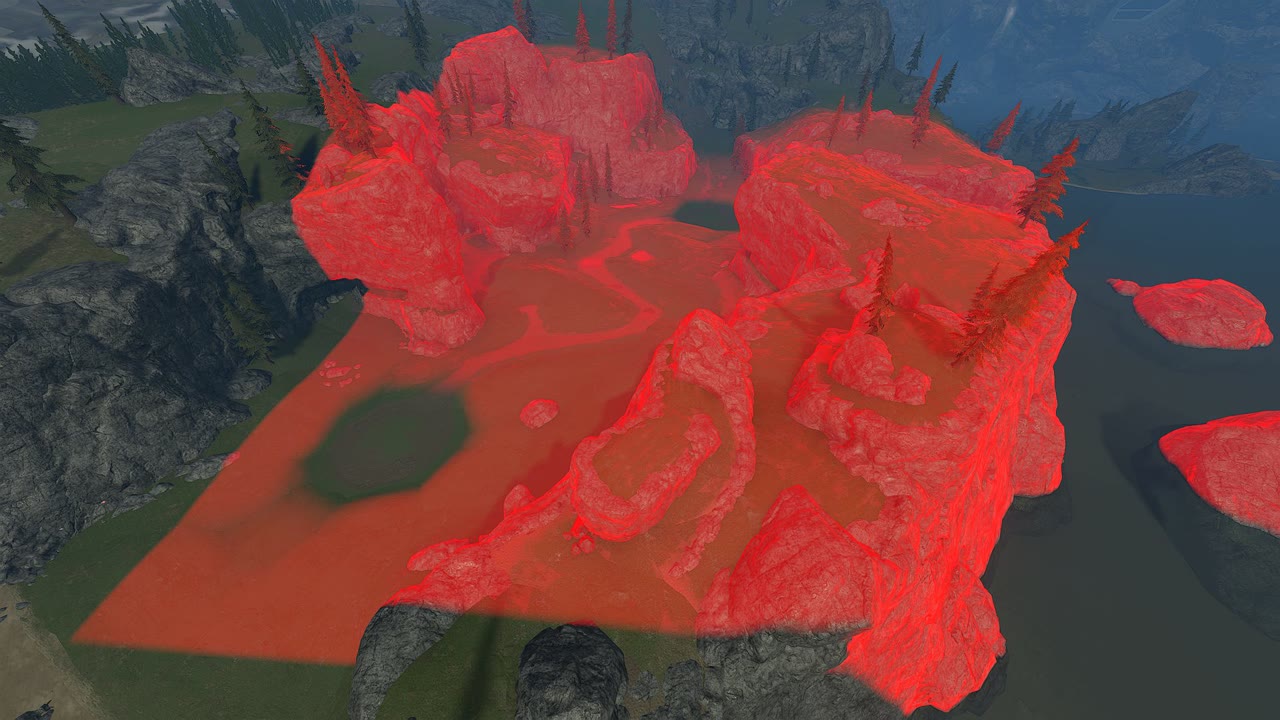
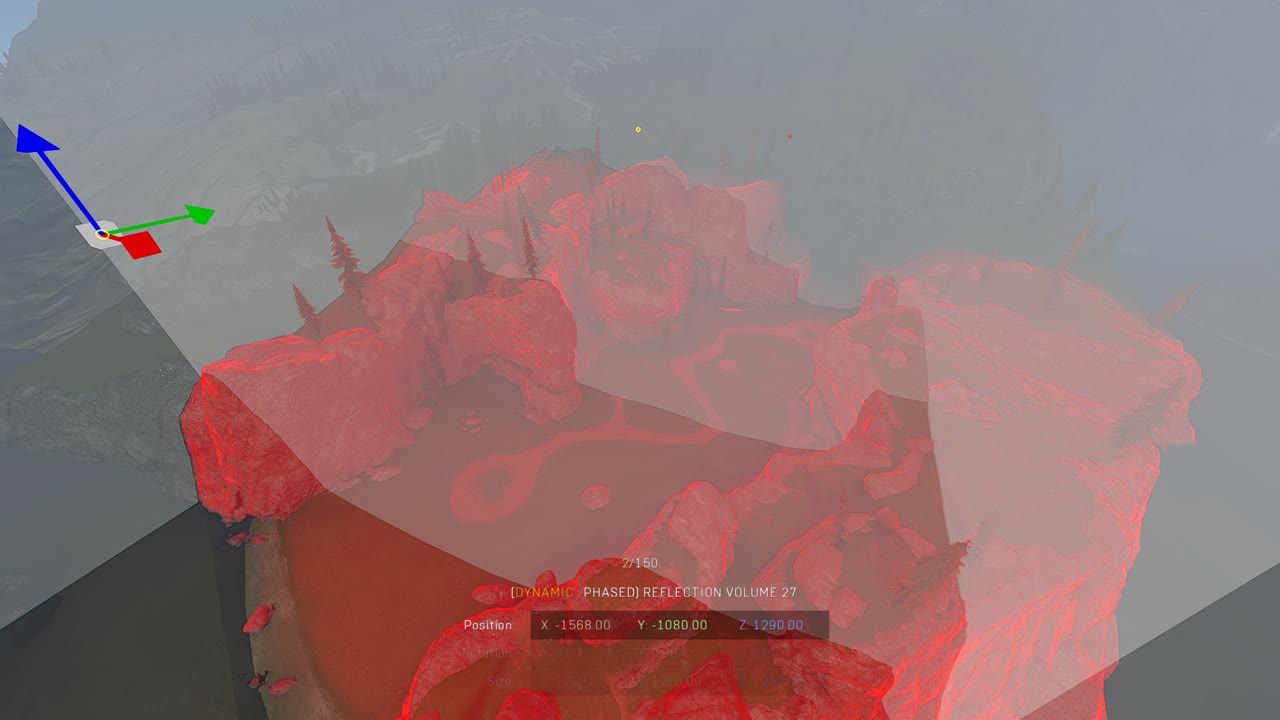
Covering the canvas
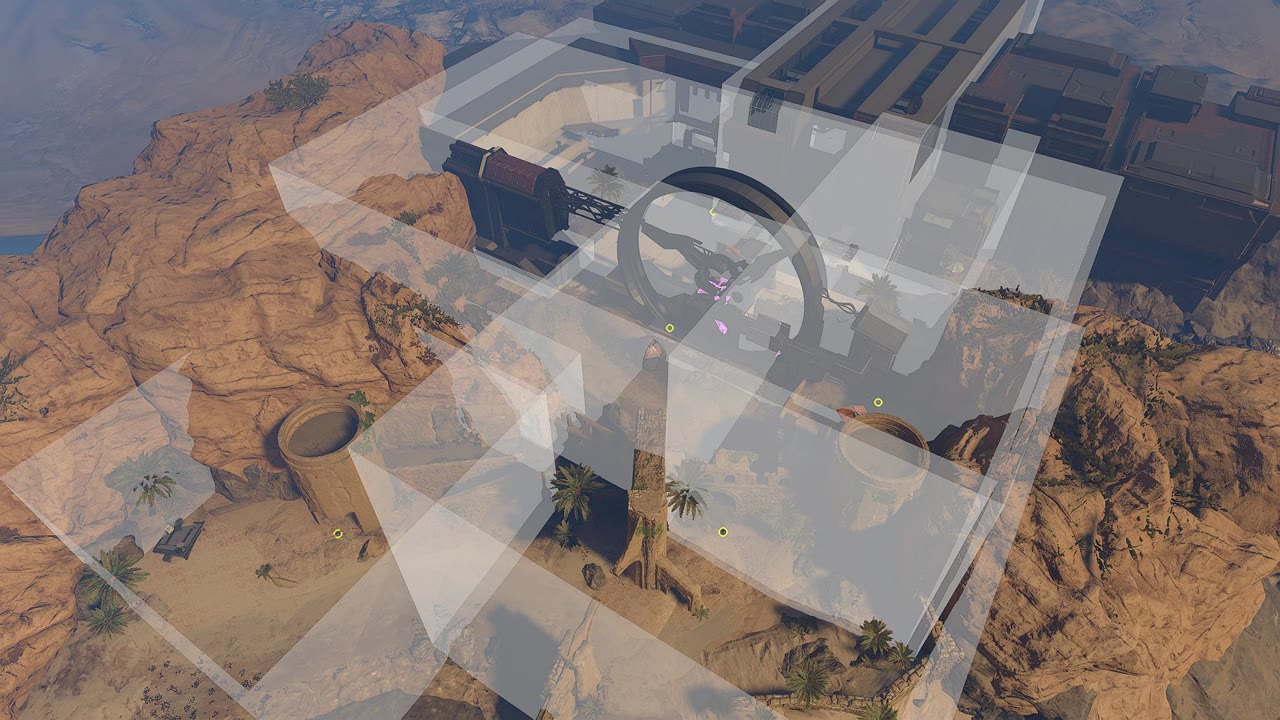
I started by researching how many Reflection Volumes would be required to cover up the entire canvas. The maximum size boundary for a Reflection Volume is a 1250x1250x1250 cube and I would need nine of them to cover almost the entire playable space. I positioned the group of nine volumes so that they just about covered the entire interior of the Coliseum on one end and extended as far into the Gulch as possible on the other.
Reflection blend
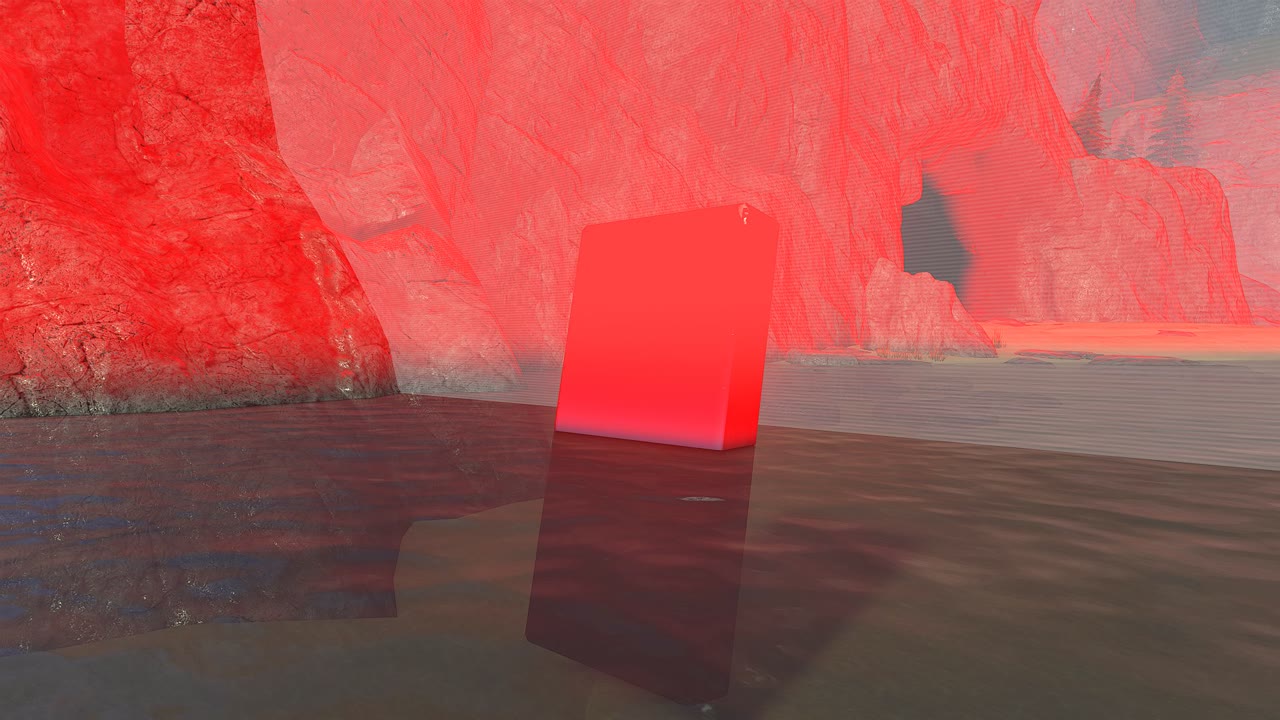
I also had to keep in mind to blend these reflections together smoothly while still making them cover the largest amount of space. Not having a blend value on the Reflection Volumes would lead to an abrupt and noticeable change to the Global Reflection at the edge of the canvas where the volumes didn't reach.
How much the Reflection Volumes overlapped was very precise as overlapping them too much led to a smaller total area coverage and not overlapping them enough had the Global Reflection leaking out in between the two Reflection Volumes. During this testing phase, I used a bright red emissive texture around the custom Reflection Volumes so I could easily see the areas that they were affecting, and where the Global Reflection was taking over. In the end I went with a 10-unit blend distance with and overlap of 14 units per volume, which seemed to strike a good balance.
Boundary at sea level
The height of the Reflection Volume boundary was extremely important as I wouldn't want the custom reflections to be applied to the water at the sea level, which was the whole point for this odd solution in the first place. I positioned the Reflection Volumes so that their boundary would just about skim the water level by 0.4 units, but as they had a 10-unit transparency fade on the outer edges, the reflection wouldn't be noticeable on the water.
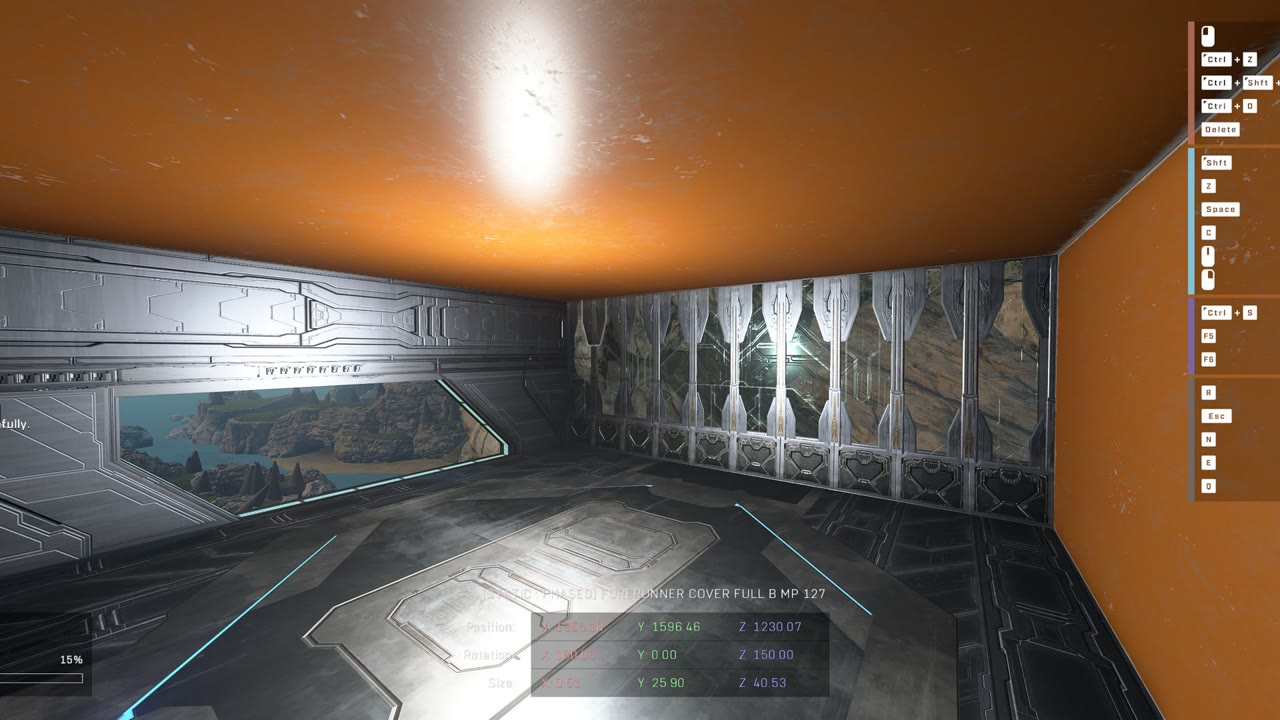
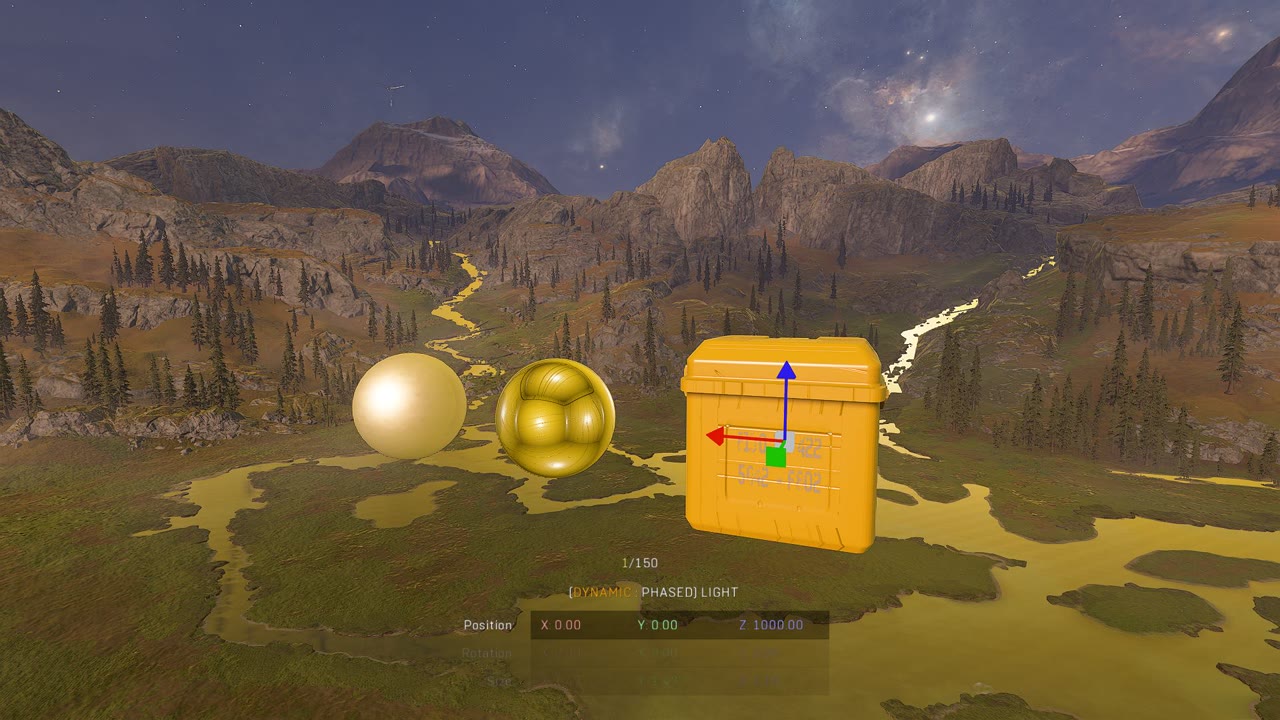
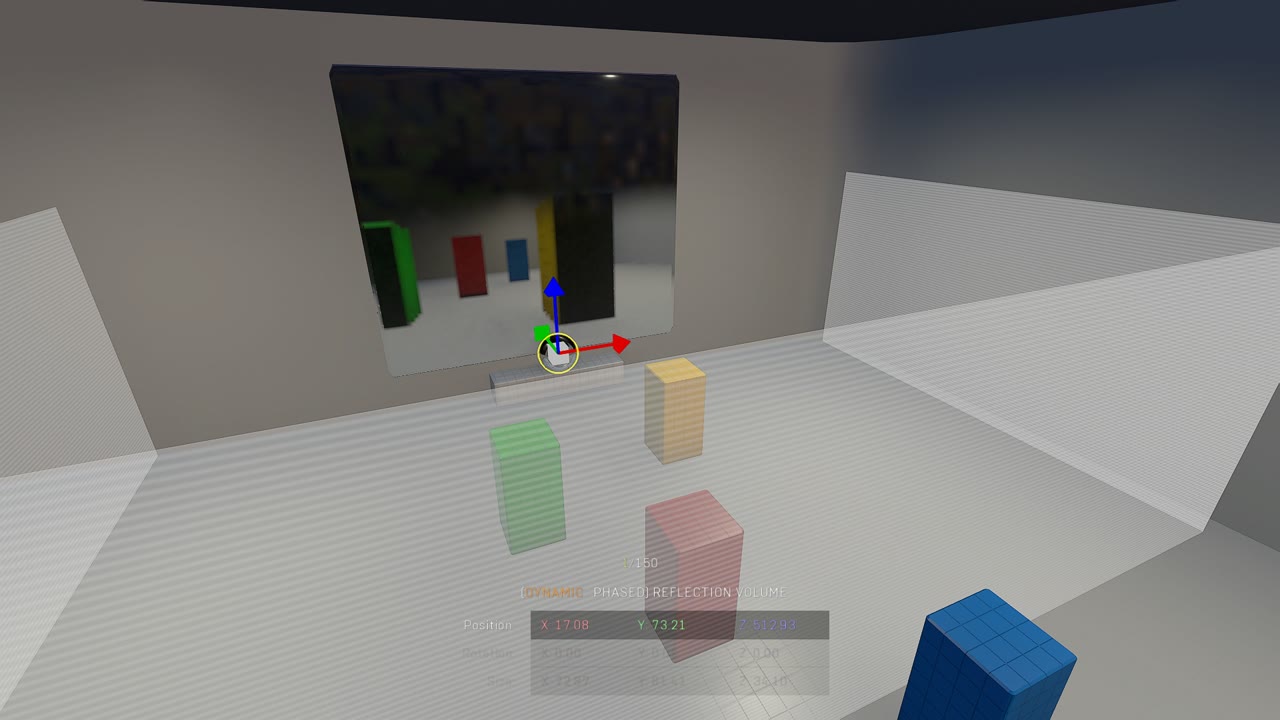
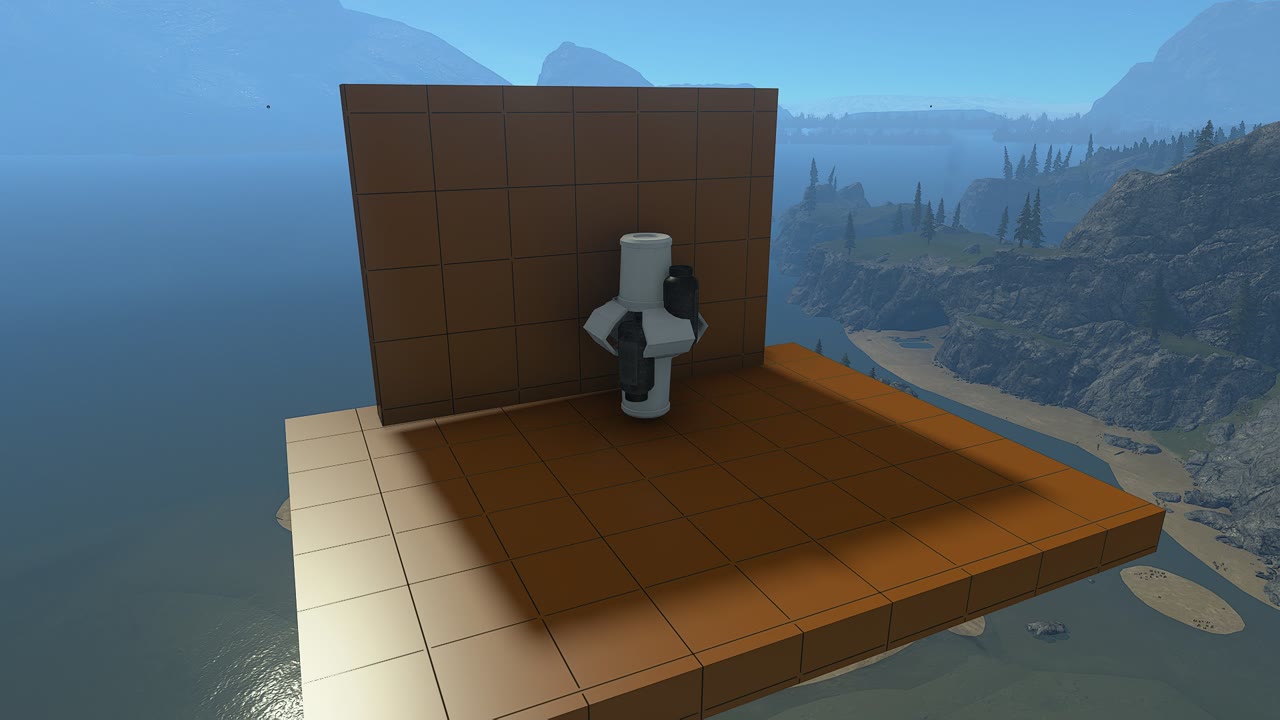
Small custom texture object
If a very small object is used to cover the origin point of the Reflection Volume, the small object will only be rendered for the player if they are close enough to it. This trick can be used to have Reflection Volumes in visible areas while still mostly hiding the custom textured geo around it. I used this knowledge as I had to position the Reflection Volumes in the sky. Luckily, they are pretty high up and the objects are small so players may only find them if they accidentally fly past them, or if a map is unfortunately positioned in the sky right next to one of them.
I initially used two small objects for this: The caps of an open bottle object against each other, as they were the only objects I found with a hollow sphere on the inside. This produced an even texture on the inside and also allowed for changing the top and bottom texture individually. Later I would change the object, but for now it was this:
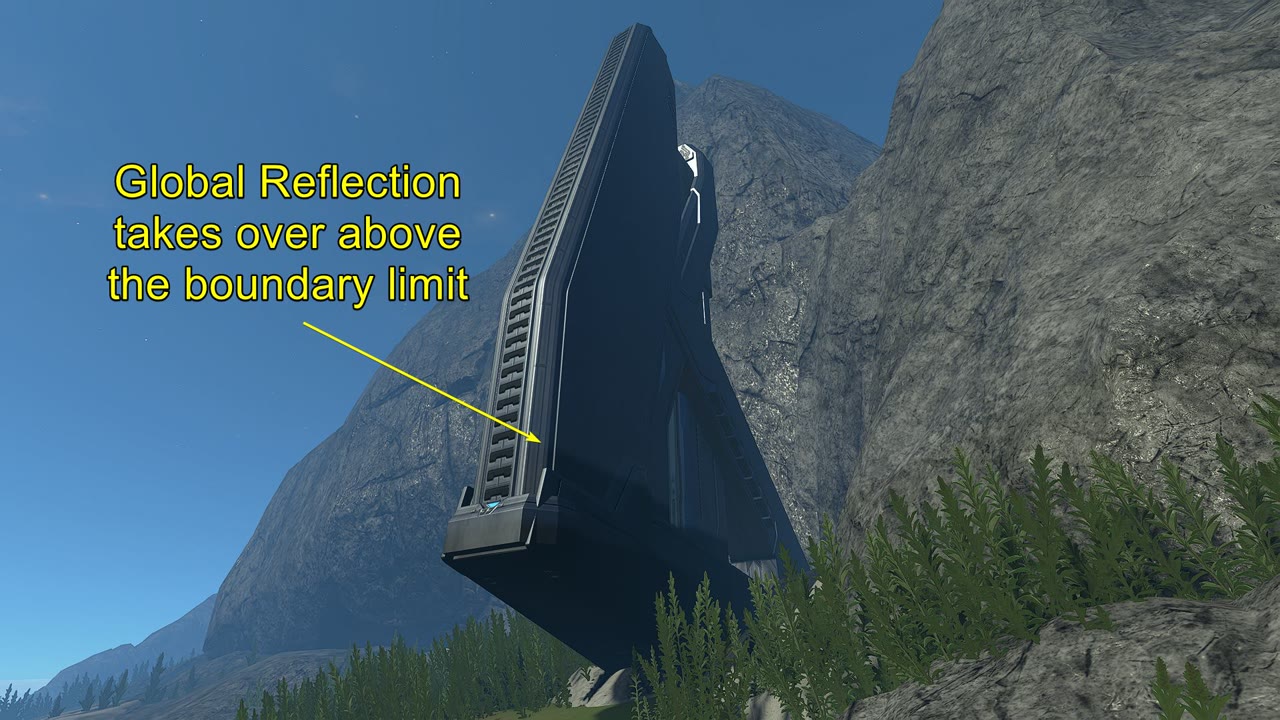
Custom reflection edge
Luckily since the sea level on our Forge World remake was at 681.68 units and the Reflection Volume height was a maximum 1250, the boundary of the Reflection Volume would nearly reach the limit of the forgeable space, leaving just 68.72 units of space from the 2000-unit canvas ceiling where the Global Reflection would take over. The only structure that this top reflection cut-off would be somewhat visible on was the Forerunner Beam Emitter (covered later) that had a portion of it in the playable space and the rest in the skybox where the Global Reflection took over. The reflection change was indistinguishable everywhere else due to the smooth blend and lack of highly reflective surfaces.
Gulch reflection fix
As our Forge World map took up the entire forgeable canvas, the nine Reflection Volumes didn't quite reach it from end-to-end; leaving a small portion of the Gulch still without a custom reflection. The Gulch also had a secondary issue where the terrain level in the circular base areas dipped below the sea level, so the Global Reflection would take over. As a solution to this, I placed two extra Reflection Volumes in the Gulch to combat both of these problems while still staying under the total Reflection Volume limit of 15.
One Reflection Volume was used to extend the covered area, and another was used to cover the two spots below sea level. Luckily the maximum boundary size of 1250x1250 just about reached both circular areas.
A side-effect of having these custom reflections for the entire Gulch was that the water puddles had the custom reflections applied to them instead of being the same color as the sea, but in my opinion, they looked better once I would actually set up the correct reflection texture on them.
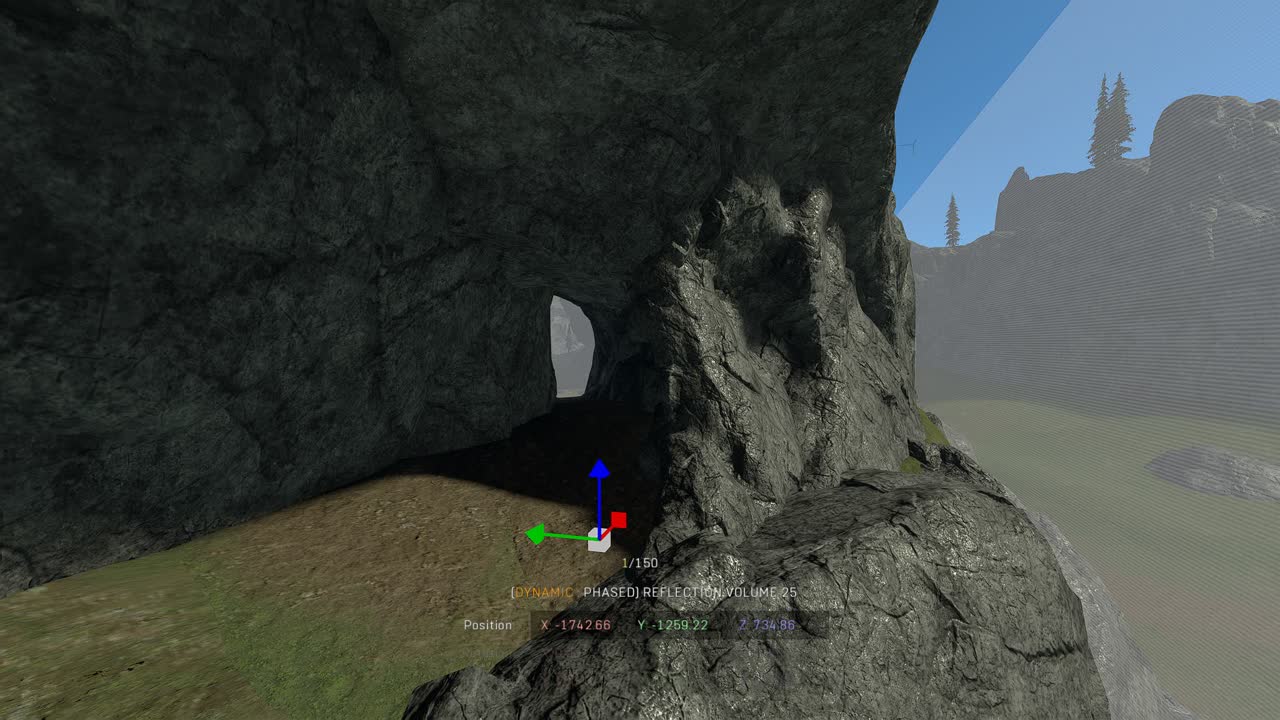
Extra reflections
With the custom reflections taking up 11/15 total Reflection Volumes, there was still space for four more Reflection Volumes to be placed in areas of the map that benefitted from them. I followed what Scrub and Virus had previously set up on the map where Reflection Volumes were placed in tunnels and caves that required a darker reflection than what would be the generic Forerunner grey everywhere else. Luckily four Reflection Volumes was exactly enough to suit the locations of Forge World that needed them.


Custom reflection texture
After all the setup of figuring out how the entire map can be covered with Reflection Volumes, it was time to hone in the actual reflection itself. The same reflection would be used on all 11 Reflection Volumes to ensure consistency across the whole map.
I already had previous experience creating a generic Forerunner grey reflection texture as I was experimenting with it on a different project, so I thought it would be a relatively simple process. It didn't take long before I had an acceptable reflection texture that looked good all around the map. I took some progress images to show for the team and thought I was done with the custom reflection endeavor.


Sunlight glare
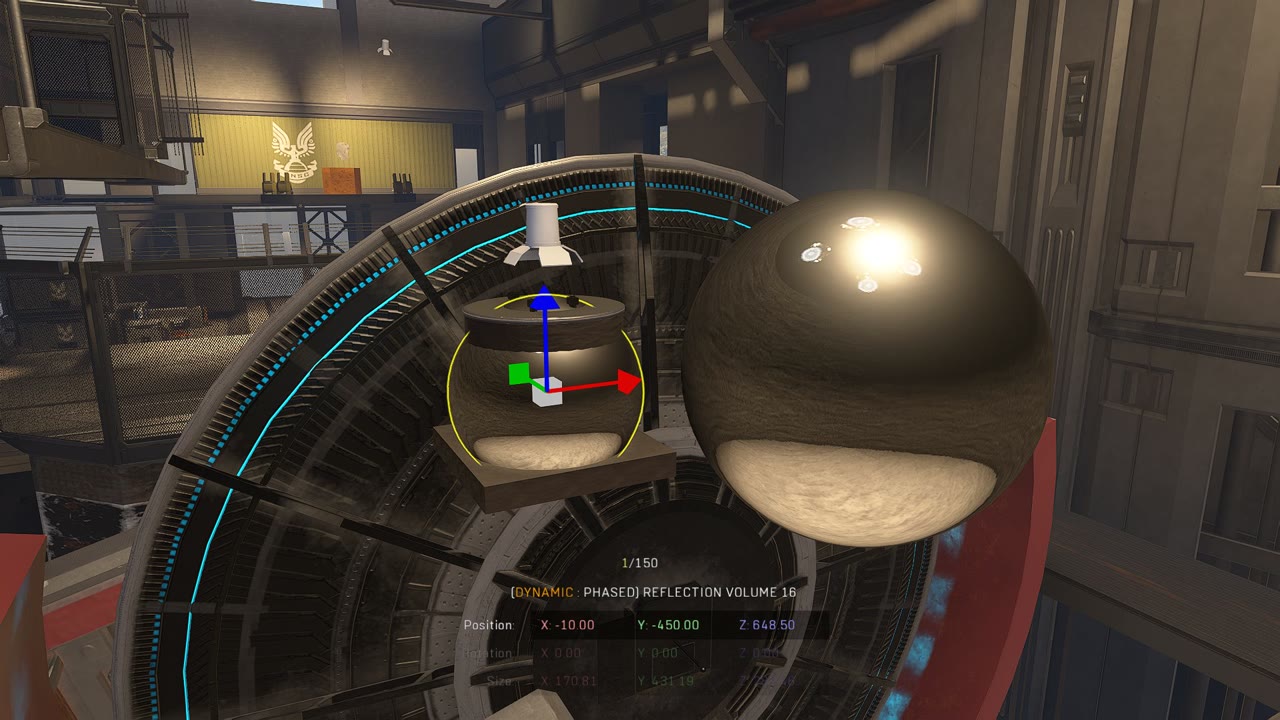
Flying around on the map the next day, I couldn't help but notice how inconsistent the reflection inside the Coliseum looked. I tried adjusting the lighting levels in the Coliseum, but it didn't fix it. It wasn't until I adjusted the Reflection Volume used for that area that I realized the problem, and it was going to be an annoying one to fix.

The custom textured object surrounding the Reflection Volume's origin point was so small that it didn't cast a shadow on its inner texture, so the sunlight would leak through the object and show one side tinted gold in the reflection image, which completely broke the even texture that I was pursuing. I cycled through the entire list of material swatches available in Forge, but found no adequate material which would ignore the glare of the sunlight. The only swatches which ignored the glare were the "Emissive" swatches, but getting a perfect dark grey tint was impossible on them, and I thought I was out of options.
Casting a shadow
After some thinking of trying to solve the problem, I thought about the root cause: What if I block the sunlight from getting to it in the first place? I did some testing with small objects surrounding the bottle caps around the Reflection Volume, but realized that they, too, were too small to cast a shadow on the texture. Realizing that I might need to majorly compromise how seamless the custom reflection setup would be if I had to cover up each Reflection Volume with large objects to block the sunlight, I almost got frustrated and gave up.
Then as I was trying to recall any remaining potential solution to the problem from my years for experience with Infinite's Forge and all its quirks, I realized there was one very specific object that may just work as a solution.
The invisible-fence-that-nobody-uses-but-also-casts-a-shadow-for-some-reason
There is exactly one object in Halo Infinite Forge that can be made completely invisible, still have it cast a shadow and be scaled very small. The Chain link Fence - Non-Telescoping in the Accents > Fences category is the fence that would solve the shadow casting issue.
Let's break down why this object works in this situation:
- Has a transparency layer on swatch 1 — As this is a fence object with a see-through section, it has a transparency layer on it. This is crucial, as if a blank material is applied on swatches 2 and 3, they will inherit the material from swatch 1. If the swatch 1 material is also set to blank, the object will become completely invisible!
- Casts a shadow — This object has the property of casting a shadow. All other objects with a transparency layer that are nearly invisible such as the Glass Transparent 10% do not cast a shadow.

- Can be scaled down very small — In my case, this was also important as I needed as small of an object as possible to surround the Reflection Volume with in order for the object's collision to not cause issues with projectiles. (The "No Collision" physics on objects still block projectiles)
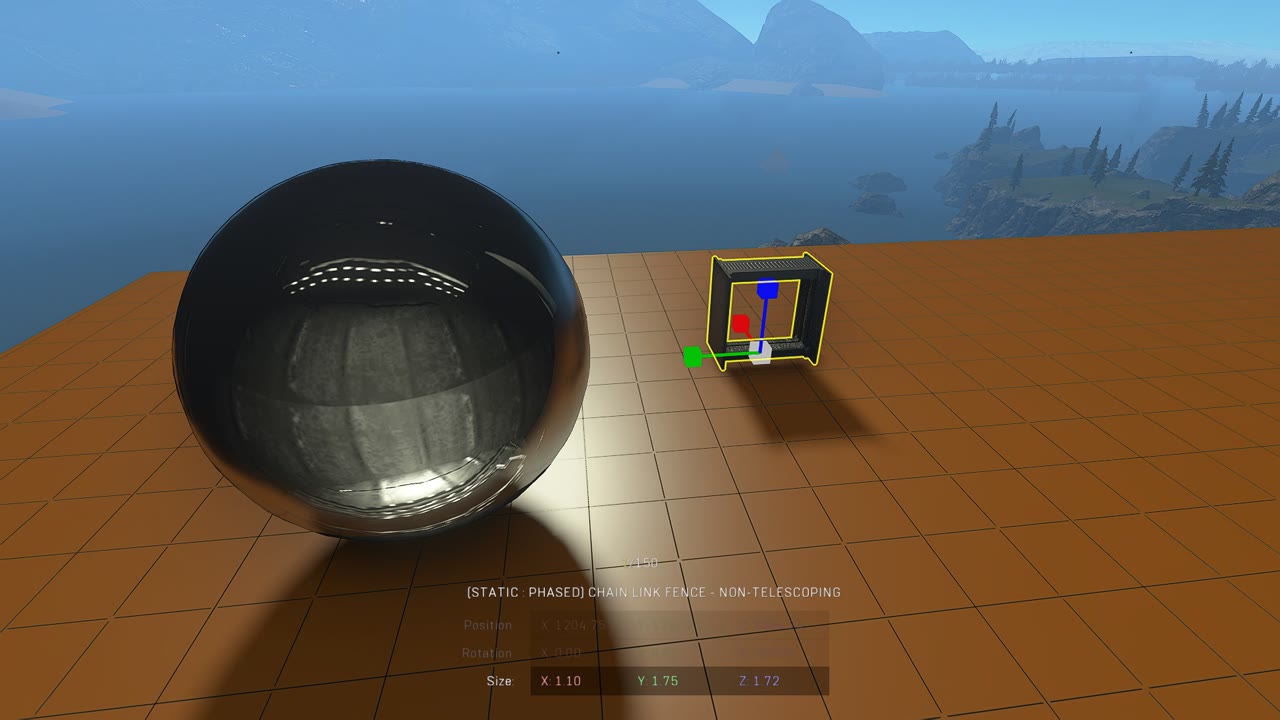
I used two of these fence objects to cover the entire geo around the Reflection Volume's origin point at just large enough of a scale where a shadow was cast on the object. I then turned the fences invisible so it looked like there was nothing there to begin with.
Piece optimization
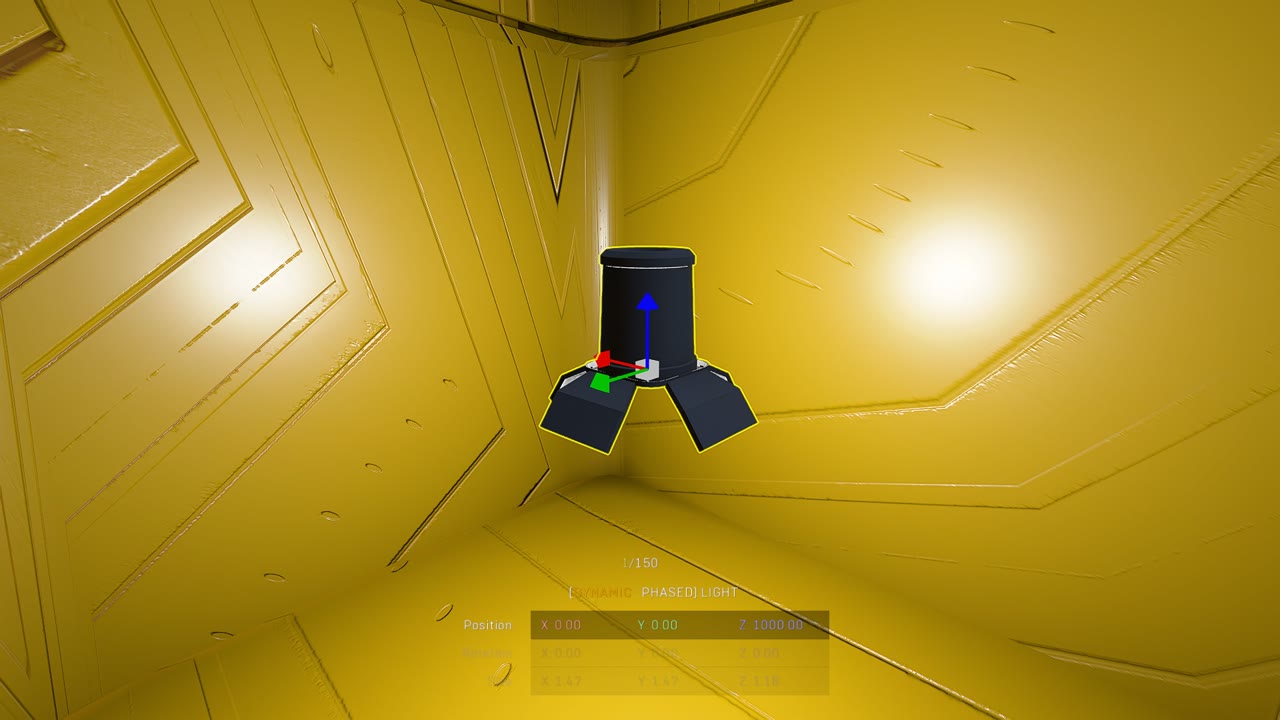
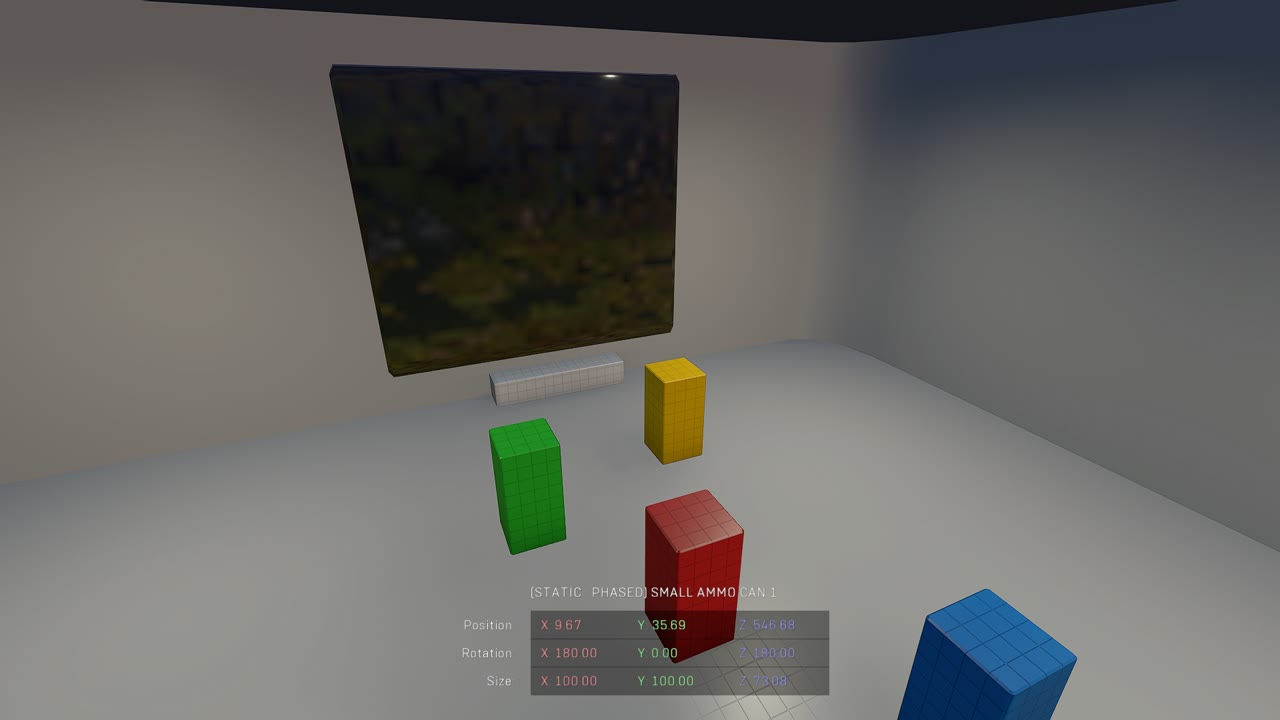
Now that I was adding two more objects to each custom Reflection Volume setup in the form of the invisible fences, I experimented a little to see if I could reduce the object count per custom Reflection as each object would equal 11 objects saved.
I swapped the two bottle caps in exchange for a single crate object, the Small Ammo Can, which was a fully closed-off container, but with the inside being textured — something that was an anomaly with objects in Forge's palette. I also removed one of the lights, now resulting in a total object count of 5 per custom Reflection Volume. This object count was exactly the same as with the previous setup, but the difference here was that this had no glare issues!
Properties transfer bug
Another crucial, but easily overlooked part of getting the glare to not show up on the Small Ammo Can was applying the "Blank" material on swatch 1, which on the Small Ammo Can can't normally be modified. In order to change this swatch, I had to select an object that had an adjustable swatch 1, and perform an exploit where I'm opening the Object Properties of one object, while actually having another selected. An example of this exploit is shown here.
Finalizing the reflection texture
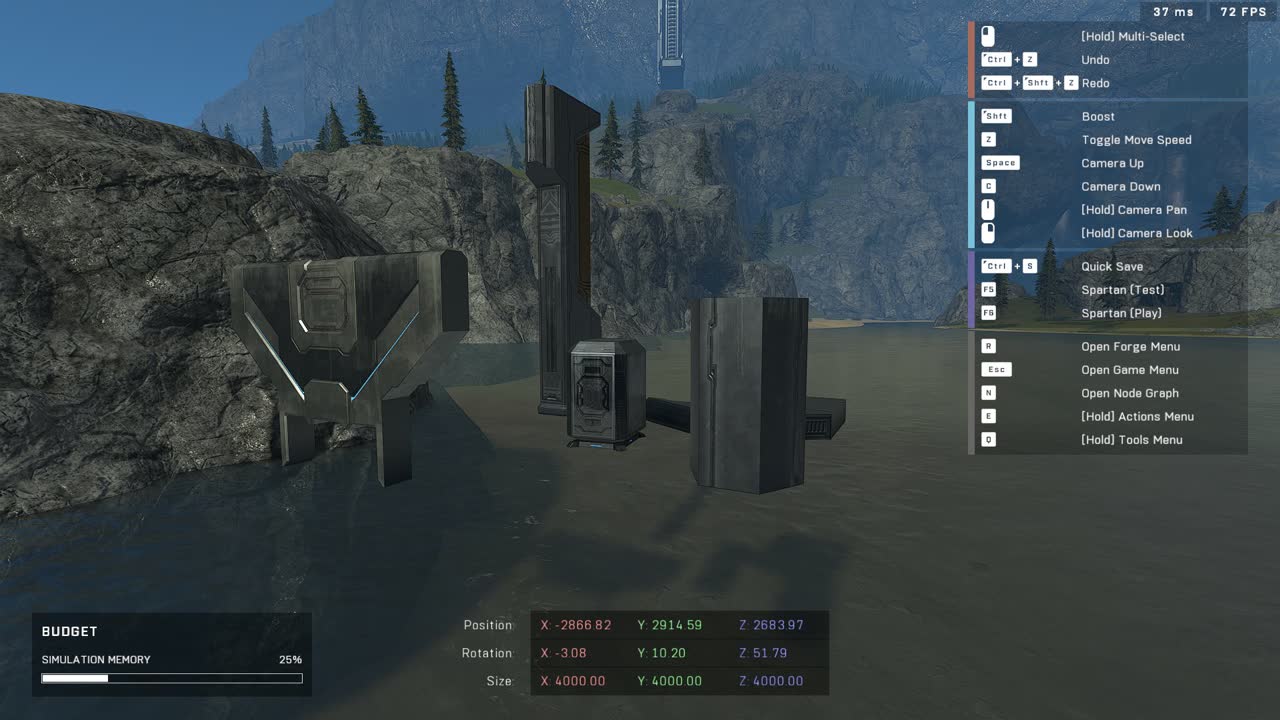
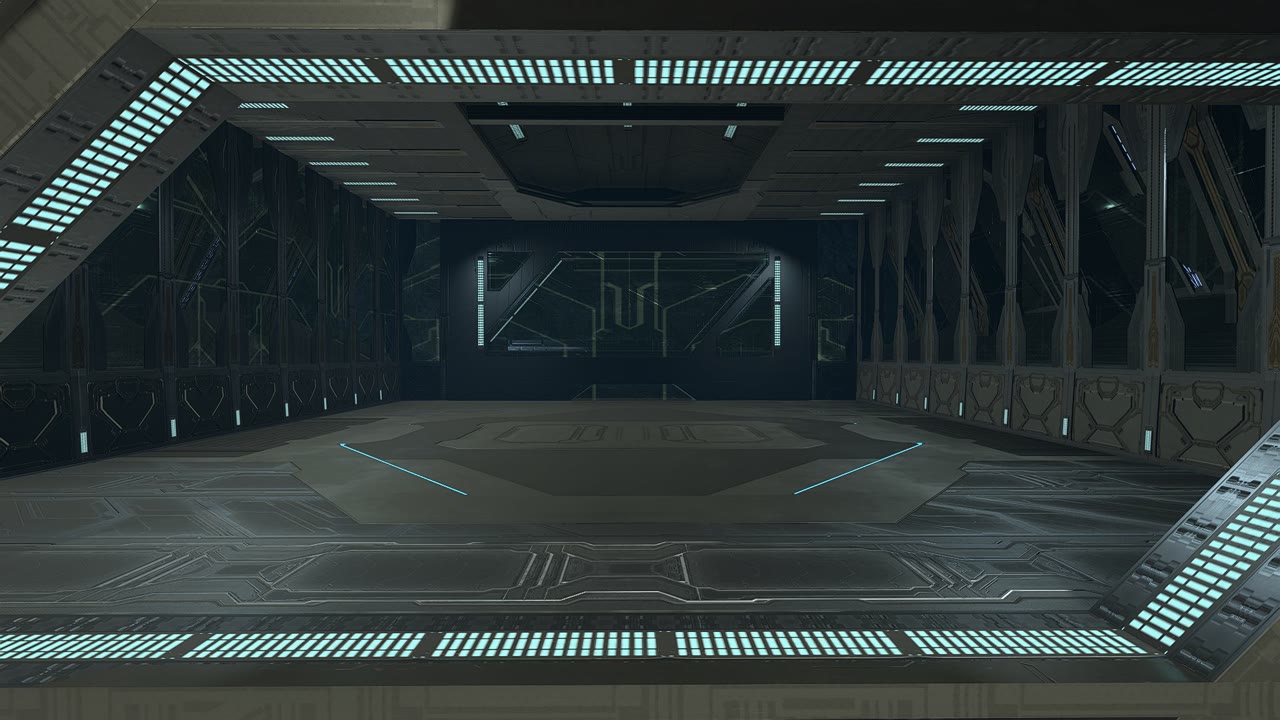
Now finally being at the stage where I can refine the reflection texture, I did some more comparison tests. This time instead of just using singular Forerunner MP objects to determine if the reflections looked good everywhere, I temporarily imported large Forerunner structures that would give me an accurate representation of what the reflection looked like on larger scale reflective structures.
I placed prefabs of Hemorrhage base recreations by Scrub and an entire map remake called "BTB Fortress" made from blockout pieces with Forerunner materials.

The important part was still to nail down the tint of grey. The detail in the texture wasn't a priority at all, and things like inconsistencies in the Forerunner texture itself wouldn't generally be shown through the reflection. After a long time of comparing screenshots from objects on Halo Reach Forge World and Infinite, I settled on a material that inherited a very faint dark blue as its base color, and I applied a white color on top of it with a 0.30 intensity. This combination seemed to mimic the underlying color of the baked-in reflection of Reach's Forge World objects, and it suited well for our project.
Multiple geometry updates
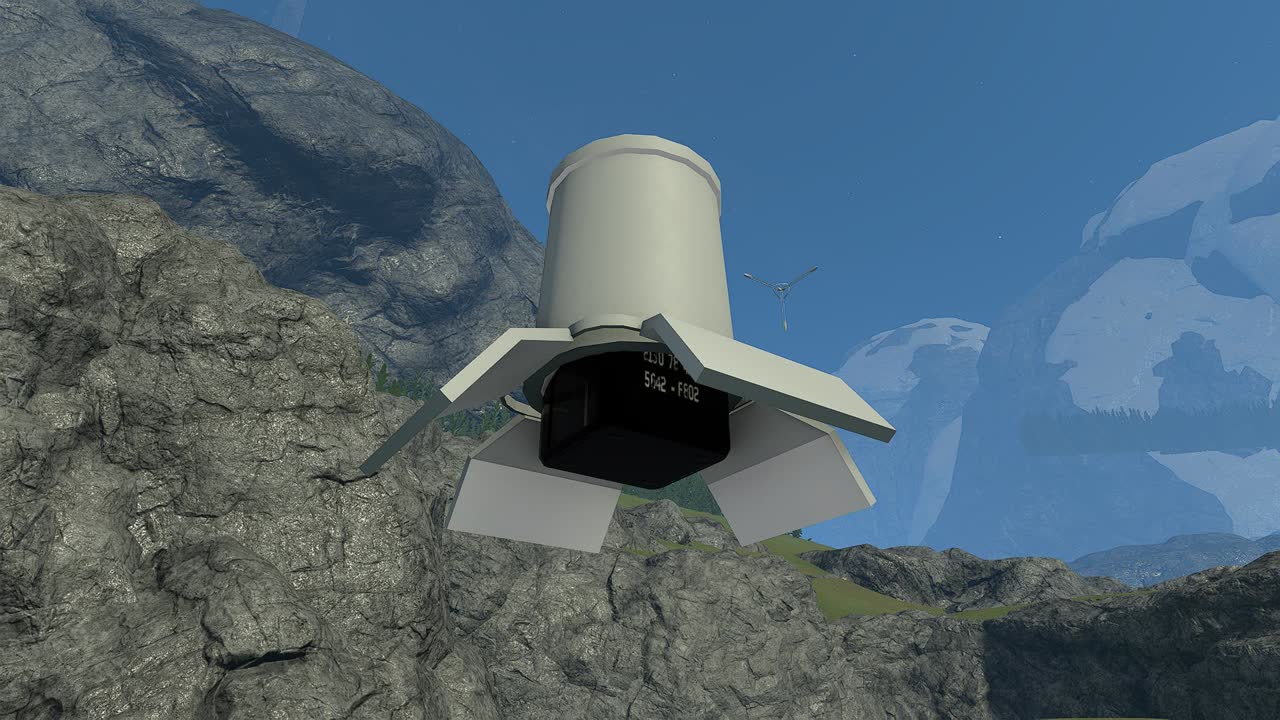
Beam emitter
The beam emitter in the skybox had been initially built by eyeballing its location and shape. As I was updating the mountain skybox geo in Blender, I blocked out the beam emitter with just 9 pieces and printed it in the correct place along with some more accurate terrain surrounding it.
Scrub took lead on arting the blockout beam emitter with Forerunner objects following the theme that the rest of the Forerunner structures did on the map. After some feedback about the light colors on the beam emitter, it was ready in quite a short time.
Scrub recalls the biggest difficulty about arting the beam emitter was trying to emulate the matte finish of the Forerunner textures the beam emitter had in Reach. He wasn't able to get the perfect texture he would've wanted on the structure, but as it would be located in a far corner of the map, it wouldn't matter as much.
Rock adjustments
After the large shapes of the skybox mountains were laid in place, it was time to polish them up and do a final pass on the rock shapes inside the map.
Skybox mountains
At this point there were only the major mountains arted in the skybox, but the spaces in between them were empty, and even some areas had parts of the Arid canvas sand dunes poking out. These parts of the skybox had to be touched up for the skybox to start approaching its final form.
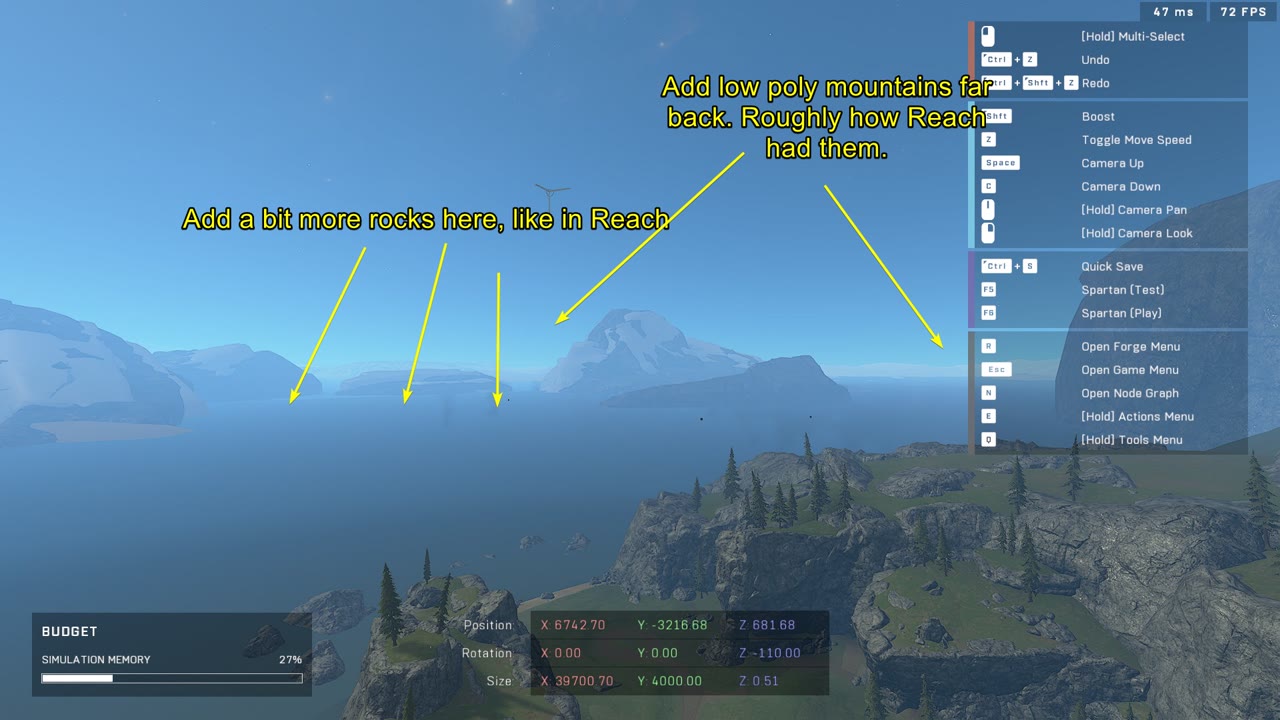
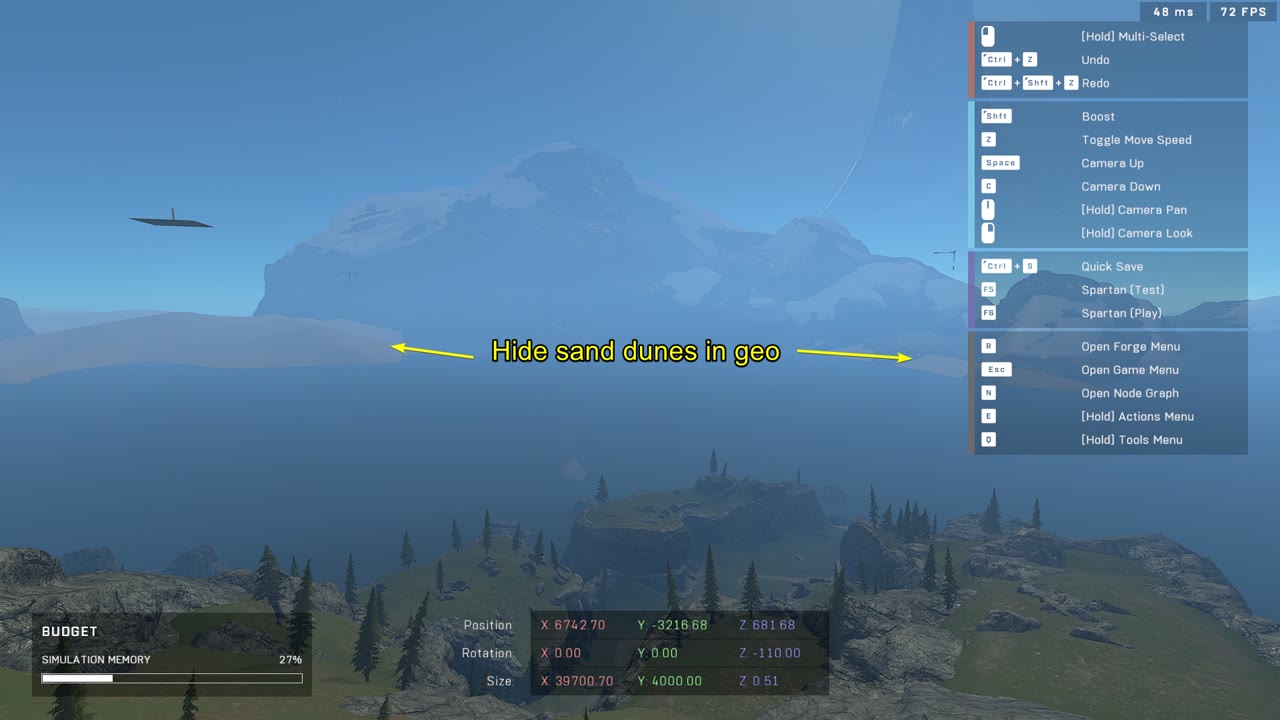
Huber did the initial grunt work hiding the sand dunes and filling out the empty areas with convincing mountains. After some feedback of the initial pass, Scrub refined the skybox geo to bring it more in line to what we were looking to ship with.
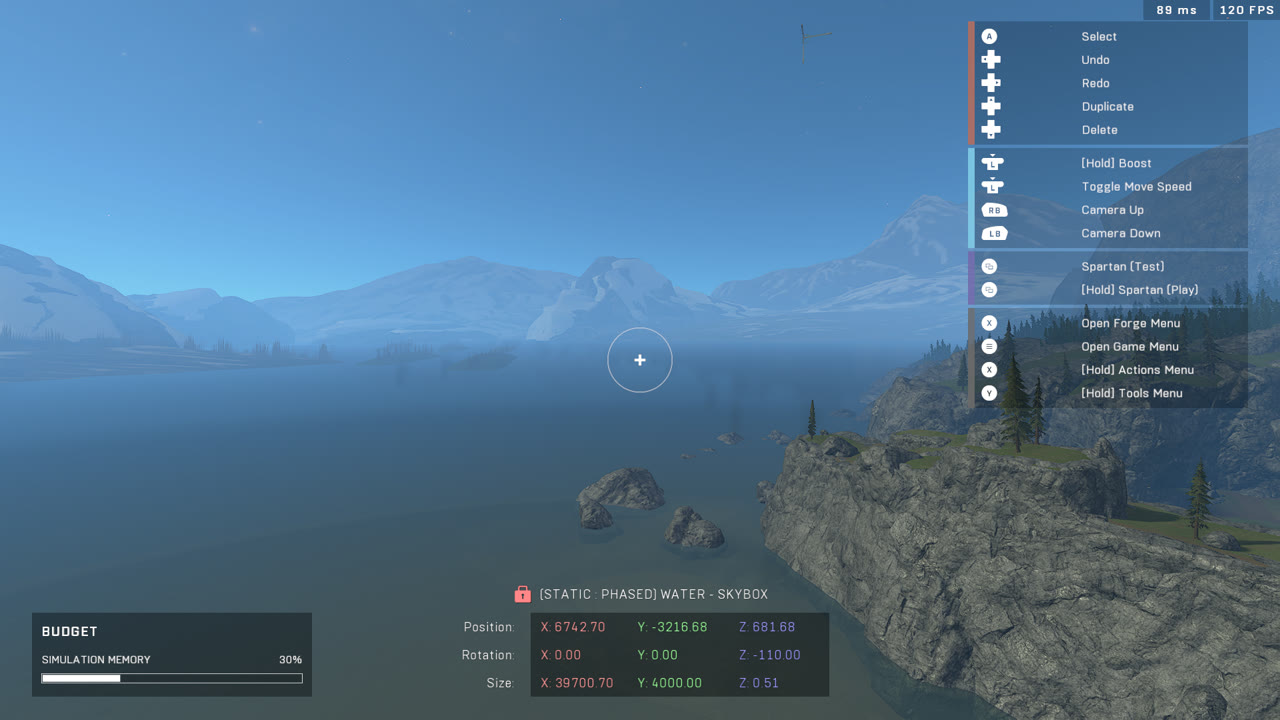
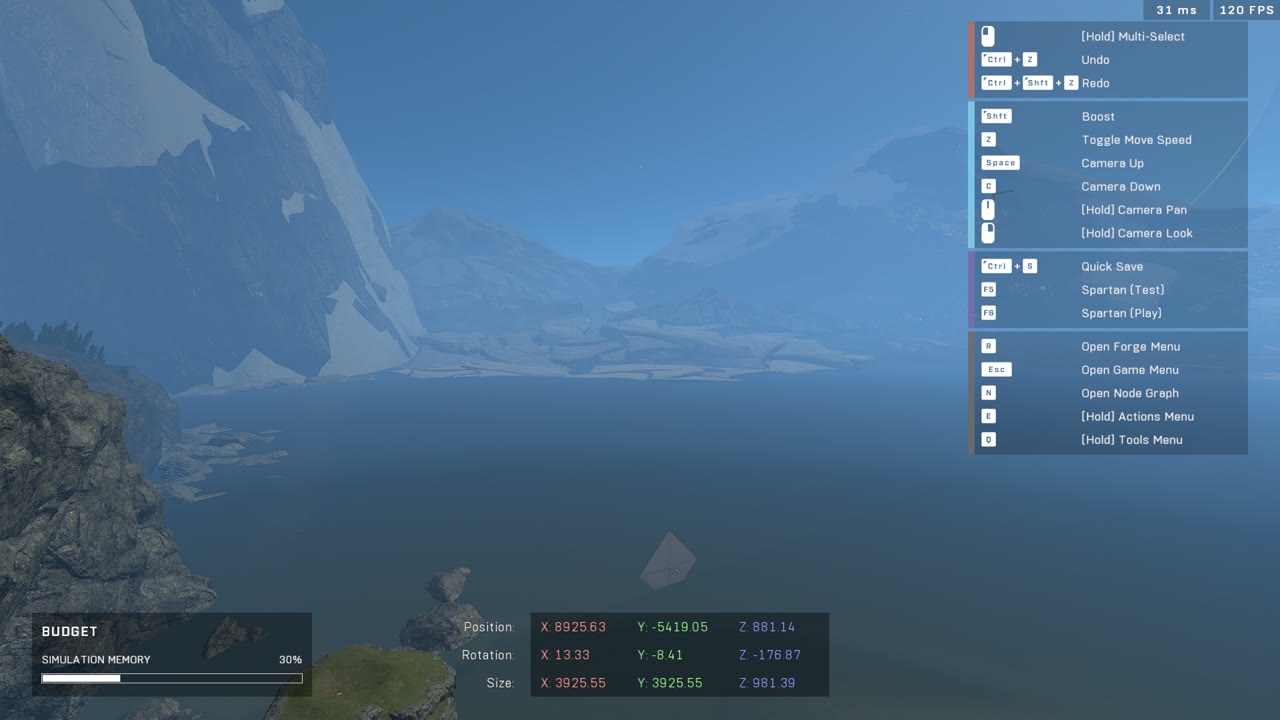
You may notice that one low rock in the water was completely deleted. This was original remade geo from Reach, but as we had to bring the distant mountain geo closer to the map, it looked very off at this scale, so we decided to just cut it in favor of a cleaner skybox horizon.

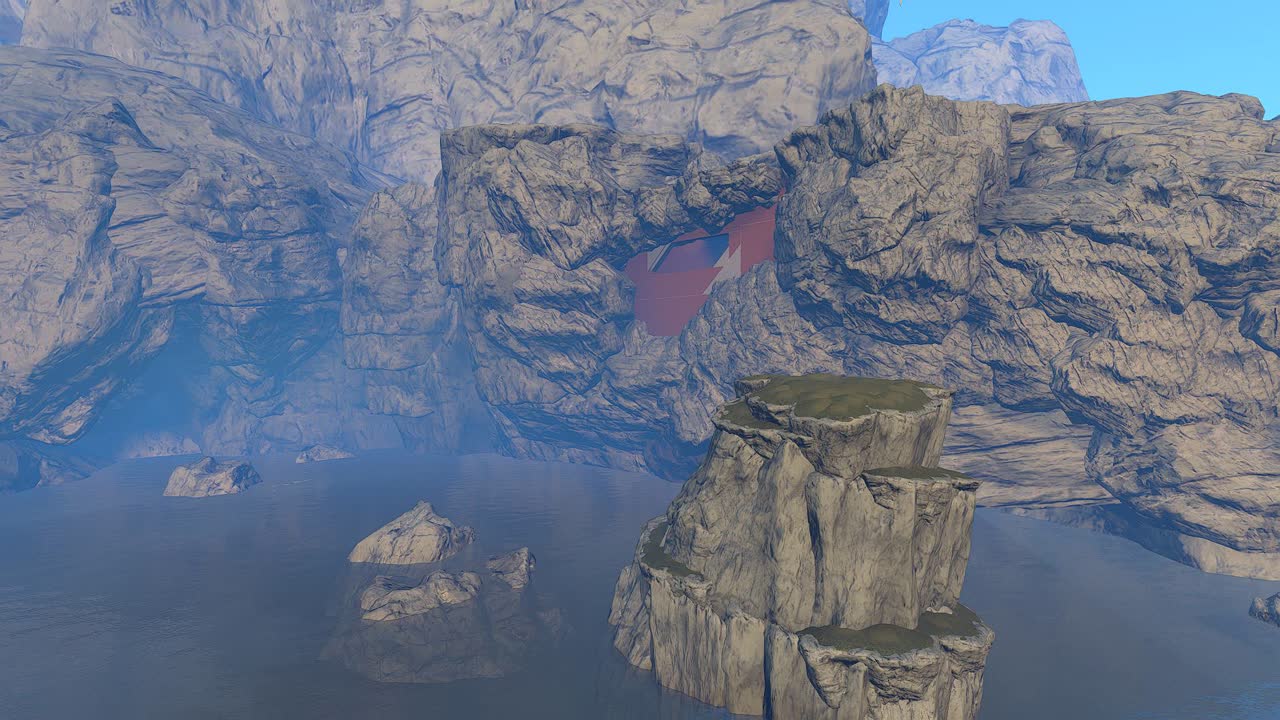
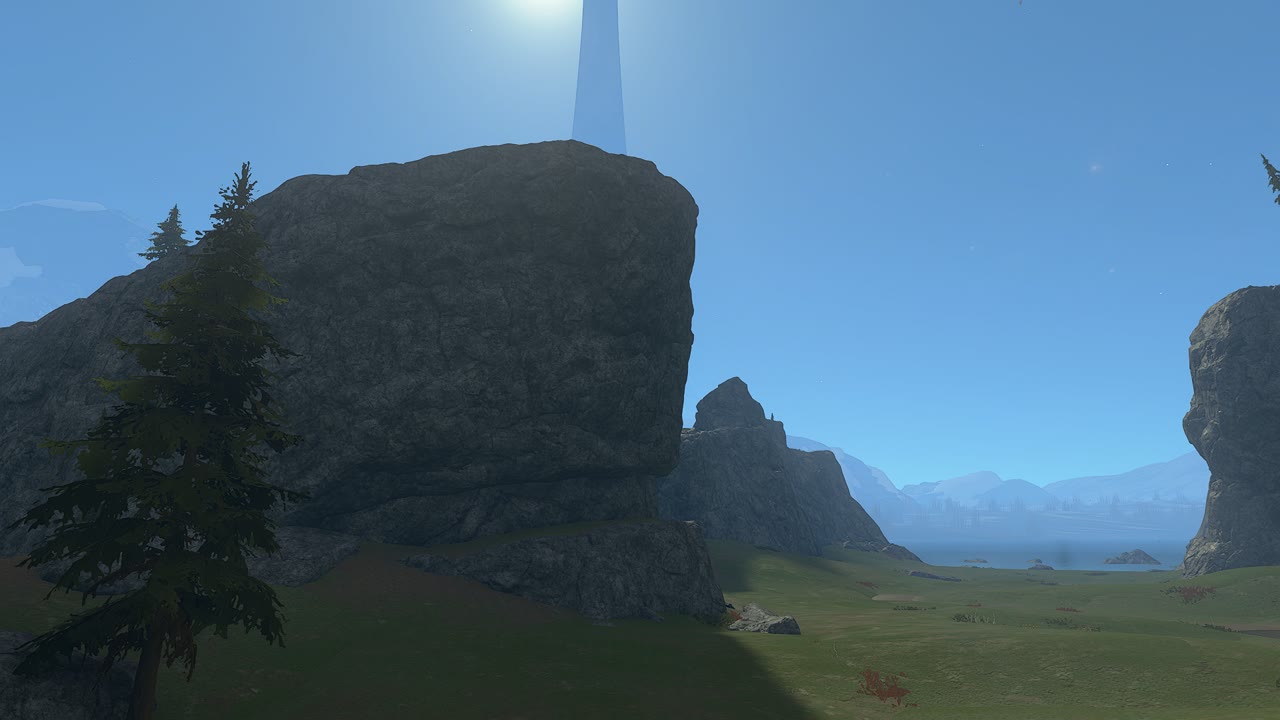
Shark's Mouth rock
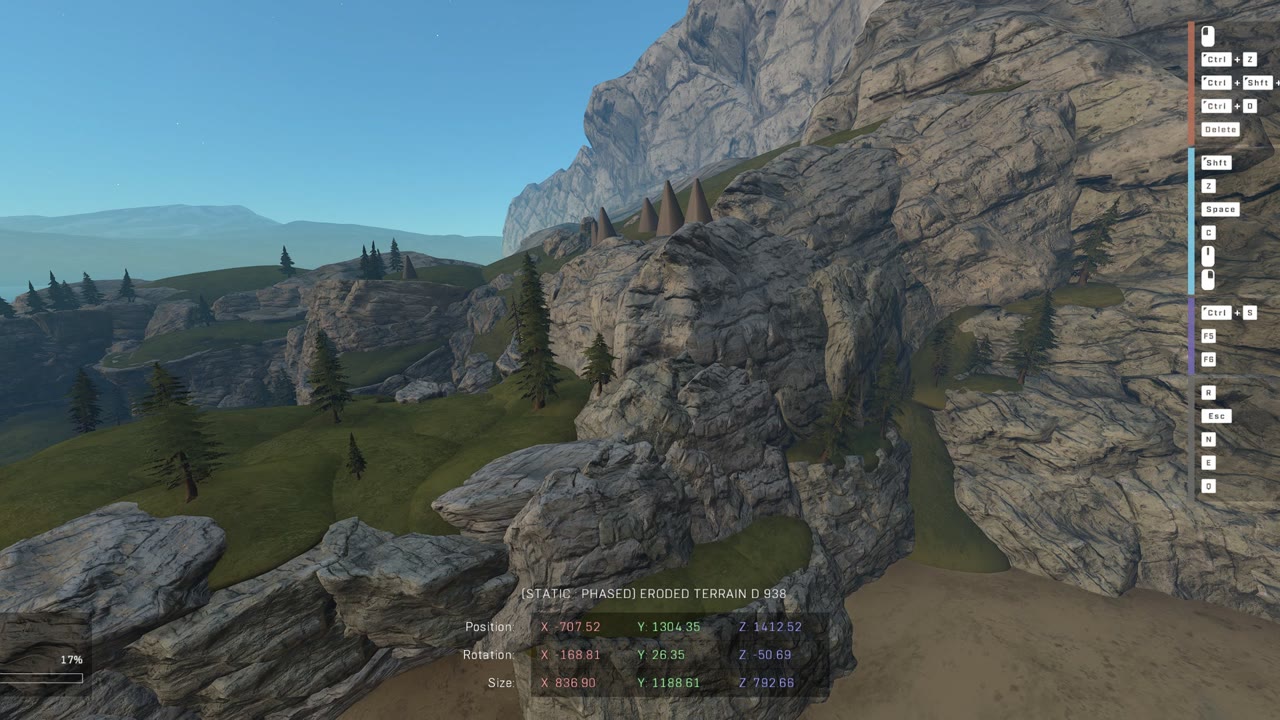
This one may have already caught your eye, and it for sure caught mine during development to the point where I had to ask for it to be adjusted. I'm talking about the rock known as "Shark's Mouth" that resembles the rostrum of a shark, which on our map had been built to be more rounded than what it was originally.
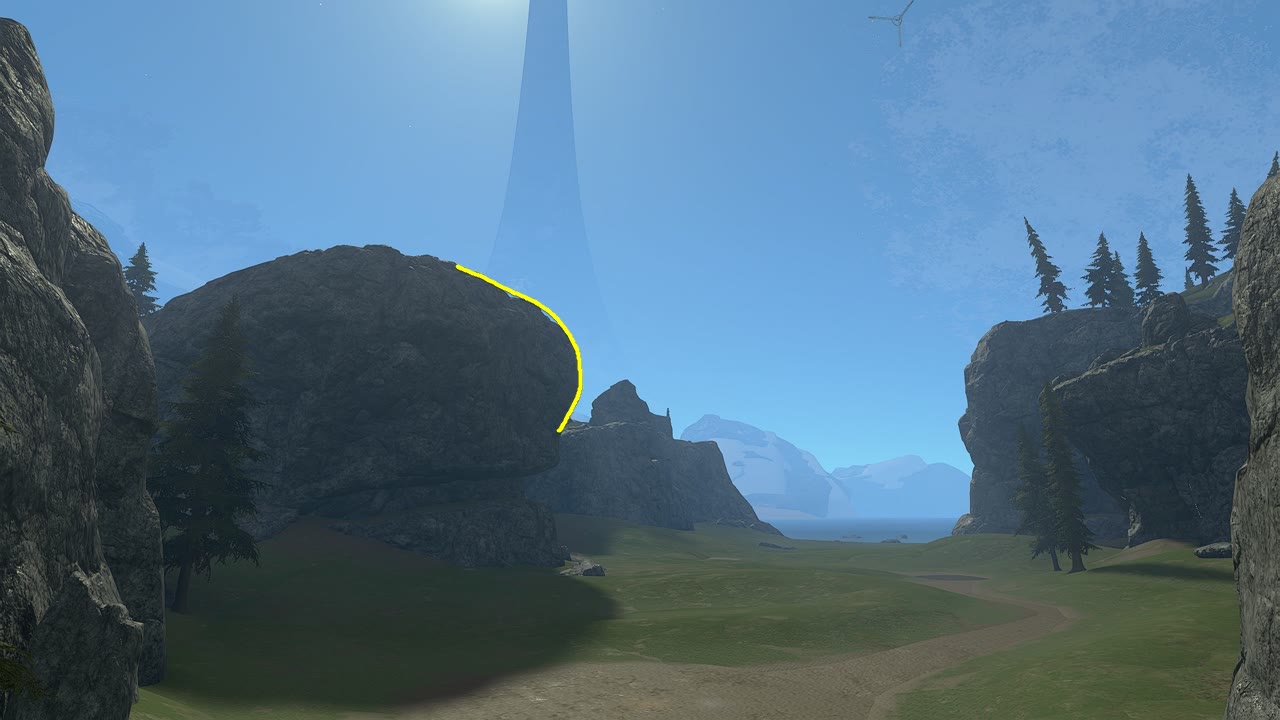
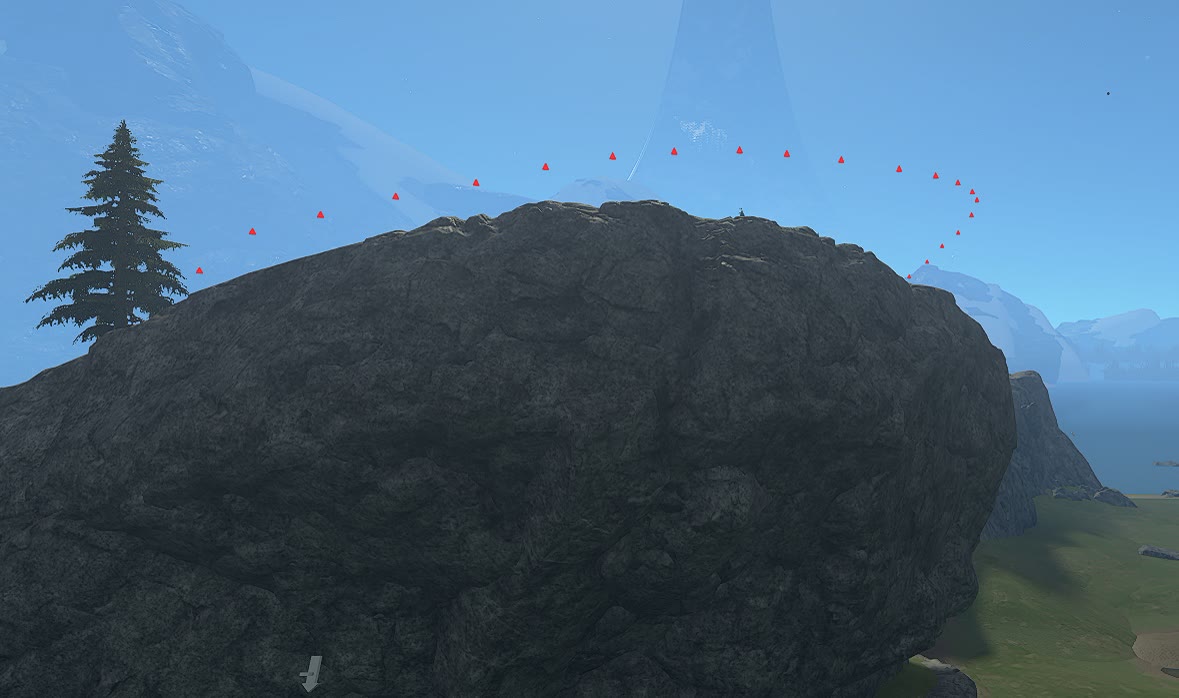
I talked with Hamish about adjusting the shape of the top part of this rock formation and I offered to put in some guide geo from the Blender file so he would know what guidelines to follow when morphing the geo. I initially put some red cones following just the top portion of the rostrum, but Hamish hadn't noticed these when he tackled the task and had made the new geo now too pointy.
I took another stab at creating better reference geo and this time placed multiple red flat discs around the rock in the Blender file following the original geo, so Hamish would have more clear guidelines to follow.
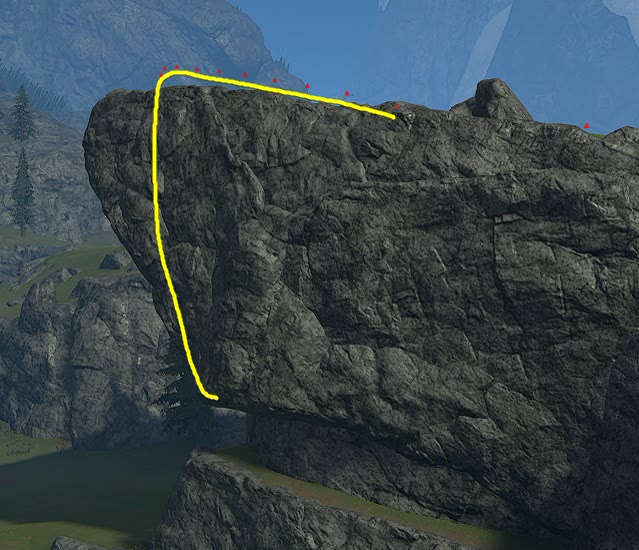
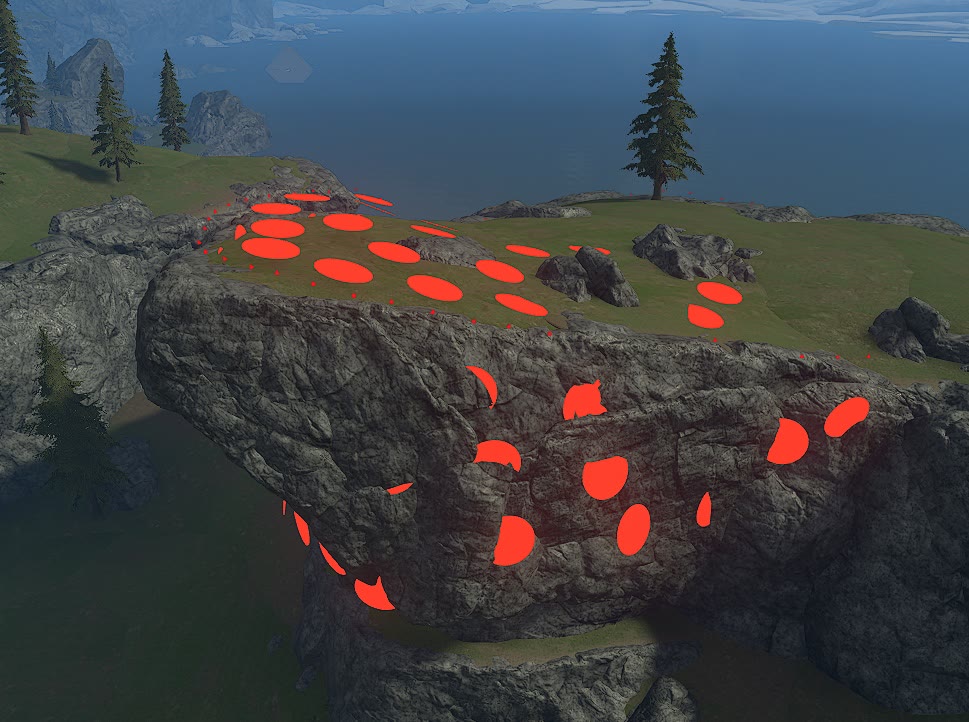
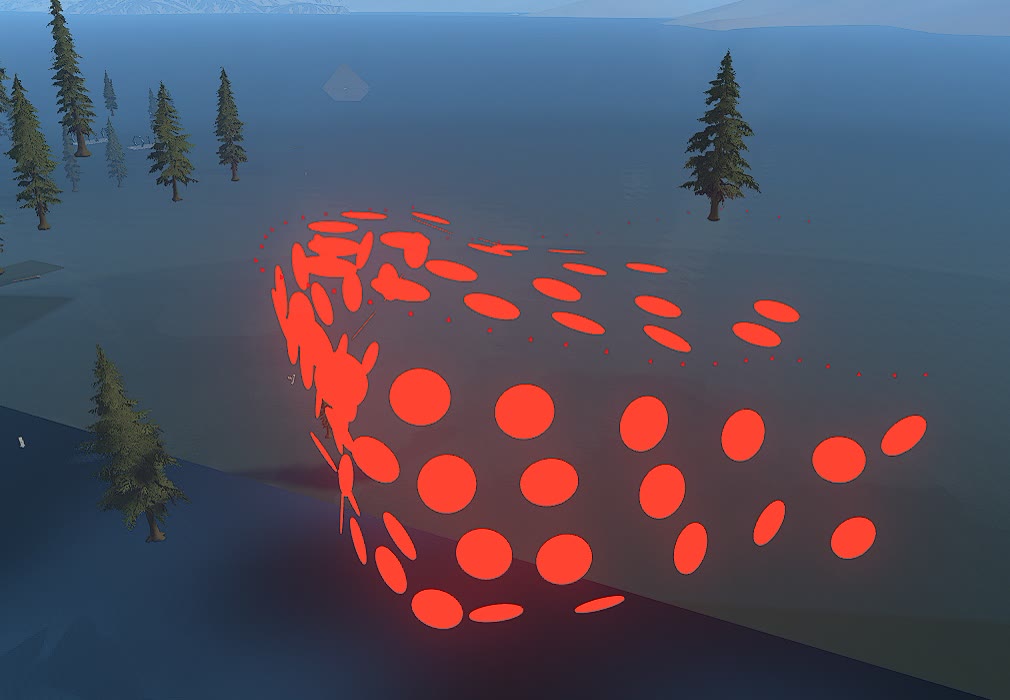
Now having much clearer guidelines for how the new rostrum geo should be, Hamish did a great job at adjusting the existing rock- and terrain geo around the iconic structure.
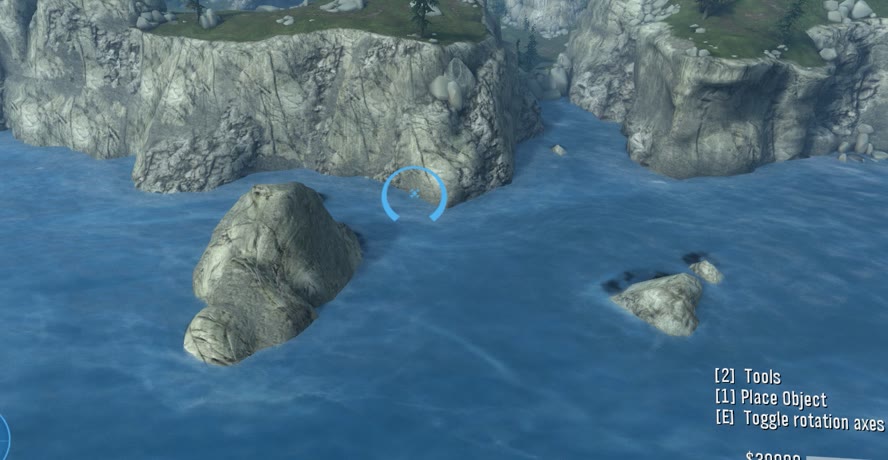
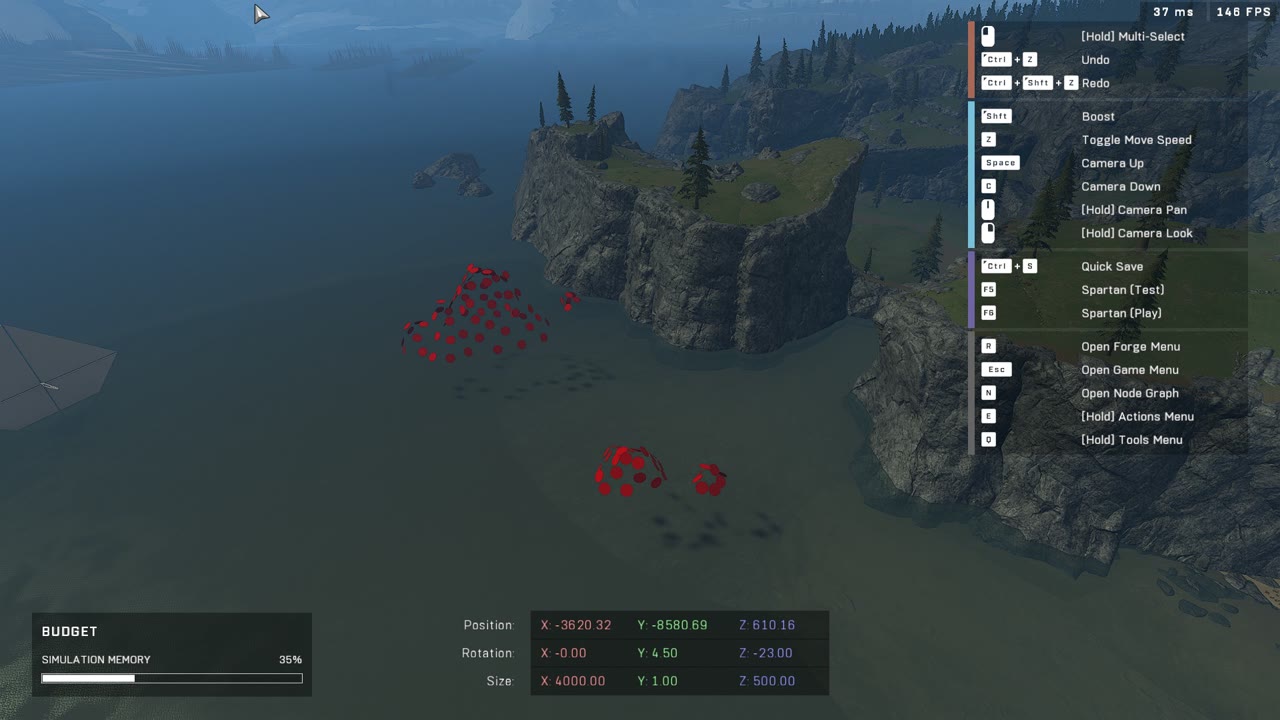
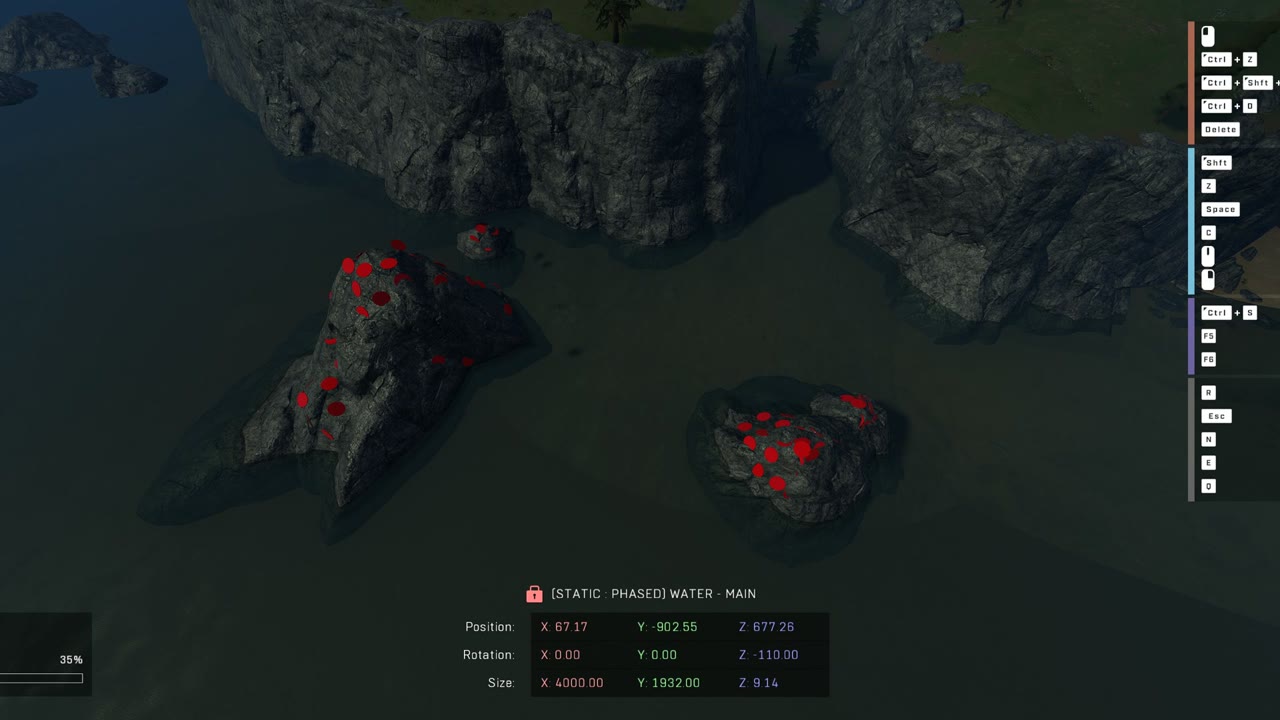
Water rocks
After the Shark's Mouth rock was adjusted, I put out a request for the guys to also fix up two of the rocks in the water near the Gulch that were also eyeballed during early development. I created similar red flat disc guidelines for these rocks in Blender and printed them to the map. Virus took the opportunity to fix up the rocks and the outcome turned out great.

Canada cliff indent
Flying around the map and looking for geo inconsistencies, I noticed something off about the top portion of the "Canada" mountain cliff located above the Gulch cave. I fondly remember using some rocks in a small indent on top of this mountain to hide behind during some custom games in Halo Reach, but in our map, it was nowhere to be seen. At this time, I was also looking into some "mountain climb" spots (discussed later) on the map, of which one of them started at this very spot.
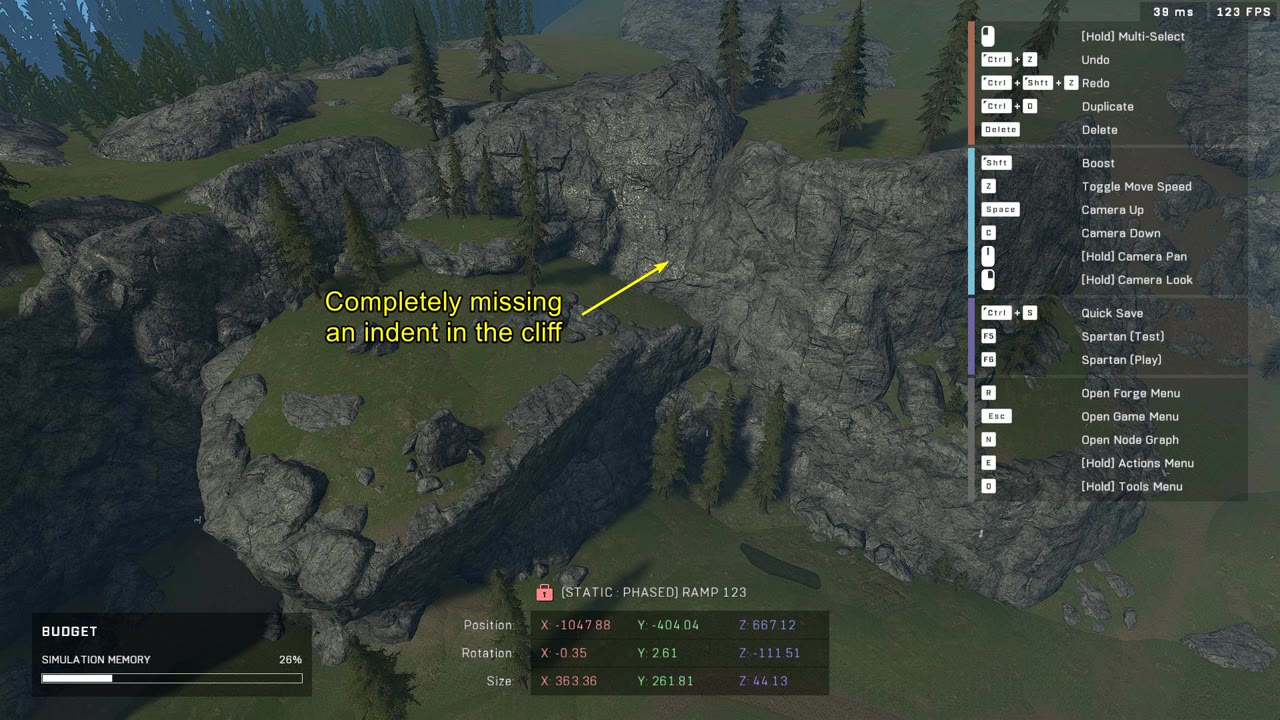
Scrub graciously adjusted the geo around this area to bring it more in-line with how it looked like in Reach. As this wasn't a high-priority area accuracy-wise, I didn't bother making any guidelines for how the geo should be.
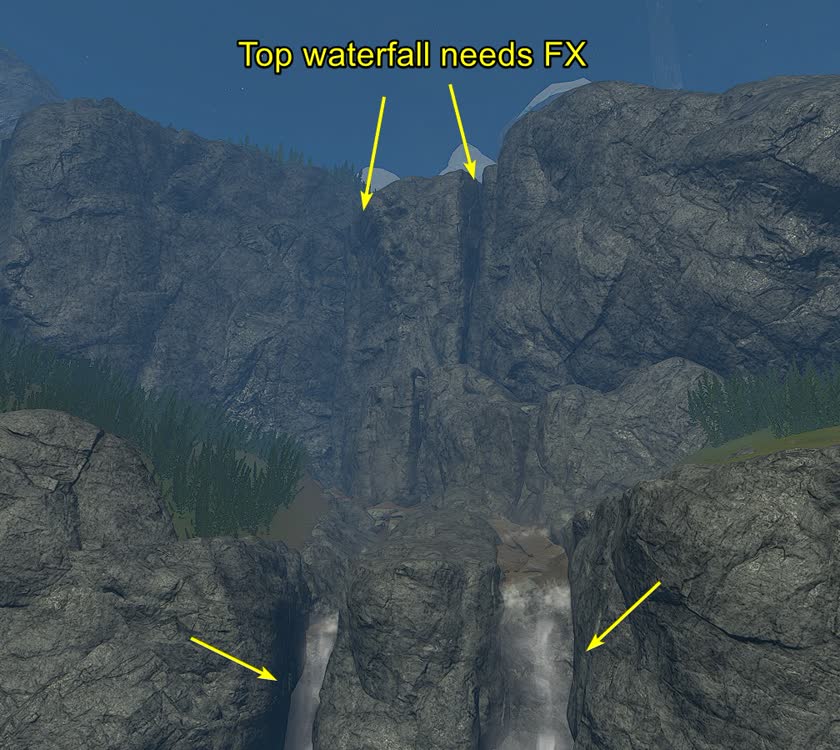
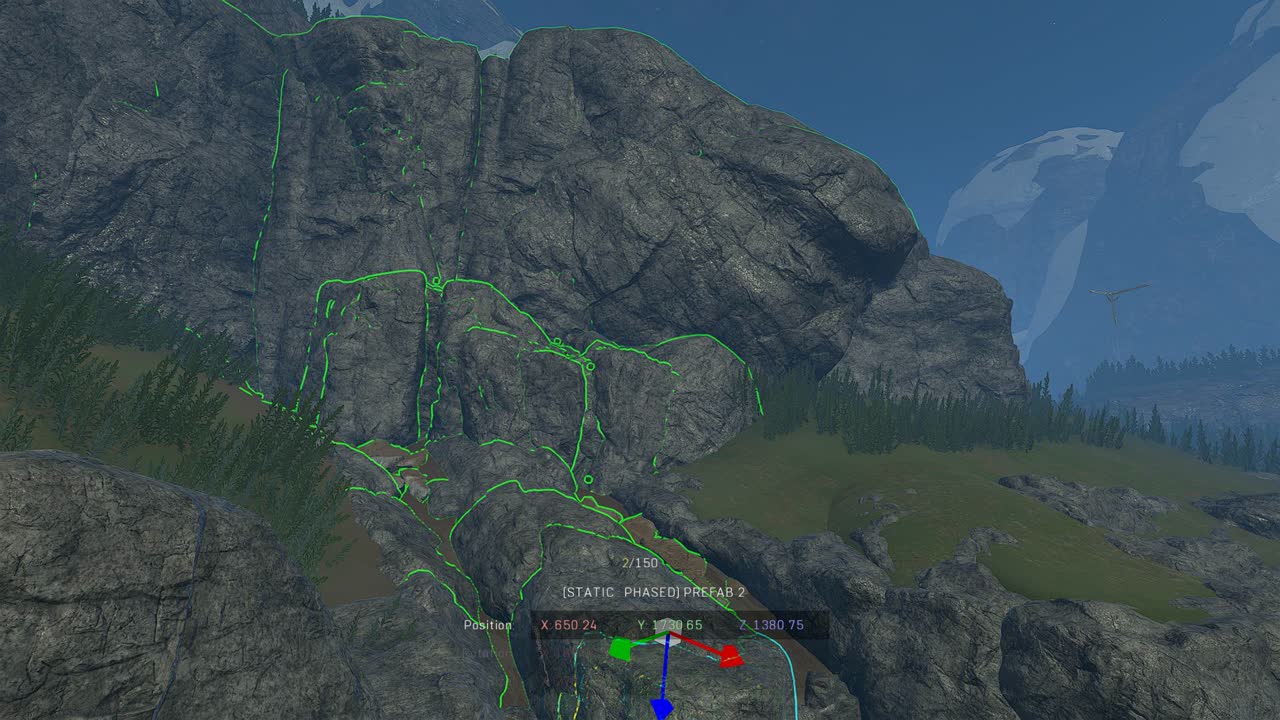
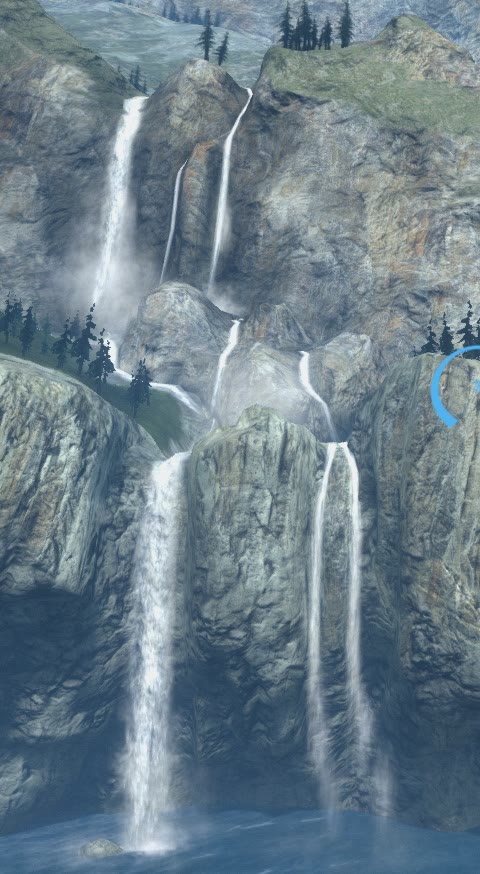
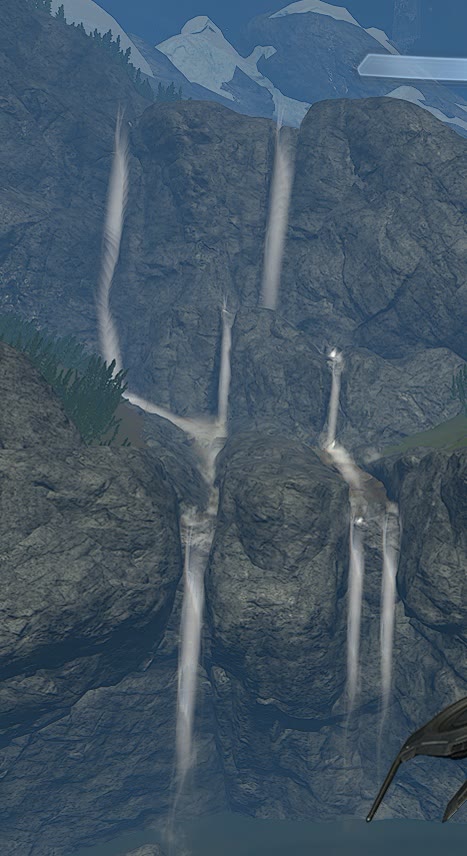
Waterfall
The skybox waterfall area was a tricky one to make as it was outside the 4000x4000x1500 canvas bounds and the fake water would have to be made with FX objects, which can't normally be placed outside the bounds. At this point I had also printed a more accurate blockout of the cliff where the waterfall would be, and Hamish did the final cliff art shortly after.
There was one method I knew of which would allow us to have FX outside the canvas bounds, which would require the FX to be moved into specific coordinates during runtime using scripting. We were aiming to use this method, so I copied the waterfall cliff and brought it inside the canvas bounds so the waterfall could be built there and then later moved into place.
Hamish did the initial FX placement for the waterfall, but as I was validating it, I noticed a glaring issue with the FX used where they would disappear when the player was about 2000 units away. 2000 units might seem like a lot, but when the cliff would be in place, it was surprisingly far away, and the FX would basically not be seen from the map at all.
As I was there on the map reporting about the waterfall not being good and looking for FX that could work for the waterfall, I just decided to attempt fixing it myself. I found a suite of FX that had different lengths to them, but were all the same type, and didn't disappear with distance. These FX worked really well for this situation and I built out the waterfall in the temporary location with them.
After having placed all the FX objects, came the tricky part of figuring out how to get them to show up in the right places outside the canvas bounds. As I couldn't just move the cliff and waterfall FX into place since FX objects can't be moved outside the canvas, I placed temporary blocks at the positions of the FX objects and then moved the cliff and temporary blocks into place.
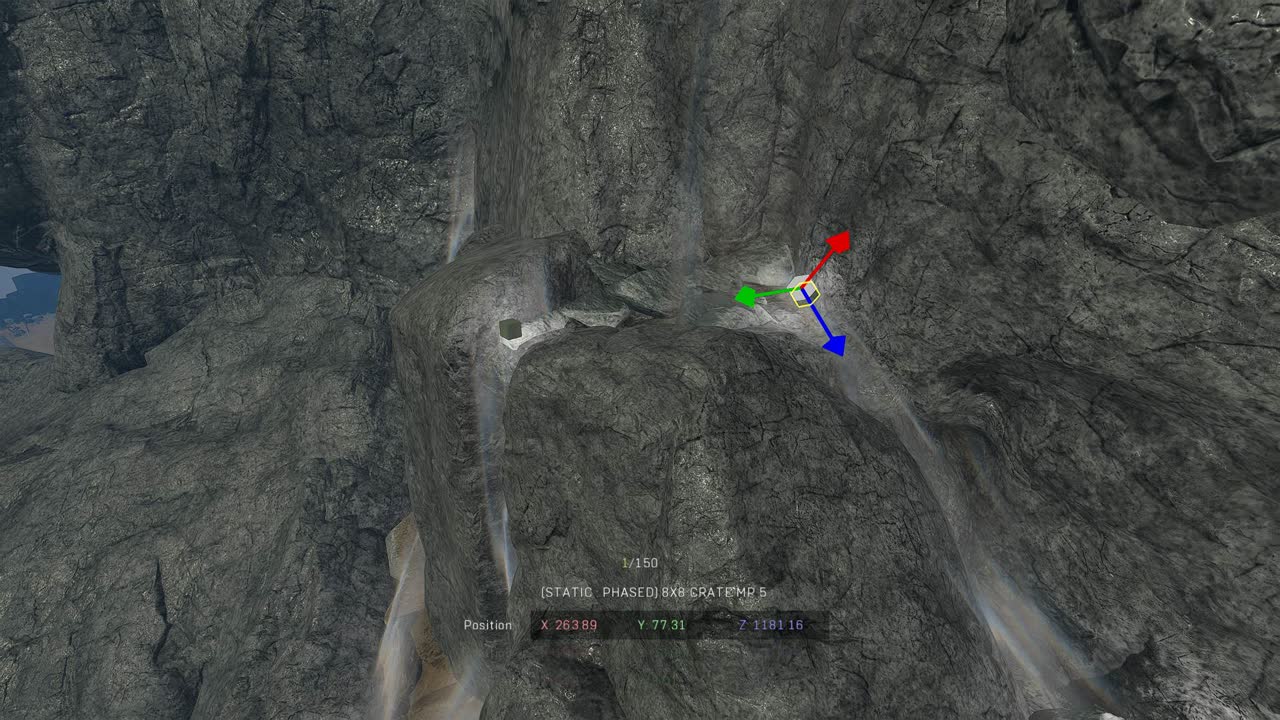
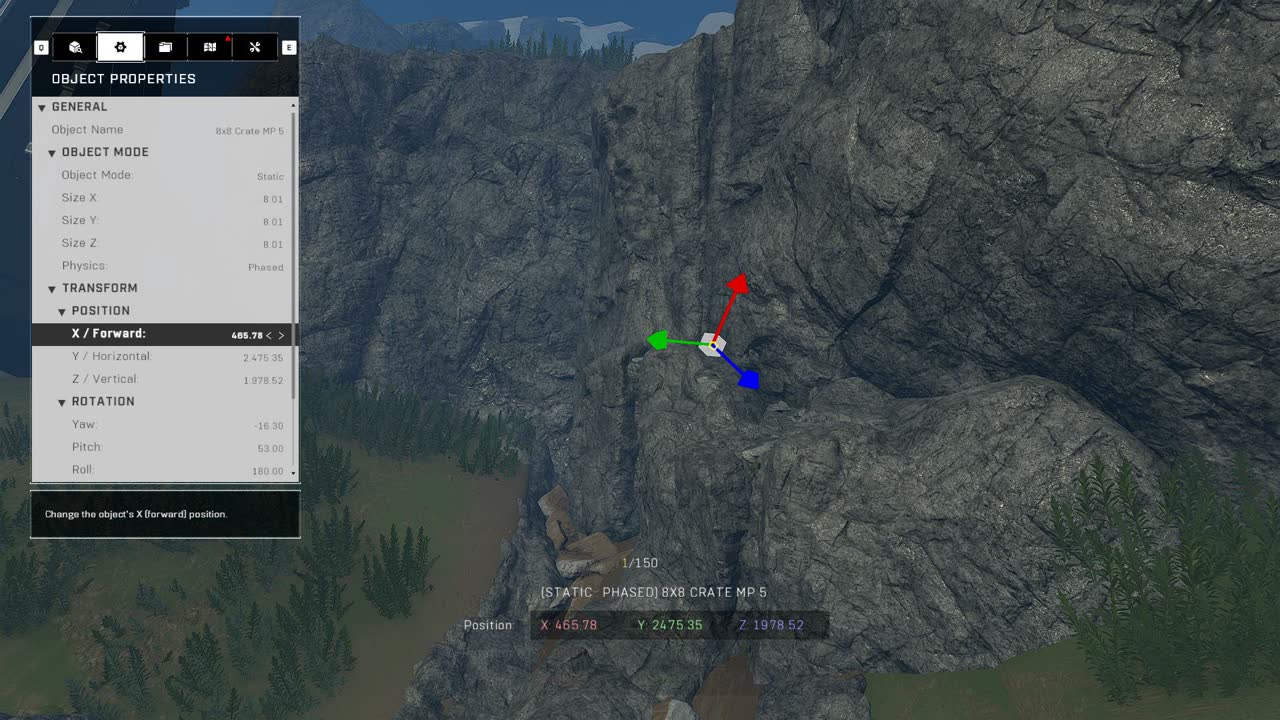
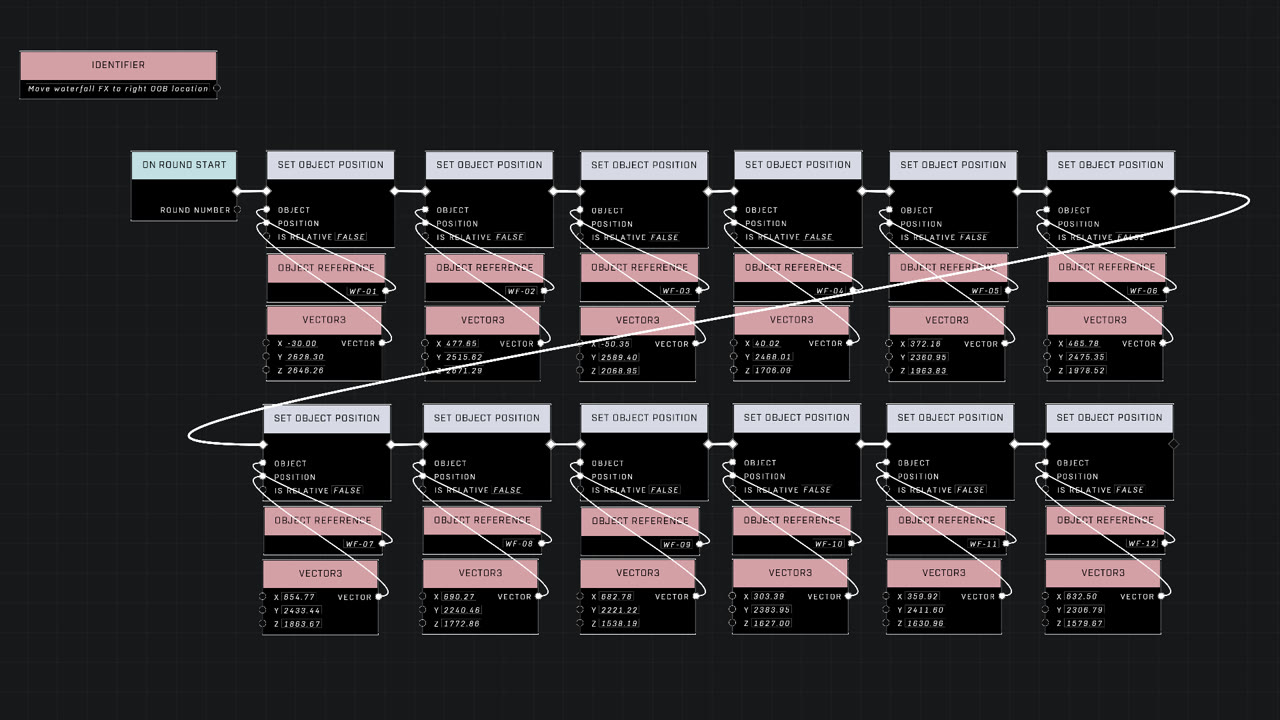
With the cliff in place, I could inspect the positional data from each of the temporary blocks, and know that those would be the positions each FX should be at. I then wrote a script that took every FX object and placed each in the specific positions that I had written down. This script would run immediately as the game runtime became active, and it worked seamlessly. I stored the waterfall FX objects in a corner of the map with the correct rotations, so just adjusting their position would build the waterfall perfectly.
Coliseum Door
The Coliseum Door was something initially planned, but never brought to light before this point. I had a vision for the release of the map where we would have the Coliseum room closed off with a window object that resembled the piece "Coliseum Door" from Halo Reach. This piece was specifically made to close off the tilted rectangle doorway of the Coliseum. I wanted there to be an official recreation of it from our team so it would be easier for the next forger to delete it, if it was unnecessary than to have to try and rebuild it if they wanted it for closing off the Coliseum in an elegant way.
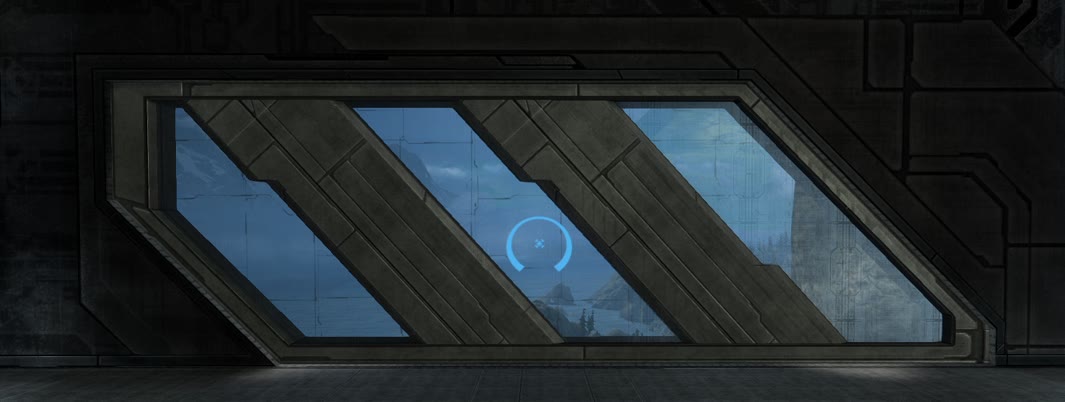
Simple blockout
I first made a simple 18-object blockout of it in Blender and printed it to Infinite. While the goal for this piece was to have it resemble the original Coliseum Door only in the doorway, we had a stretch goal of it also being a movable object that would look good outside the doorway, like in Reach.
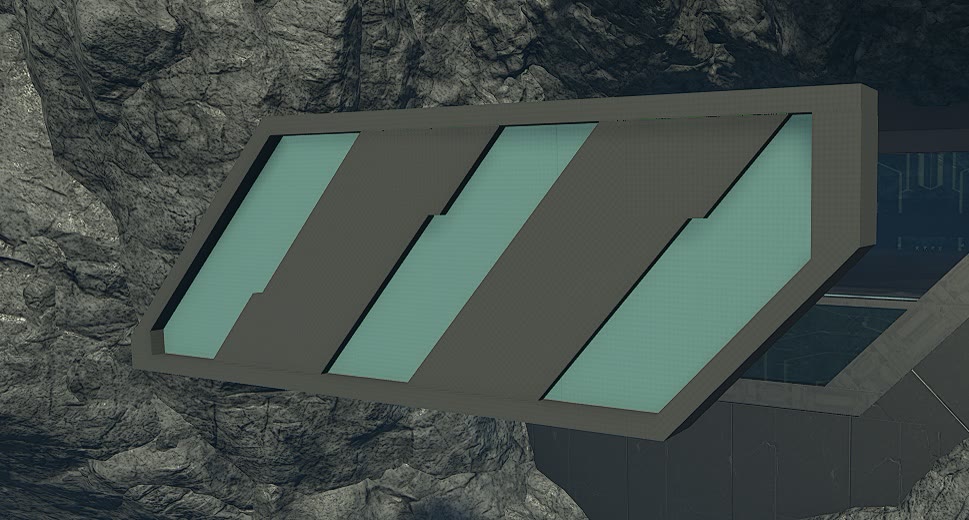
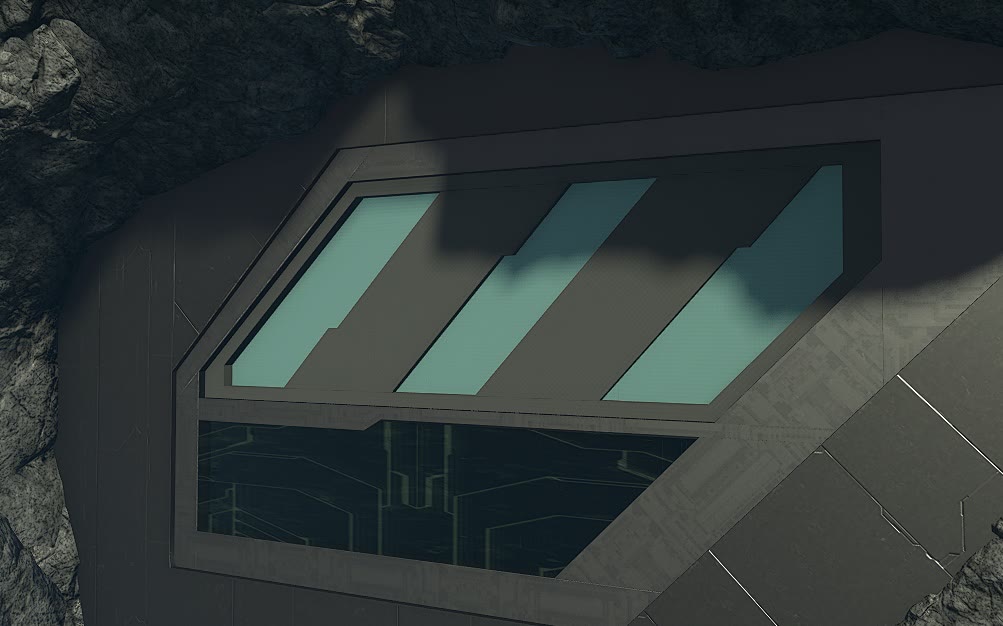
Virus did some initial experimentation with the arting of the door, but quickly realized that trying to achieve the mentioned stretch goal was not very feasible, and at the least would majorly compromise on the visuals and object usage of the door piece. After some experiments, he landed on using art pieces that followed the blockout accurately, but the art fidelity was still compromised due to trying to stay within the bounds of the blockout.
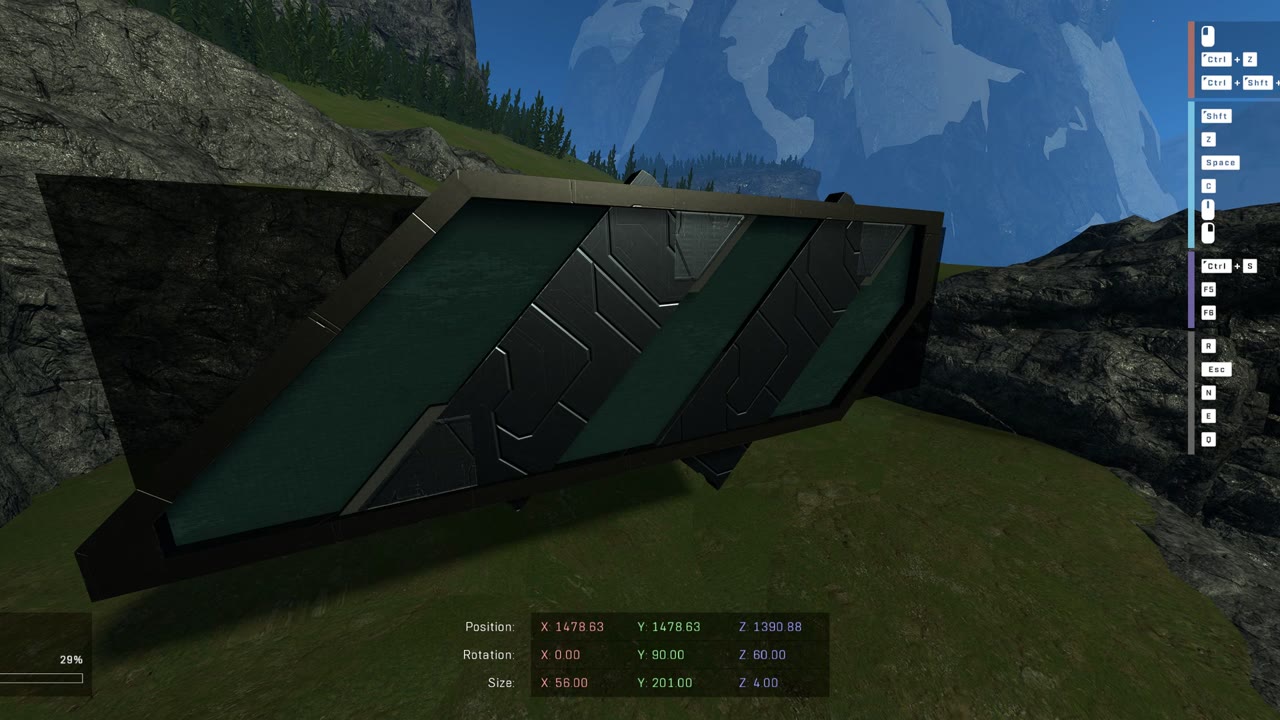
Forerunner art
The next day I did some experimentation myself and quickly got into the groove of actually arting the door myself. I fully embraced the ability to go outside the bounds of the blockout just to make the door look the best in the one position it was meant for in the Coliseum doorway.
I found some pretty compelling Forerunner art pieces to use, and was actually going to have the door stay within reasonable bounds of the blockout, but ultimately decided to go with some odd looking stretched floor pieces for the outer rim of the door.
The reason for these oddly stretched pieces was that the tiling texture on them would be kept consistent if they were all scaled the same, and I was able to manipulate their positioning ever so slightly to produce a believable stitched texture wrapping all the way around the object. It was some minor quality-of-life detail, but as I was exceeding the bounds of the blockout anyways, I thought to might as well go all the way since I could.
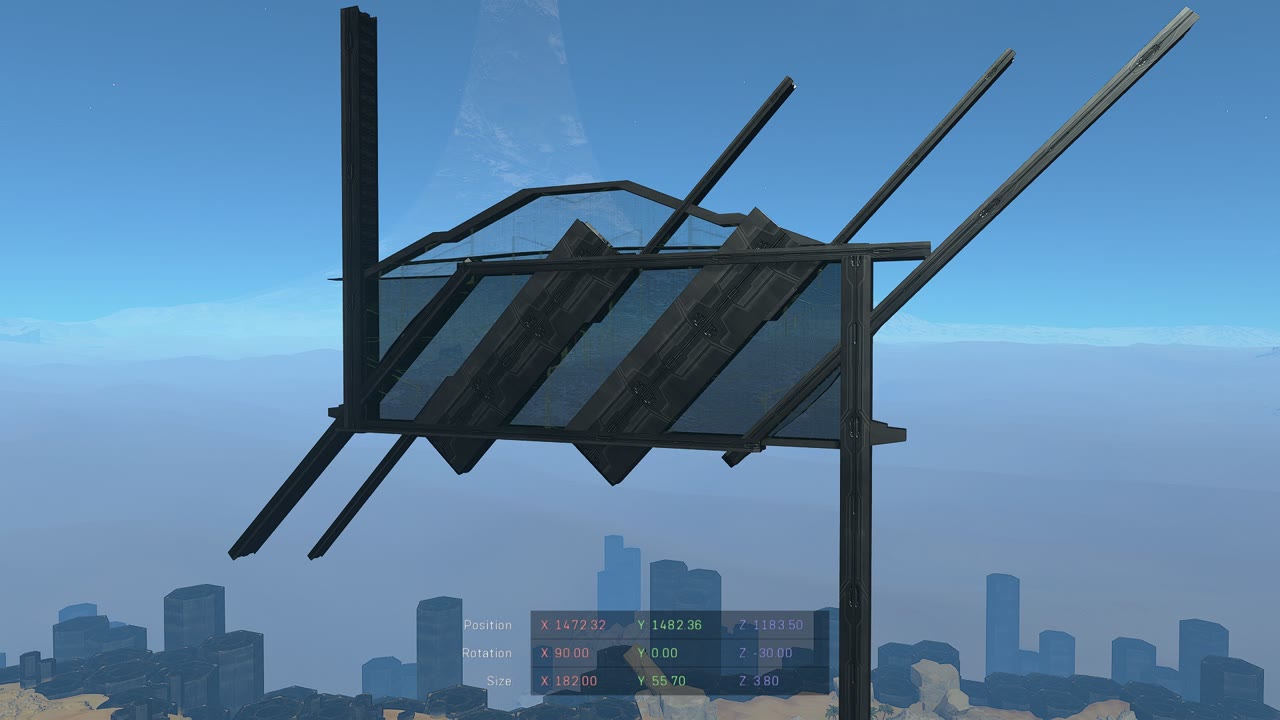
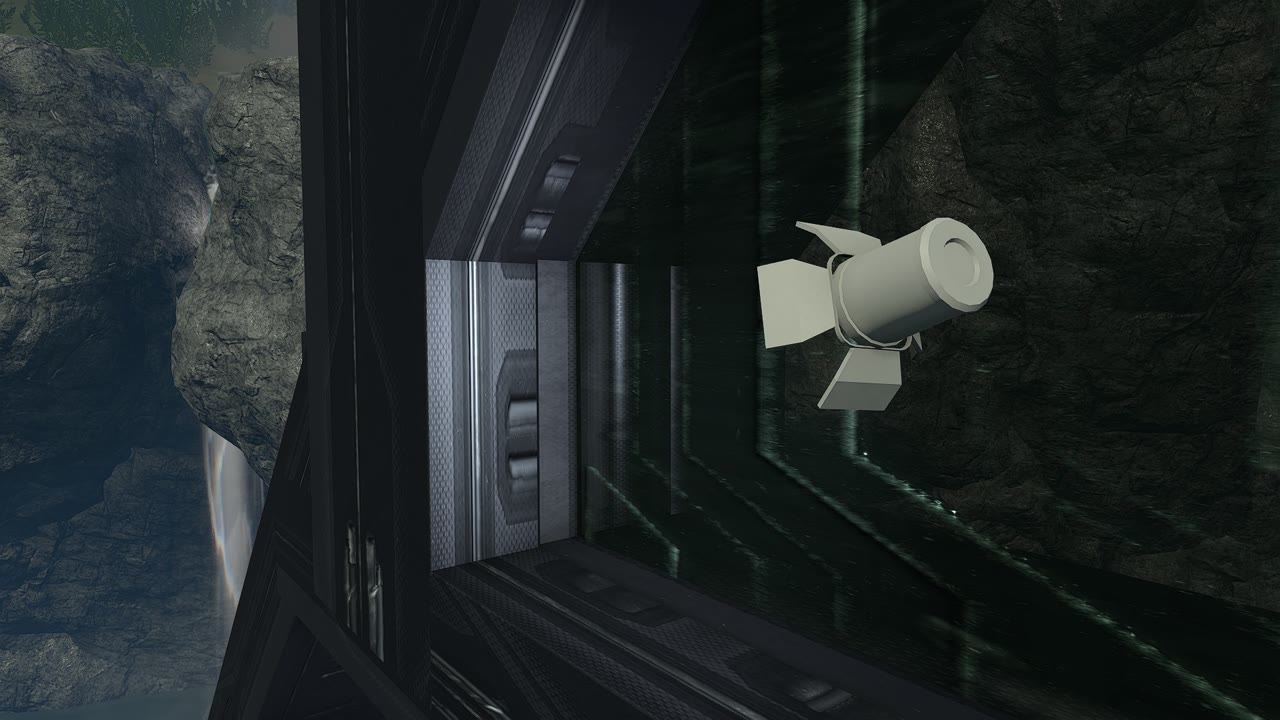
In the end what still only mattered was that it looked great while in the correct position, and this piece certainly did. The glass on the door was a highly tinted dark blue, which allowed players to see outside the Coliseum, but if the next forger wanted to block visibility in- or outside the Coliseum, they could just add a solid object inside the thick glass to fully block the visibility and then delete the objects behind it to save on map budget.
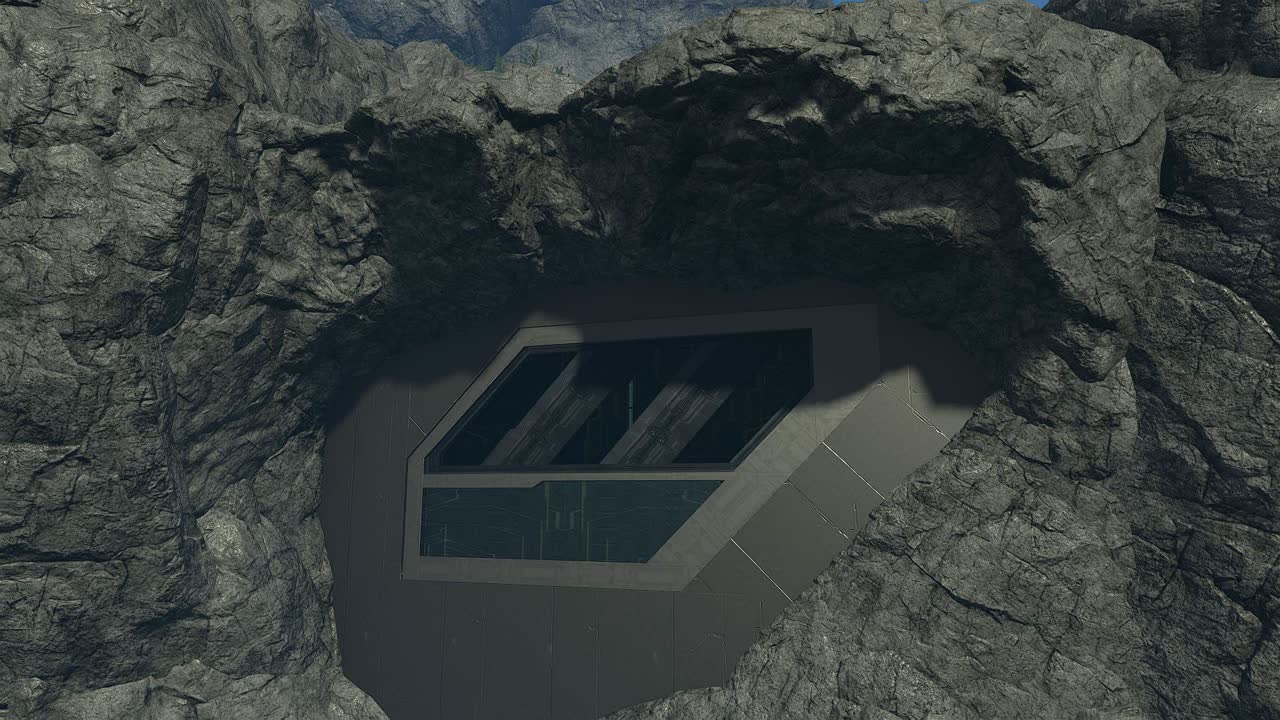
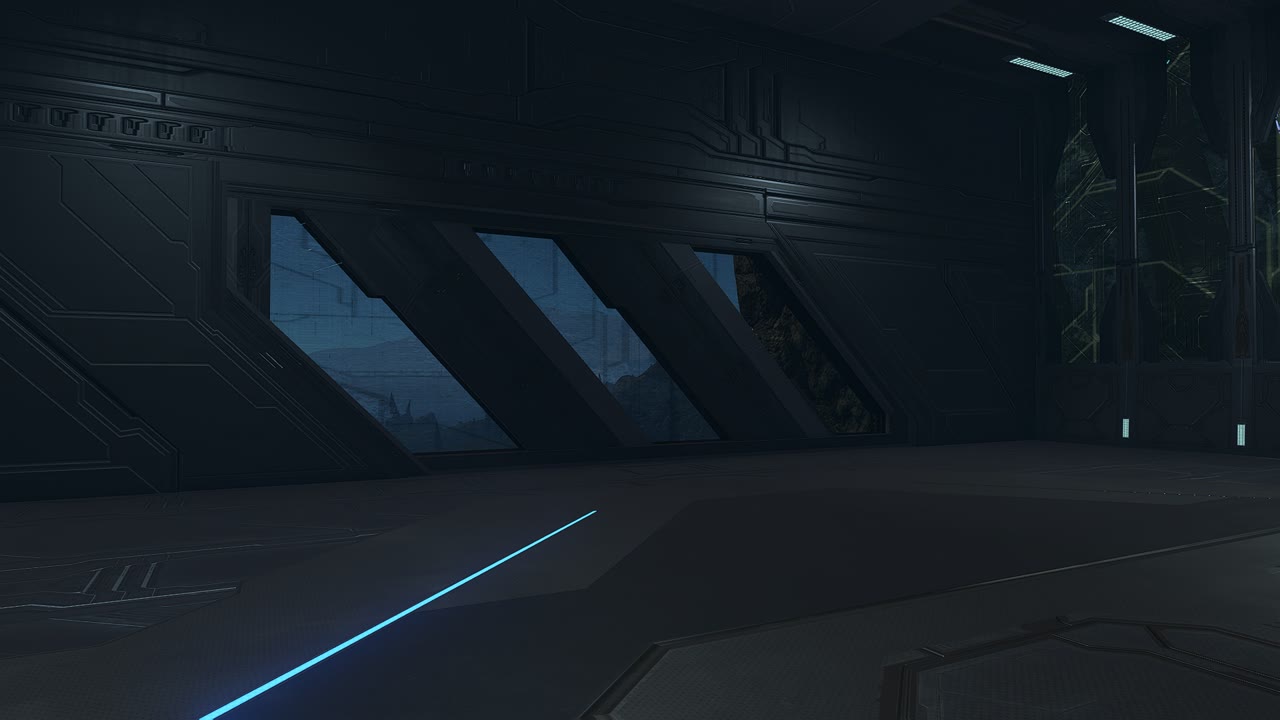
Foliage
As all of these geo changes were happening, even since the beginning of the skybox overhaul, Mr IncrediJON (Jon) had been going over the entire map and adding foliage. Jon had not been involved with the Forge World project up to this point, but he did have experience with foliage on a Forge World-like map, as he had worked on the foliage for Hemorrhage, which was one of the maps that our Forge World originally started from.
As Forge World was so large, we wanted to keep the foliage density to a minimum while still not looking empty, which was a challenge. In Halo Infinite each piece of foliage is its own object and there's no tooling to just brush foliage over an area, so everything had to be placed by hand in each spot with careful thought.
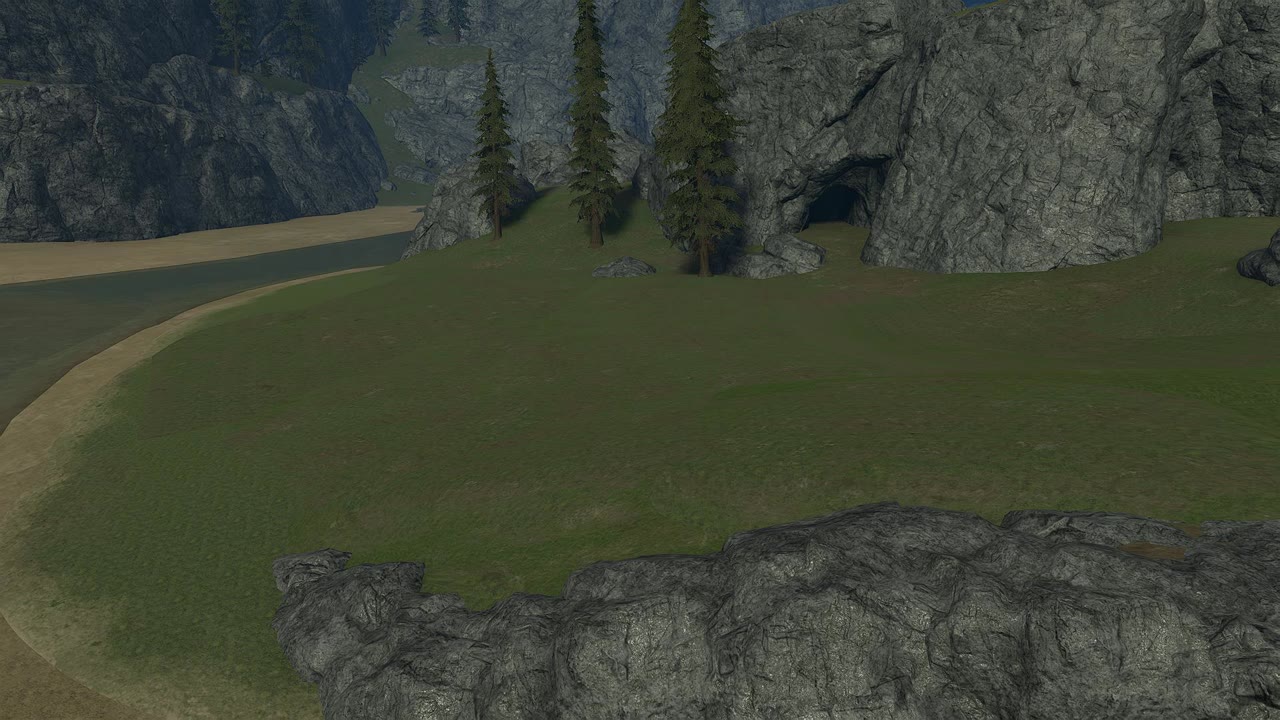
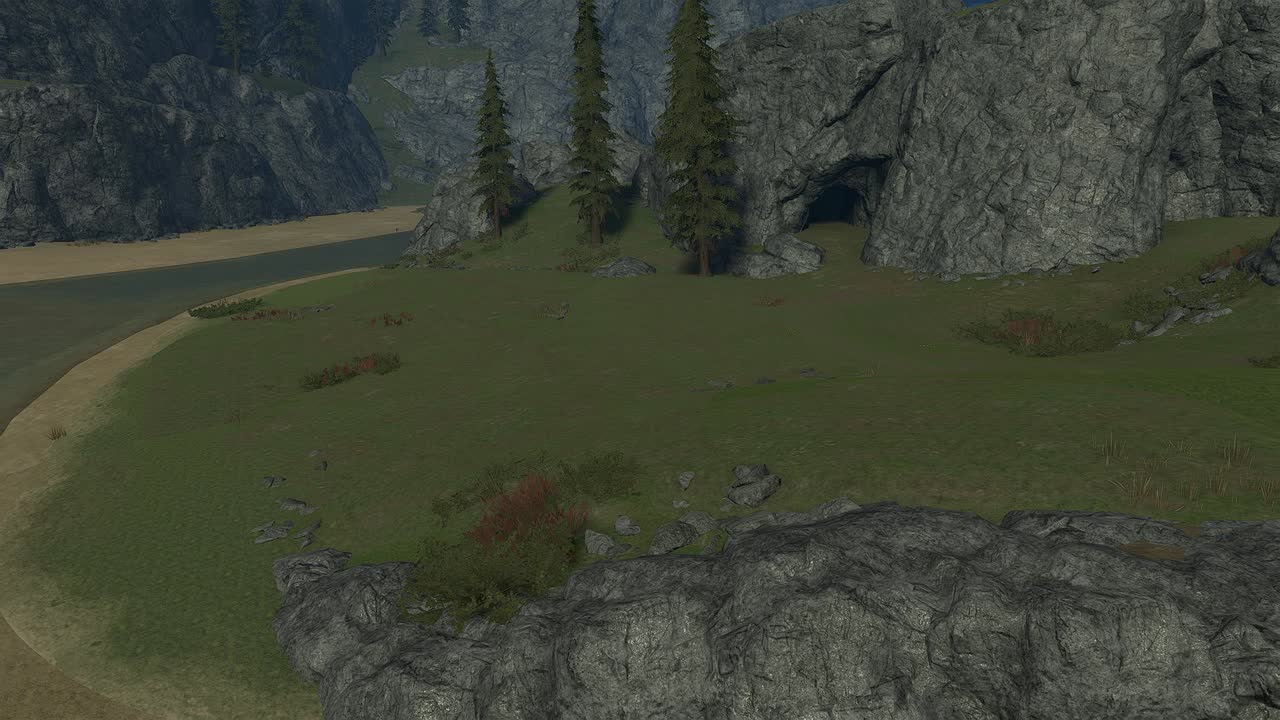
A priority for Jon when placing the foliage was to scatter it sparsely, but still make it look natural. He leaned into the idea of having less foliage in areas with more vehicle traffic, and also cleverly used the bushes and small rocks to hide any obvious seams between the terrain pieces.
Jon used a variety of foliage objects to bring out some extra detail and care for those who appreciate it. He mentioned wanting to use even more foliage variants, but discarded a handful of them due to the objects disappearing when viewed from long distances. Even with all the limitations in place that he was faced with, Jon was satisfied with the results he was able to produce.
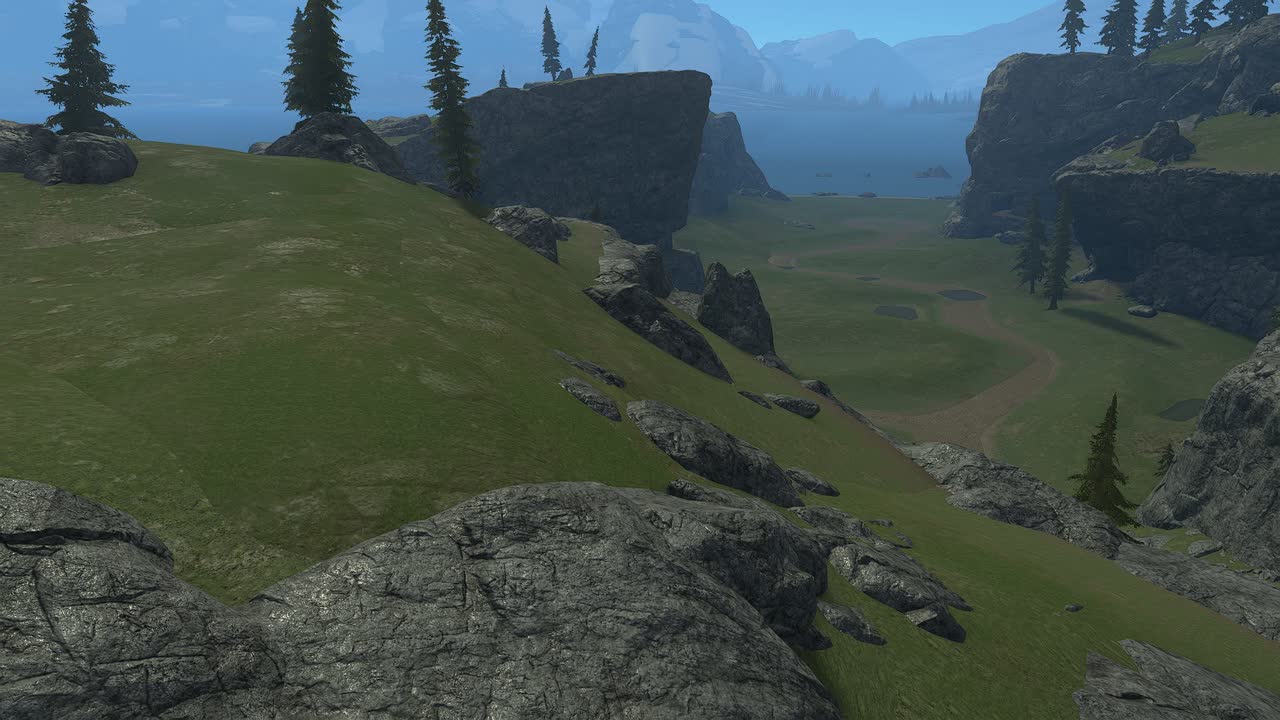

Nav Mesh
With the terrain being final, it was time for me to tackle the Nav Mesh. Nav Mesh is what NPCs use to know where to navigate around a map, and for a huge map like Forge World, the amount of data to be generated was also huge. I had a fair amount of confidence in the Nav Mesh being buildable on such a large map based on my previous experience with Halo Infinite maps, and that confidence came from knowing what had to be done to make it work.
I placed all skybox objects into a folder and all small detail objects into another folder that would both be hidden when building Nav Mesh. Hiding the objects meant that they would get ignored by the Nav Mesh generation process, leading to a faster build time. I also placed some extra geo in specific areas to prevent the Nav Mesh from generating in unwanted areas.
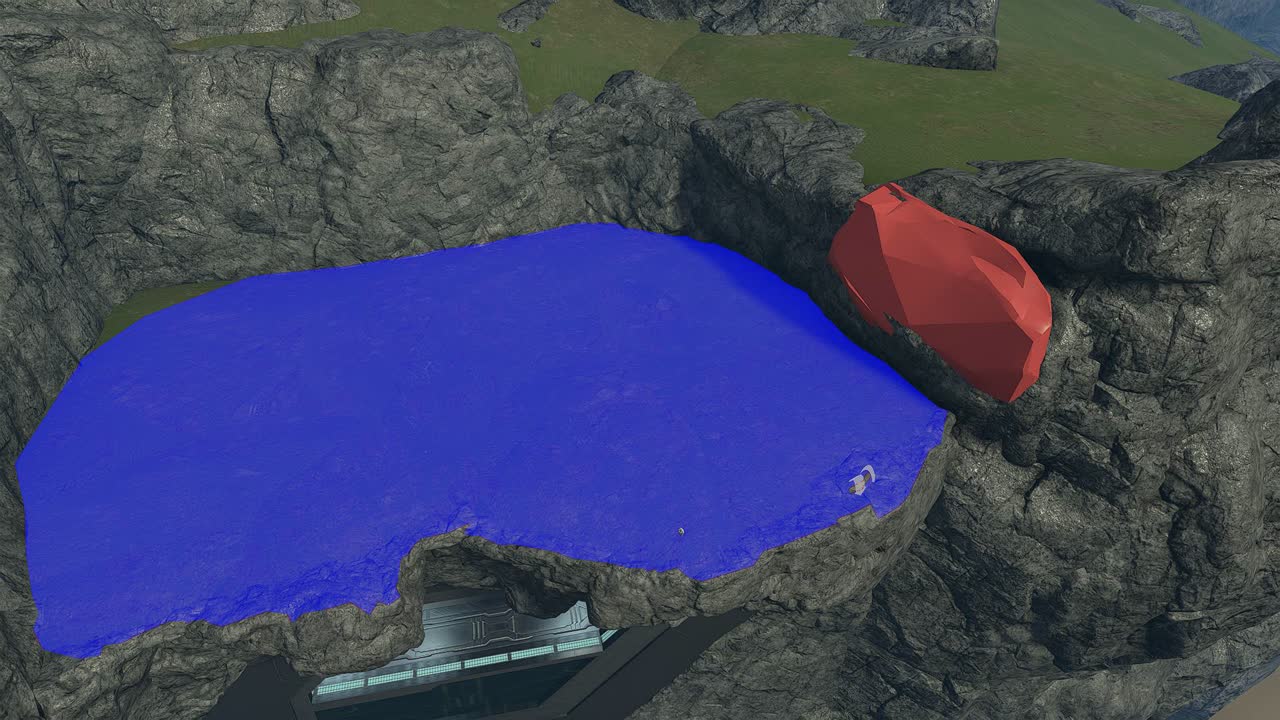
Building the Nav Mesh for Forge World in an optimal state took 10 min 40 s, which is quite good for such a large and terrain-heavy map. The average build time for an optimized 4v4 map is about 4-6 min and the longest build time I've ever seen was 18 min 11 s with Death Island Evolved.
Futureproofing the Nav Mesh
When working on the Nav Mesh setup for Forge World, I also realized that I should place some jump hints that allow bots and AI to jump down from the mountains. If players wanted to create AI battles on future copies of the map, their pathfinding would be supported as much as possible without any modification to the Nav Mesh. By thinking about these possible scenarios before the release of the map, it would make the life of the next forger much simpler.
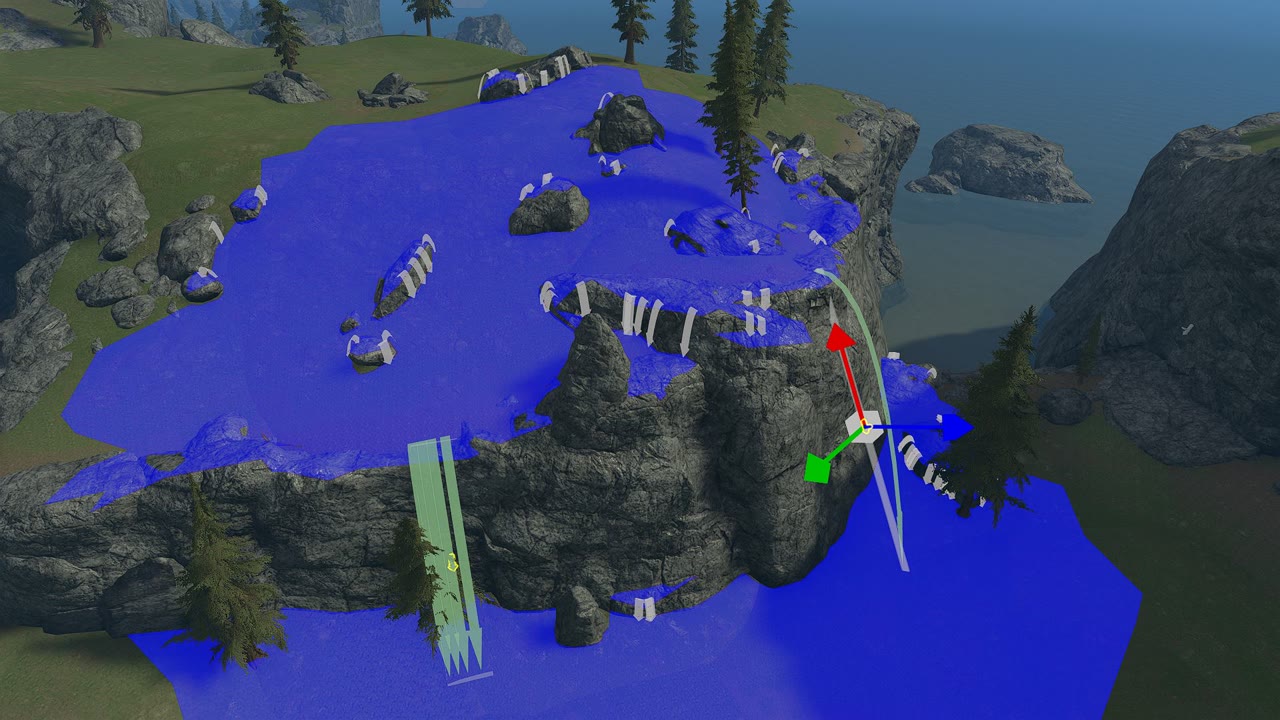
Nav Mesh technicals
Building Nav Mesh on such a large map like Forge World required some quite niche knowledge I had learnt over the years of Forging in Halo Infinite, which I've explained in the details below:
Read more
When building Nav Mesh in Halo Infinite, the engine goes through all the visible collision on the map which consist of the built-in canvas geo and all visible Forge objects. In order to optimize the build time, one must reduce the amount of geo that the engine has to parse through. The simplest way to achieve this is by hiding the visibility of objects to be ignored. Another way is by covering an area to be ignored with a "Nav Cutter" object's volume, and the last method is to disable the object's collision entirely.
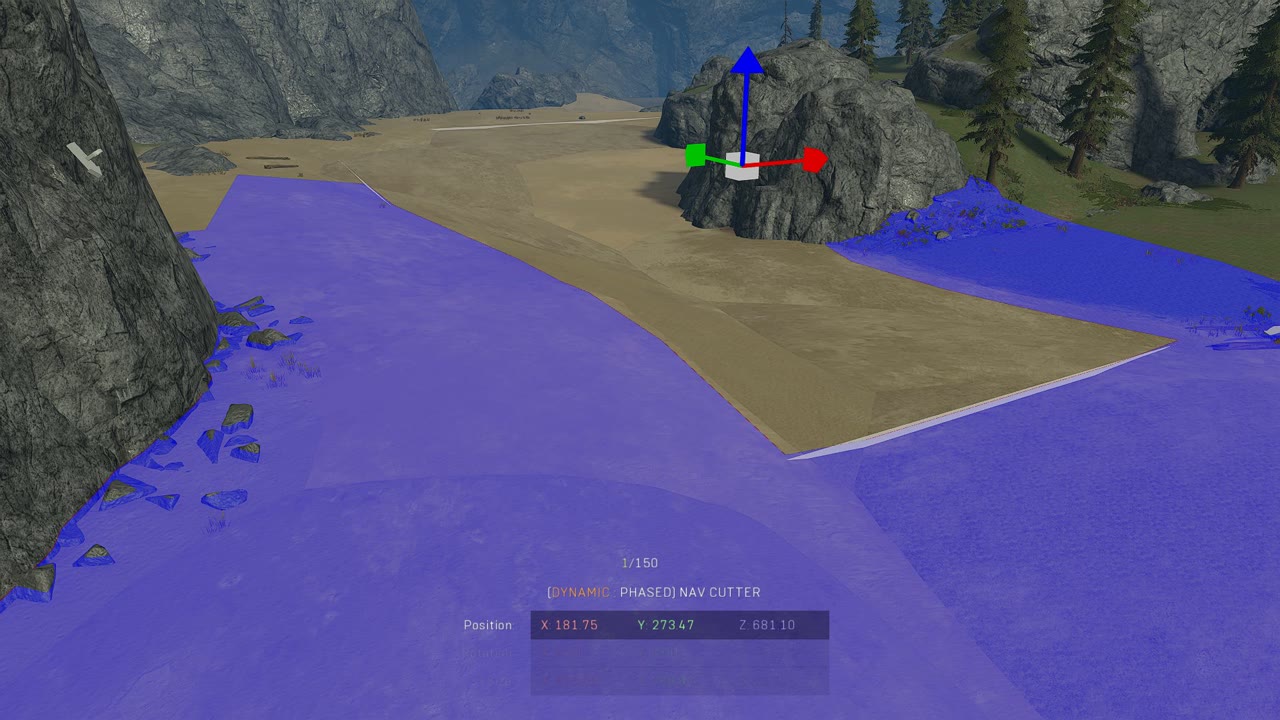

Having completed multiple mapping projects on Infinite, I had refined a good workflow for what had to be done for optimizing a Nav Mesh build, and for Forge World it consisted of the following:
- Place all objects with collision that wouldn't affect the Nav Mesh generation within reason to a folder named "Skybox".
- Place all objects without collision to a folder named "Detail (No Collision)". In this case foliage and decals.
- Place any objects that need to be present only when generating Nav Mesh into a folder named "Temp. Nav Mesh Geo".
Ignoring geo
The more complex of a collision mesh an object has, the more time it takes for the Nav Mesh build process to parse through it. If a complex object like a terrain ramp piece is in an area where Nav Mesh should not reach, it should be ignored in the Nav Mesh build process in order to optimize the build time. This was done on a major scale for Forge World as all of the skybox mountains and some of the geo in the playable space was placed in the "Skybox" folder that would be hidden when building Nav Mesh in order to ignore all of them, resulting in the Nav Mesh build time being much more optimized.
Detail (No Collision)
Why I use a folder named "Detail (No Collision)" for objects that fit the description is partly due to Nav Mesh reasons and partly due to player containment reasons. The Nav Mesh reason is that the folder should always be hidden when building Nav Mesh as any objects marked as "detail" are excess geo not useful for Nav Mesh. The player containment reason is that you can spot mistakes in player containment such as holes in the map when you hide all of these no collision detail objects at once that just make the map look prettier.
I label these objects as "detail", but I emphasize the "no collision" part in order for the folder to function for both the Nav Mesh and the player containment purpose. Halo Infinite also has an annoying feature where foliage and decal objects set to physics other than "No Collision" will be non-collidable by players, but the Nav Mesh engine will still pick up the collision of them and usually mess up the Nav Mesh generation around that area.
Temp. Nav Mesh Geo
Some areas need a little bit of adjusting for the Nav Mesh to function as desired, and in my workflow I have a folder for all of these objects. Usually custom geo is required in areas with narrow pathways or spots where Nav Mesh will escape out of the playable area due to the auto-generated jump hints on Halo Infinite going unexpectedly far as they are tuned for the AI that can jump the highest, instead of just regular player jumps. For these instances, extra geo is required to prevent these Nav Mesh connections.
There is also a Halo Infinite Forge canvas specific issue that causes Nav Mesh to generate on the built-in canvas floor unless it's forcefully prevented. There are 27 invisible "Backup Spawn Point" objects on each Forge canvas and 9 of these are located on the ground level of the canvas at Z: 500. As spawn points act as Nav Mesh root points, these will generate Nav Mesh on the built-in geo ground, which to the untrained eye will look extremely confusing as it looks like there's no objects that would cause nav mesh to generate there in the first place.
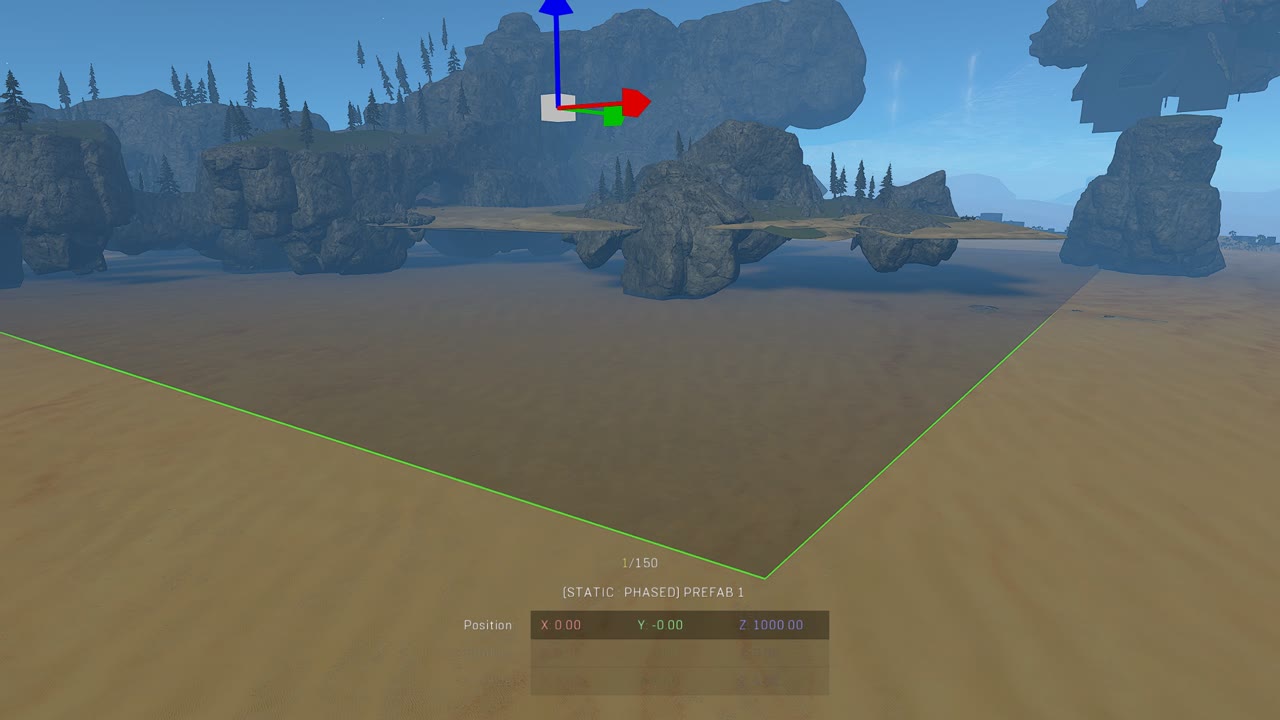
I believe I was the first one to discover the cause of this and have developed a one-object fix for this where the 9 spawn points are covered by a large object that both block spawning on them and prevent them acting as Nav Mesh root points. I use this object in the "Temp. Nav Mesh Geo" folder along with the other temporary objects in order to manipulate the Nav Mesh generation to my liking.
Audio and location names
Audio
As we wanted the map to sound realistic when just walking around and enjoying the environment, we set up the map with some sparse Audio Emitters, while not breaking the budget. Scrub was in charge of the audio placement, and I guided him by giving guidelines on how detailed of an audio experience we'd want to have.
We decided to emphasize the large sounds like wind on the shorelines and cliff faces, along with some ambient sounds in specific areas like falling rock pebbles on some cliff sides or water splashes around the waterfall. As the audio from the Audio Emitter objects in Forge is so inaudible compared to the rest of the mix, we didn't prioritize a perfect audio experience, but still made it something that players can immerse in if they turn the audio up and listen for it.
One annoyance is that we wanted to have a generic calm wind for the global audio for the map, but that can't be turned off in specific areas, so even interiors like caves will still have the calm wind sound playing at all times.
Scrub even made a one-minute "Forge World Scenery and ASMR" video showcasing the audio experience he had crafted:
Building audio
Building the audio obstruction data on Forge World required knowledge on how the feature works. If we were to attempt building the audio data with no adjustments to the map, it would produce an error stating that the audio data size is too large. As the audio obstruction build process maps voxels to every visible object on the map, all of the complex geo here would be too much for the system to handle.
What had to be done to overcome this issue was to temporarily disable the visibility of objects that we deemed unnecessary for audio obstruction data. In our case it was as simple as just hiding the "Skybox" folder, which just had geo in areas where players could never reach to hear differences in audio behind objects. Hiding these objects was plenty enough to produce a working, and optimized audio data file for the map.
Named Locations
When creating the map callouts/named locations, I referenced the original location names on the Reach map as a basis and if some name strings weren't available, I tried looking for synonyms to them. This only worked for a small amount of the names, and for the rest I had to get creative.
After looking over the list of available named location strings in Forge, I settled on these counterparts to the originals (Halo Reach - Halo Infinite):
- Alaska - Alpha
- Canyon - Gulch
- Coliseum - Open Hall
- Coastline - Outside
- Island - Island
- Lagoon - Cove
- Montana - Monolith
- Pillar - Pillar
- Quarry - Lookout
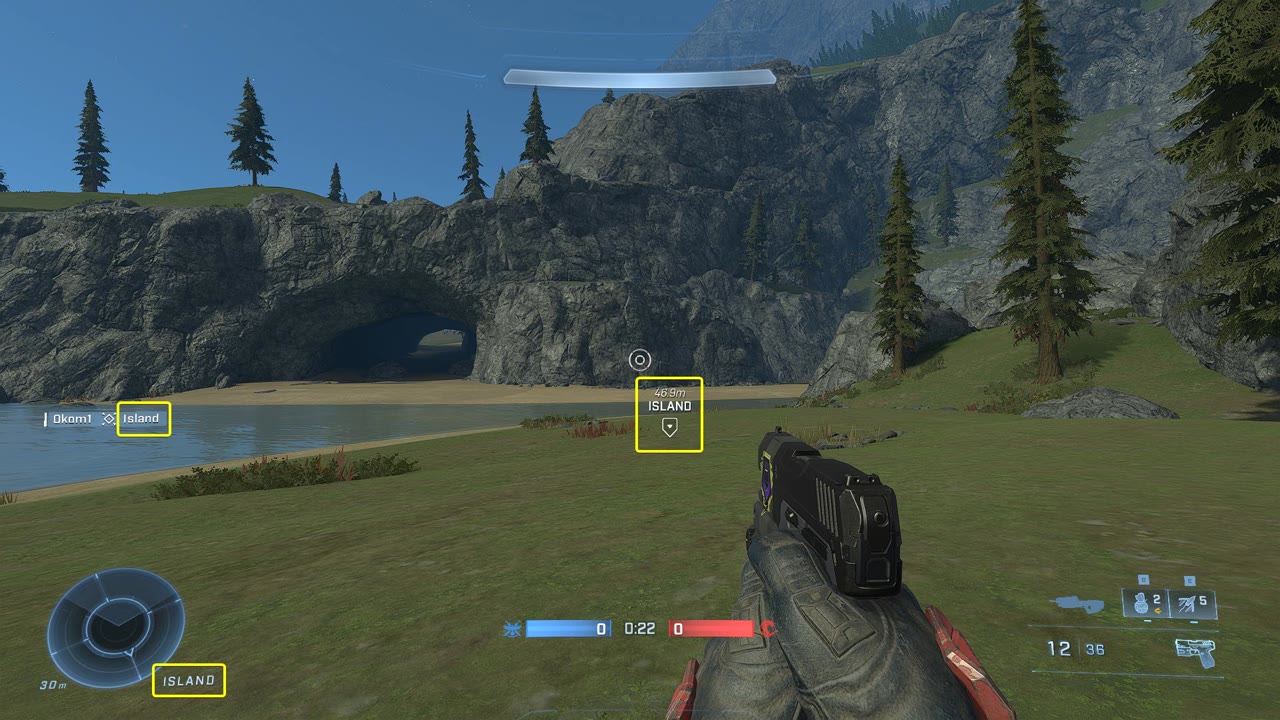
I made sure to extend the boundaries of these Named Location Volumes high up in the air so that even flying over them would show the correct name. As the entire map was built in Forge from nothing, players could of course adjust or override these names to whatever they wanted, but it was important for me to still try and make things as futureproof and intuitive as possible.
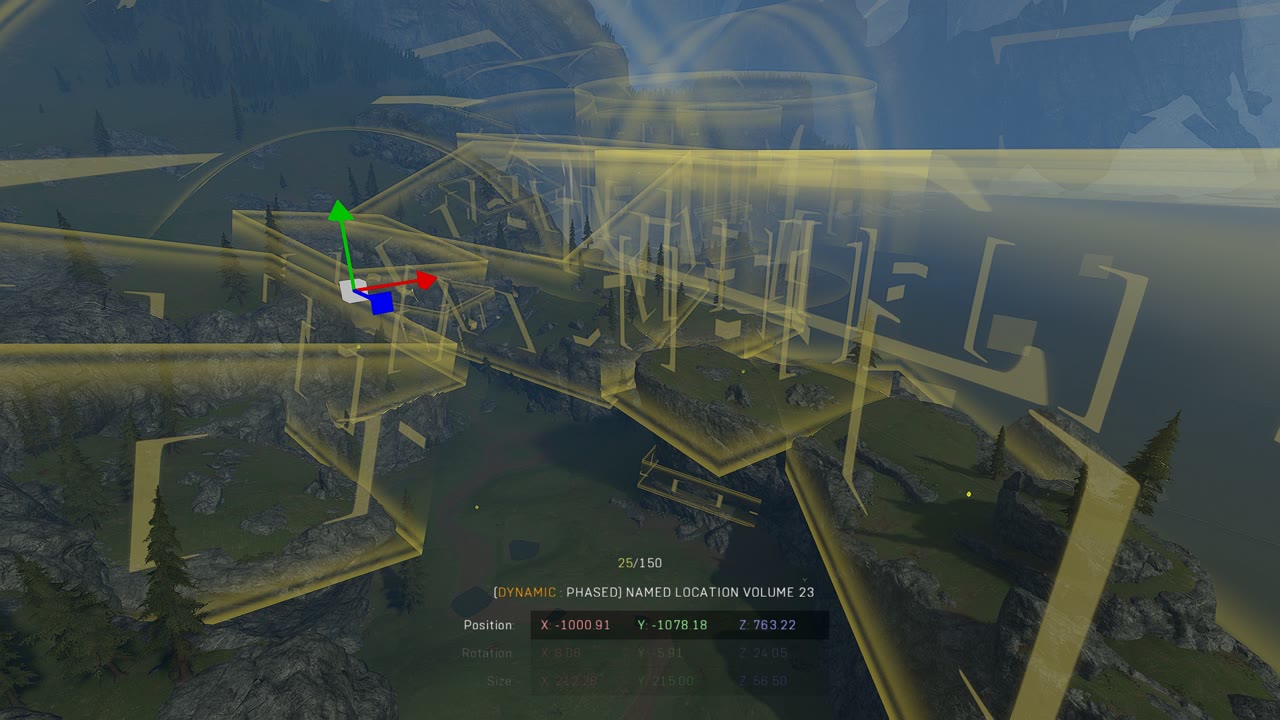
Scrub also wanted to put "Mohawk" in some area of the map since he has it on every map he's worked on in Infinite, so we put it on top of the central rock in Island, which we thought was fitting and descriptive at the same time.
Mountain climbs
Mountain climbs are a set of jump routes that players can take to climb specific mountains on Forge World in Halo Reach. They are only popular on Forge World and can be used to gain a positional advantage in a map that otherwise the level design wouldn't allow. Mountain climbs were popular amongst clans who would use them in clan battles on maps built on Forge World to advance on the enemy clan members from multiple angles.
Remaking the climbs on Halo Infinite
These mountain climbs were very specific to the geometry shapes of the original mountains on the Reach map, and as we were using completely different geometry to rebuild the map in Infinite, these routes for the most part wouldn't be present anymore. Remaking these climbs was never in the original scope of the project, but around 10 days before the release deadline, I was in a voice chat with "Copenhagen068" who used to do these climbs all the time in a clan he was a part of in Reach, and I thought to might as well take a shot at recreating them and see how it goes as well as get his feedback on them at the same time.
To my surprise, it didn't take that much adjustment in the cliff face geo of the mountains to make these climbs possible in a similar way to how they were in Reach. Of course they wouldn't be the same as in Reach, but my aim was that they'd serve the same purpose as they did in Reach; if you knew a climb, you could gain an advantage over the enemy's positioning after successfully completing it.
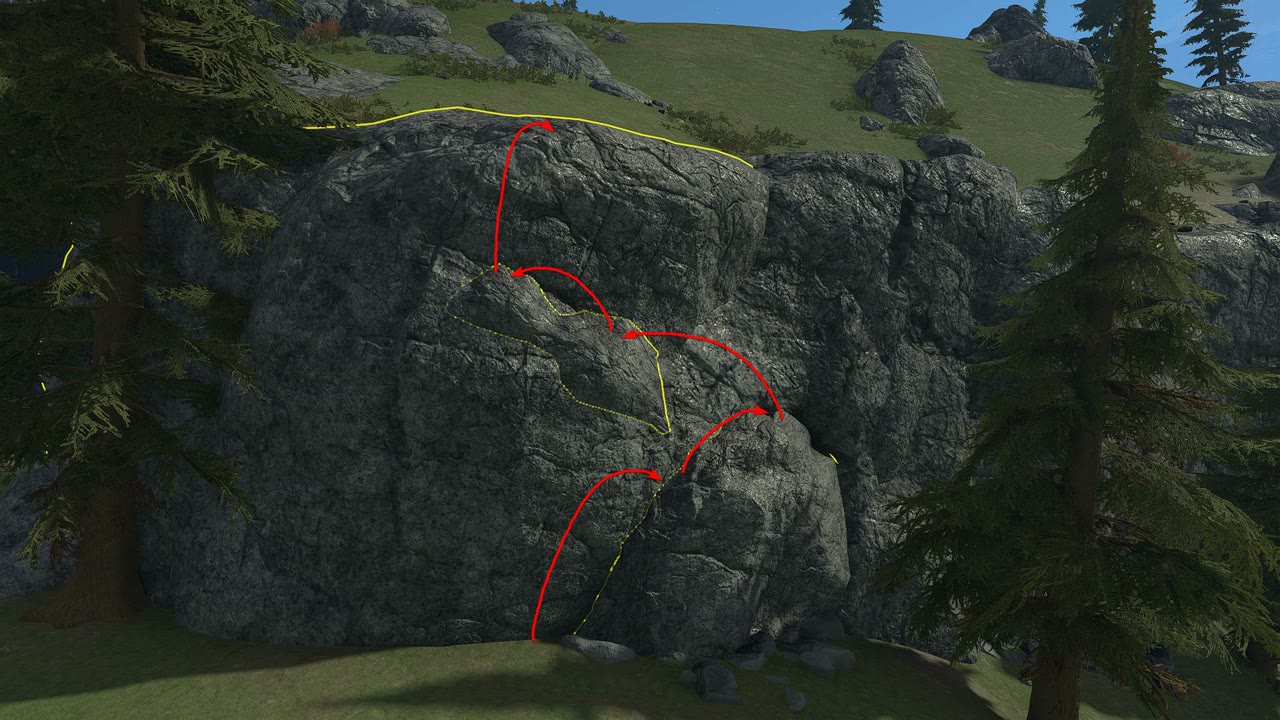
The climbs I recreated were basically a sequence of precise jumps where one had to know exactly where to land and aim for in order to successfully complete the route; just like in Reach. In the end, I remade nine climbs of varying difficulties on our Forge World recreation.
The names for the climbs I recreated were:
- Montana
- Side Alaska
- Hyper Alaska
- Ranger
- Sniper's Nest
- Marine Hill
- North Canada
- South Canada
- Rock Archway
Climb guide
In an effort to make people aware of- and practice these climbs, I made an easy-to-understand guide video showcasing how to complete all of them:
Folderization update
Folderizing a map in Halo Infinite is overlooked by many, and having a well-organized folder structure is straight up an anomaly. Even many of the maps in matchmaking do not have a well-organized folder structure; usually the majority of the objects on the map are in one default folder.
For Forge World, one of our goals was to provide an easy forging experience for anyone who wanted to build a map on top of the custom canvas. We realized that while we did have a healthy amount Forge Simulation budget to spare (27.2% in the end), some people would need more budget for their creations, at the cost of deleting certain sections of Forge World that would not be visible during gameplay.
We had already been working with my advanced folder structure ever since we moved to the Arid canvas, but now it was time to modify it and separate the map into different toggleable sections in preparation for the release. We brainstormed a folder structure that would allow forgers to easily delete sections of the map at varying detail amounts, and eventually settled on dividing the map into major landmarks, with subfolders for various object categories.
The potential categories for each landmark folder were:
- Audio
- Containment
- Detail (No Collision)
- Emissives
- Lighting
- Rocks
- Terrain
- Trees
Some landmark folders got categories specific to that landmark that I saw as beneficial to be toggleable/easily deletable. For example, I saw it useful for players to be able to delete specifically the interior of the Coliseum room while leaving the door and exterior doorframe in place. This way if that area was unused in the forger's creation, it could be deleted and visibility to it blocked in order to save on the budget usage.
In addition to the major landmarks of the map being split into folders, the basis of the folder structure was still from my advanced folder structure, which allowed for folderizing newly placed objects into descriptive folders. We included a few preset objects on the map for release such as spawn points, which I had placed in the correct folders.
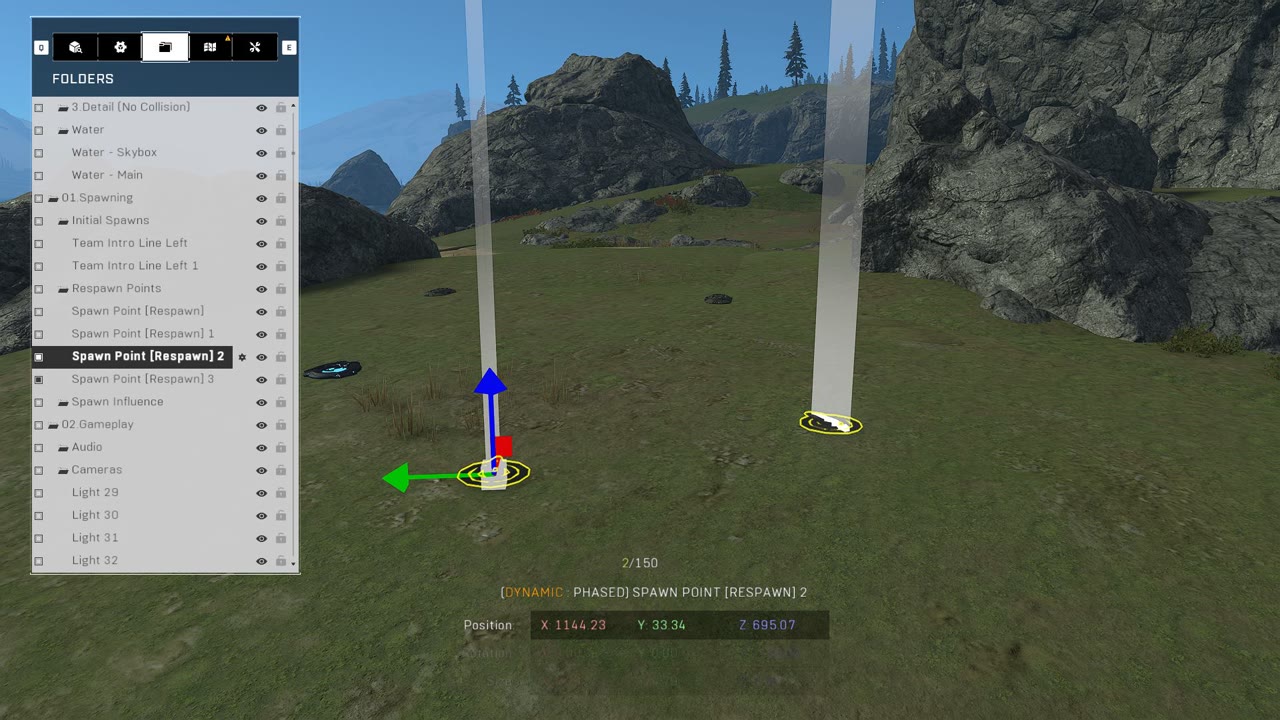
Final screenshots
Among the last items on the release checklist for the project was updating the screenshots. I loaded up into a custom game on the map, set my graphics settings to the highest, FOV to 80, turned off all the HUD elements, and took these screenshots:

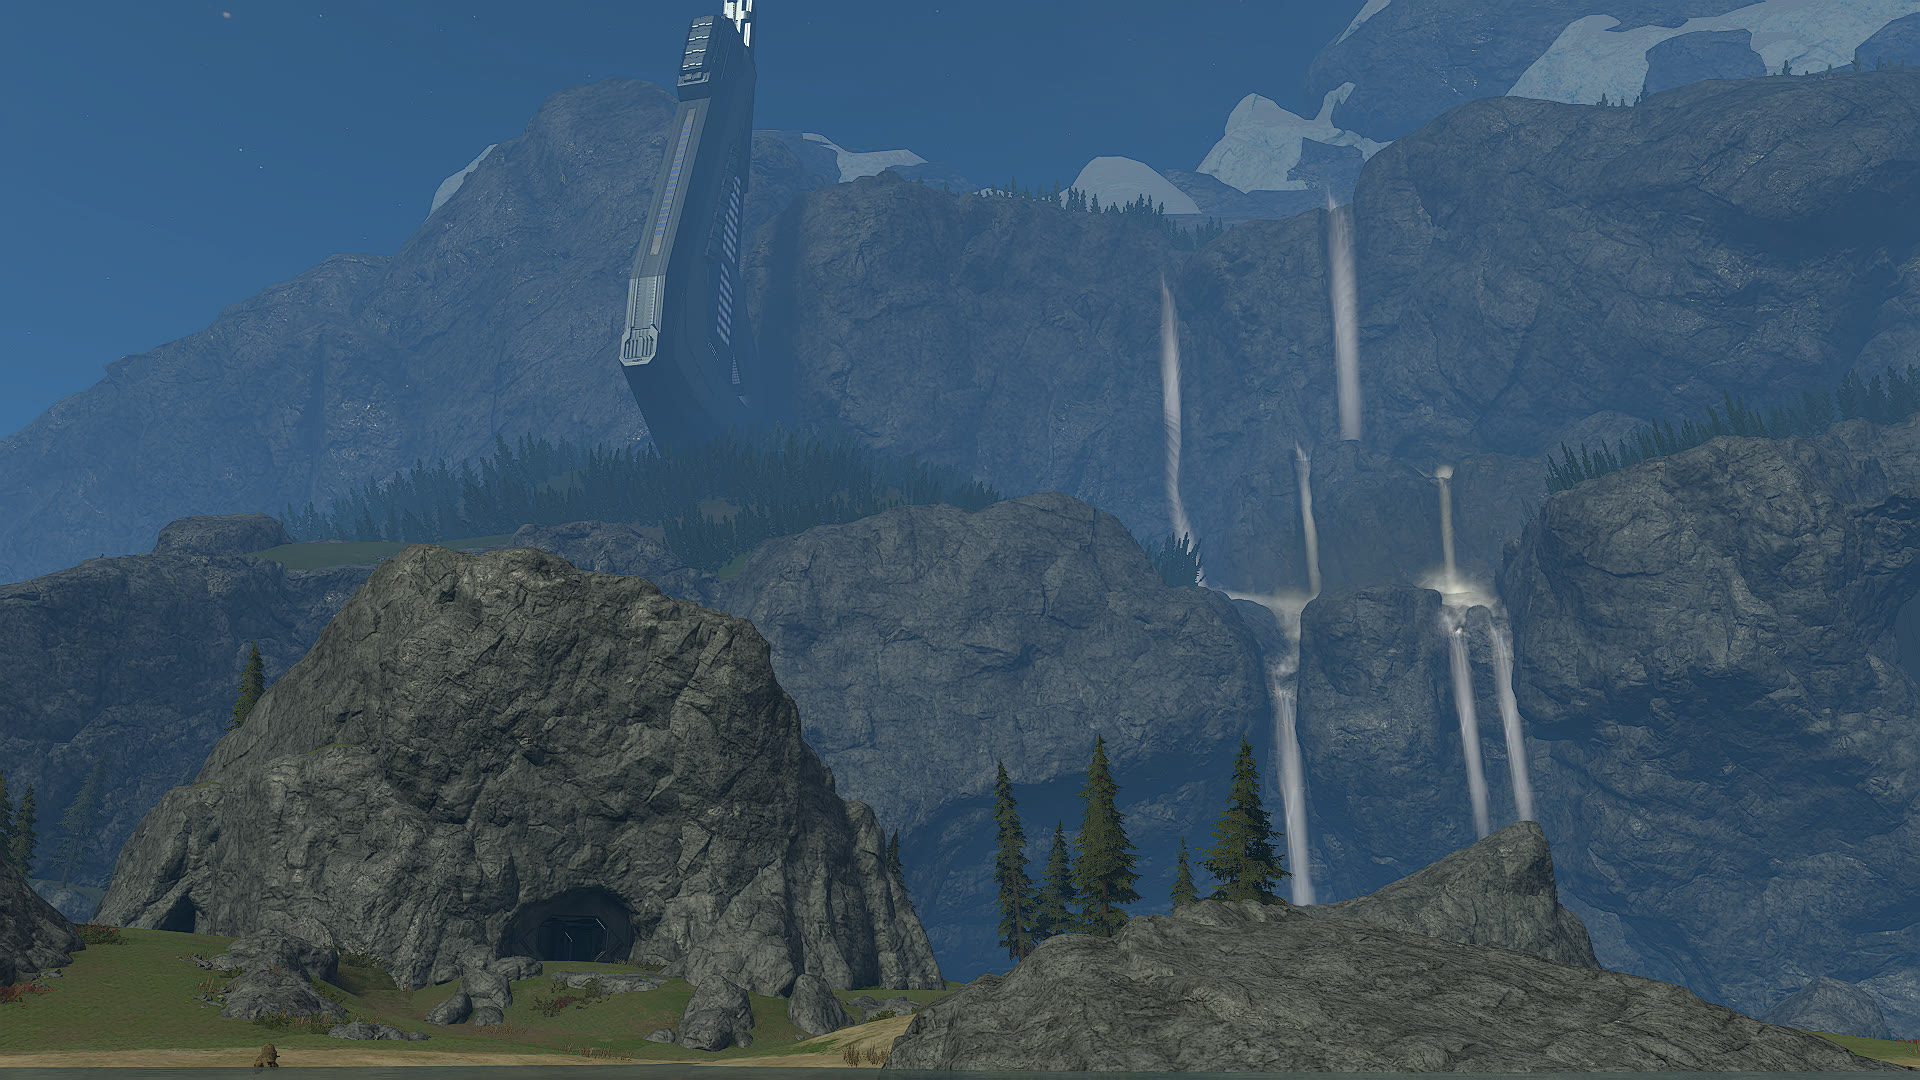

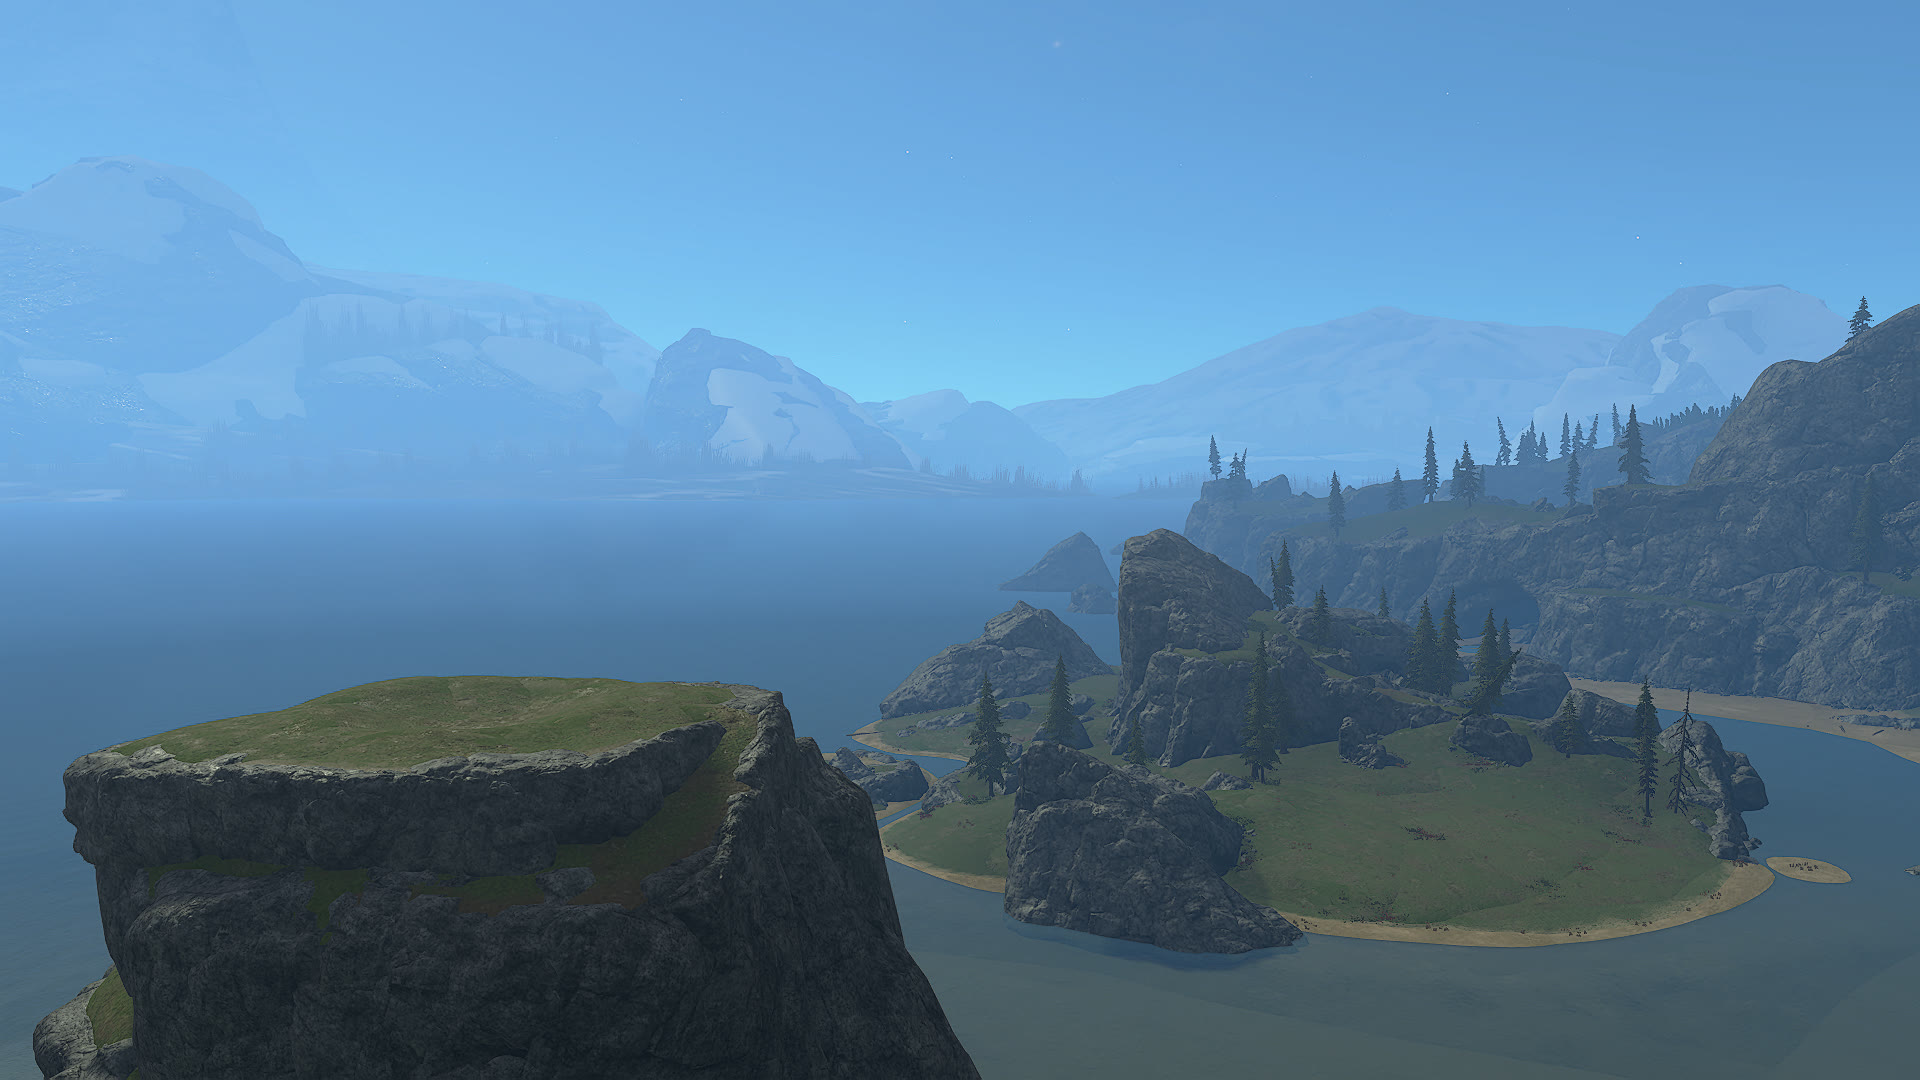
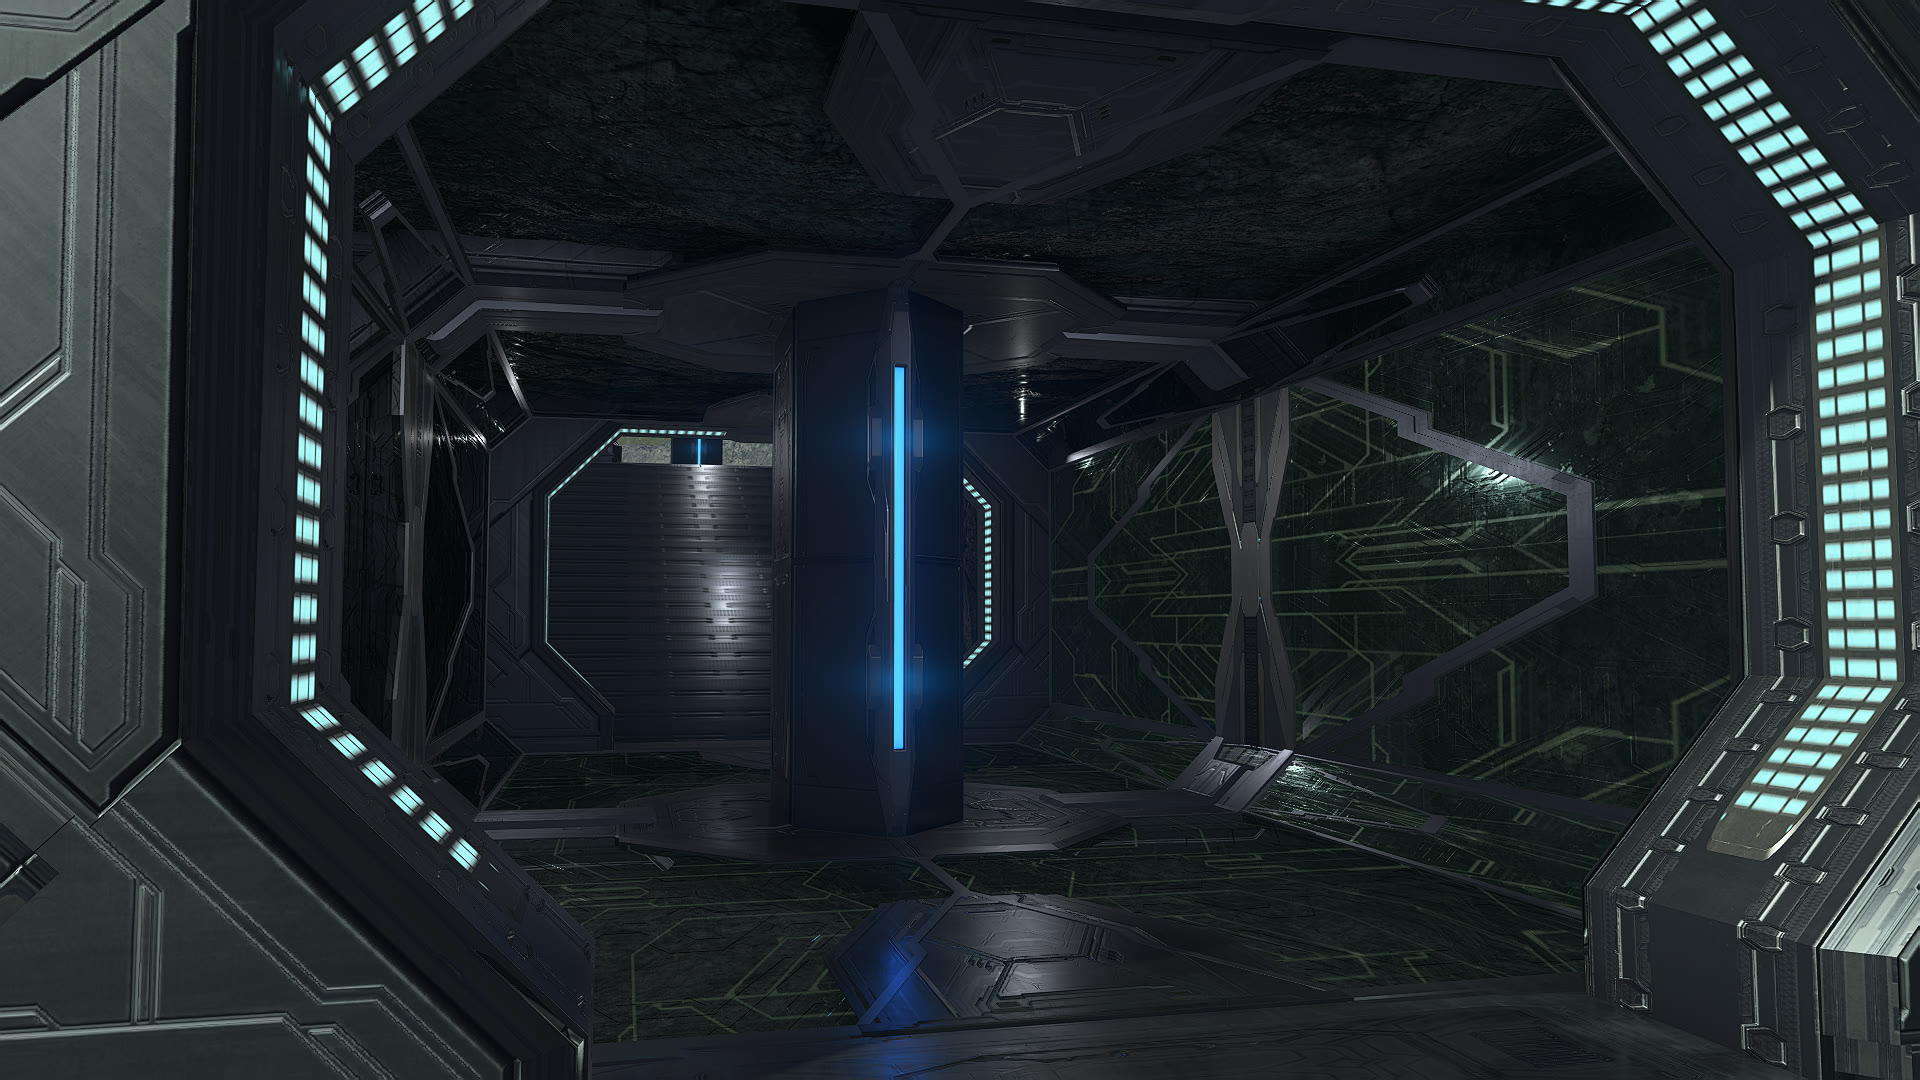
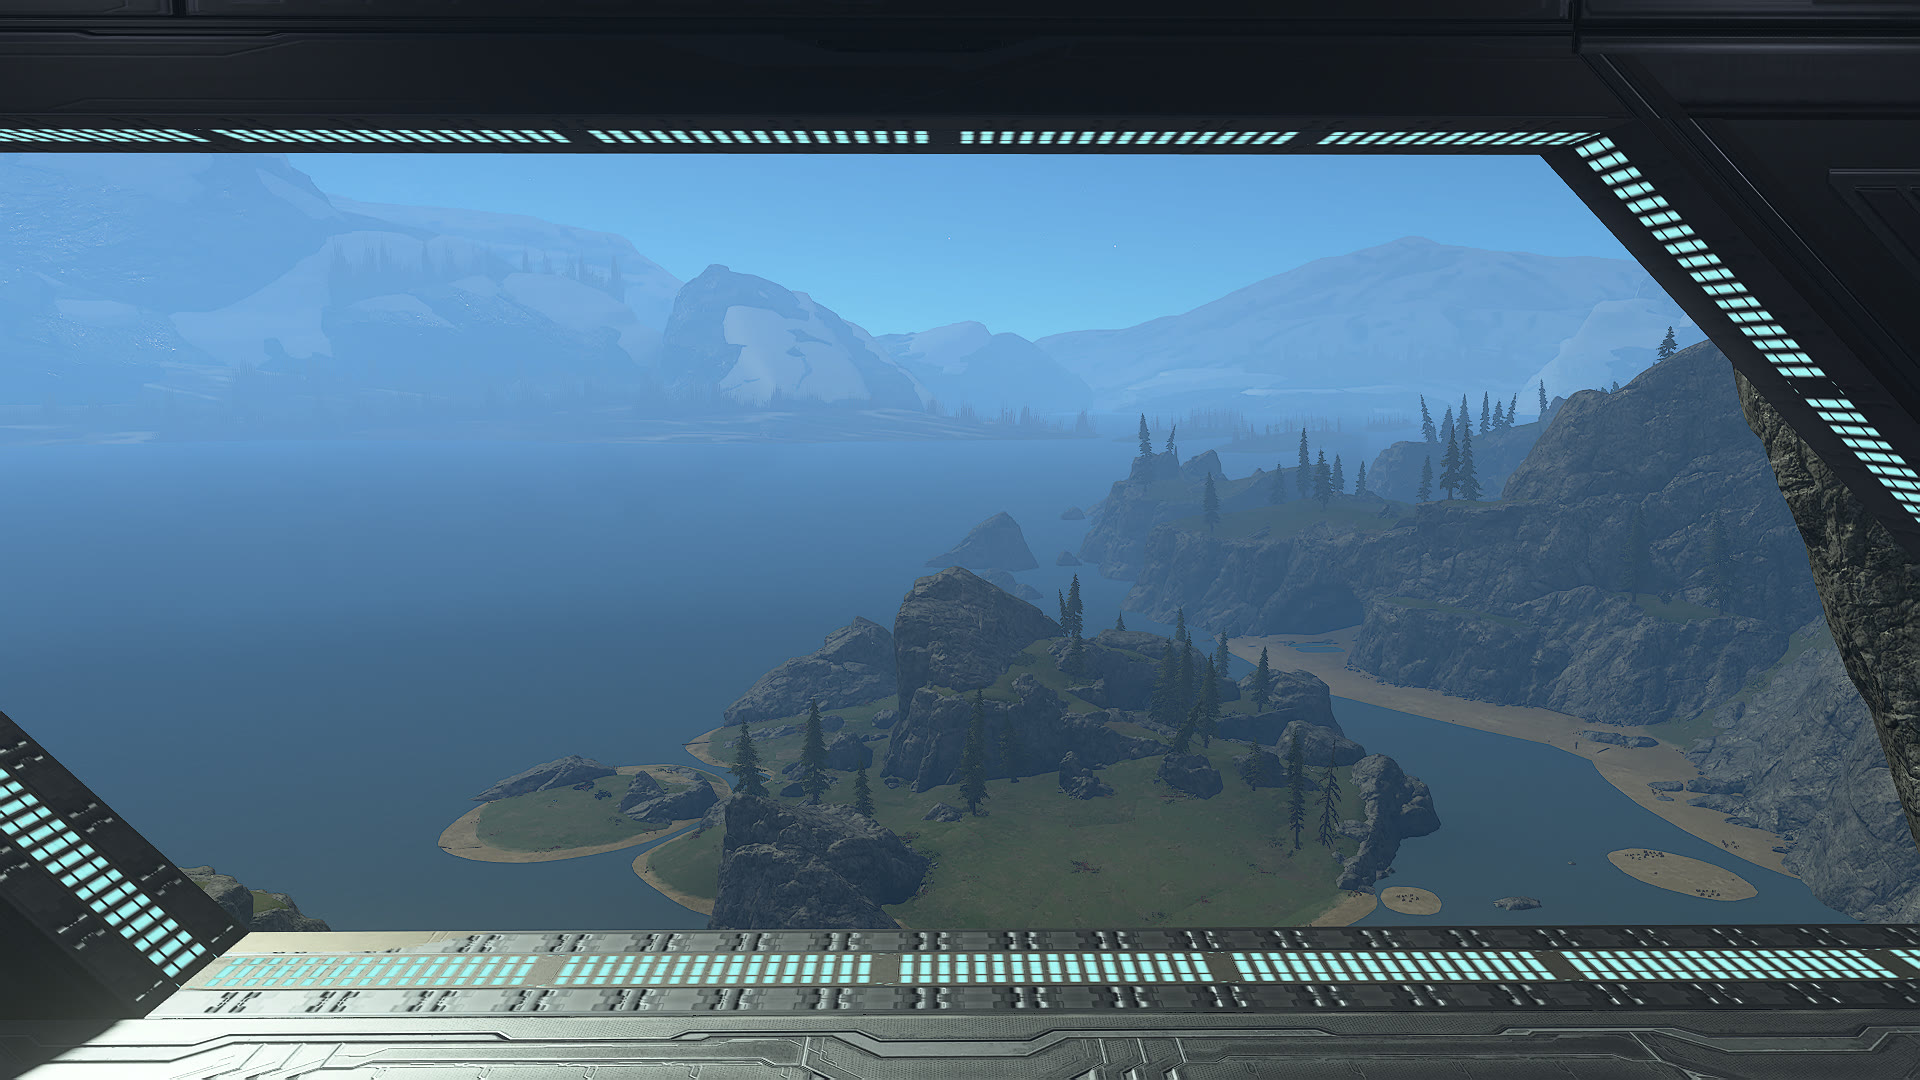

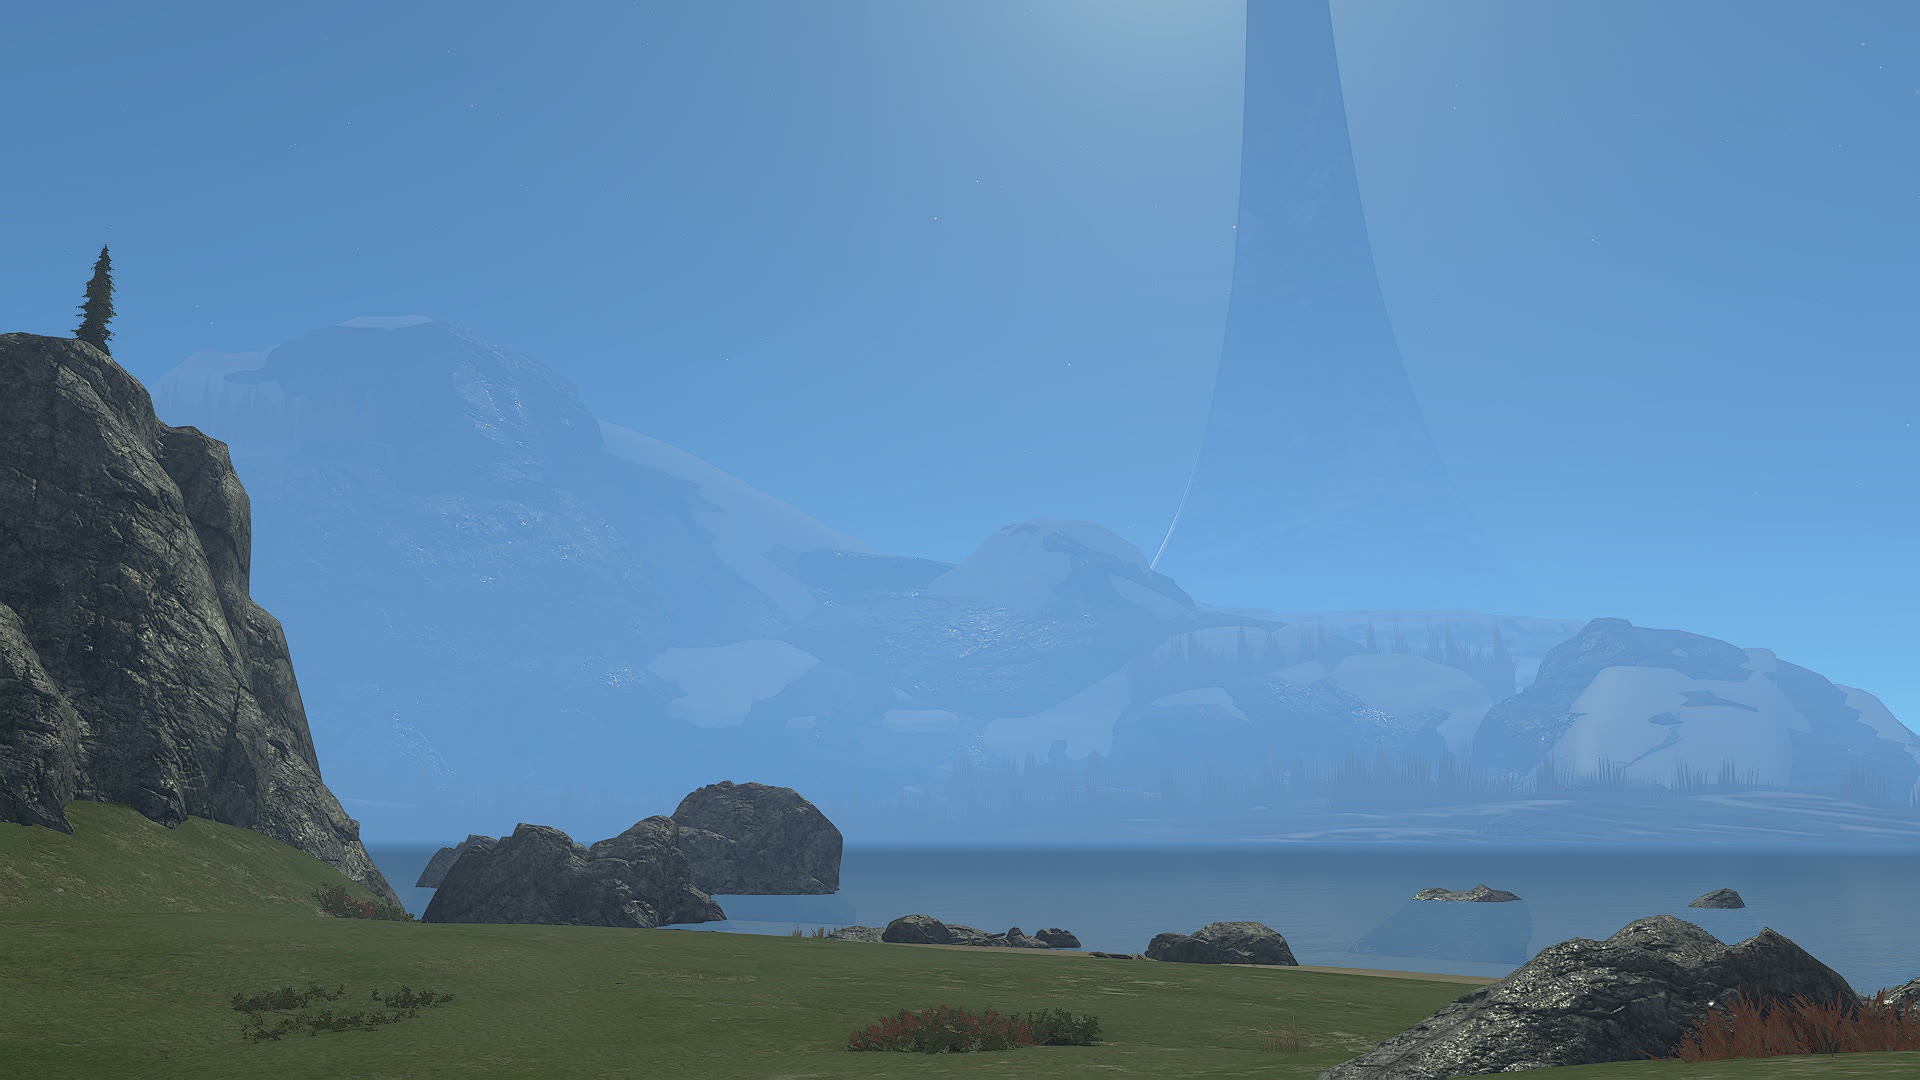
Only the first four would be used in the map metadata, so I tried to capture a variety of angles in them to showcase the vastness of the map.
Release
I had spent the previous night and morning of Dec 31st, 2024 ensuring that all of our checkboxes for release were ticked and at 15:00 UTC we un-copy protected the latest map file and published it out to the world.
The release of a large project like this is always a bit stressful for me as in order for me to feel comfortable complementing the map to others, I need to be sure that there are no issues that could negatively affect the end-user's experience of the map. But with this release, we had been very thorough on ensuring all the checks and tests were completed, so I felt a little bit better just letting everyone experience the map and build on top of it.
Release trailer
As I was working on the final fixes for the map, Jon and Scrub were making a release trailer for Forge World. The trailer would be a simple compilation of beauty shots of the map along with some Halo music in the background. Take a look at the finished trailer here:
The song choice was "Peril" from the Halo 2, Vol. 1 Original Soundtrack. It was chosen by Scrub as it was his favorite Halo track, and he thought it fit the fun and whimsy feel of messing about in Forge World on Halo Reach. Jon, who was responsible for shooting the trailer, said that he mostly utilized beauty shots that showed the various aspects of the map, and took shots from a low angle looking upwards to give a sense of scale to the viewer. Jon also included some shots with foliage close to the screen, panning against a backdrop as he likes how it gives the shot some depth. I particularly like how Jon did the credits display at 0:49 right as the music changes pace.
An issue with the trailer that was almost overlooked was an oversaturated color in the original shots that Jon was recording. I happened to notice this when glancing at the stream preview of the Discord voice chat that Jon and Scrub were in, and notified them that Jon's screen looked too saturated. Jon couldn't figure out the cause for it in-game, but he color-corrected the saturation in post to match closely to how it should look like normally. If you noticed some slight off-coloring in the trailer when comparing to your own gameplay of the map, that is why.
Social Media response
Scrub led the charge on the social media marketing for the map's release announcement. He posted about it on X, Bluesky, Reddit r/halo and Reddit r/forge, and within days, they had gained some great traction. Here's some of our favorite reactions to the release of the map:
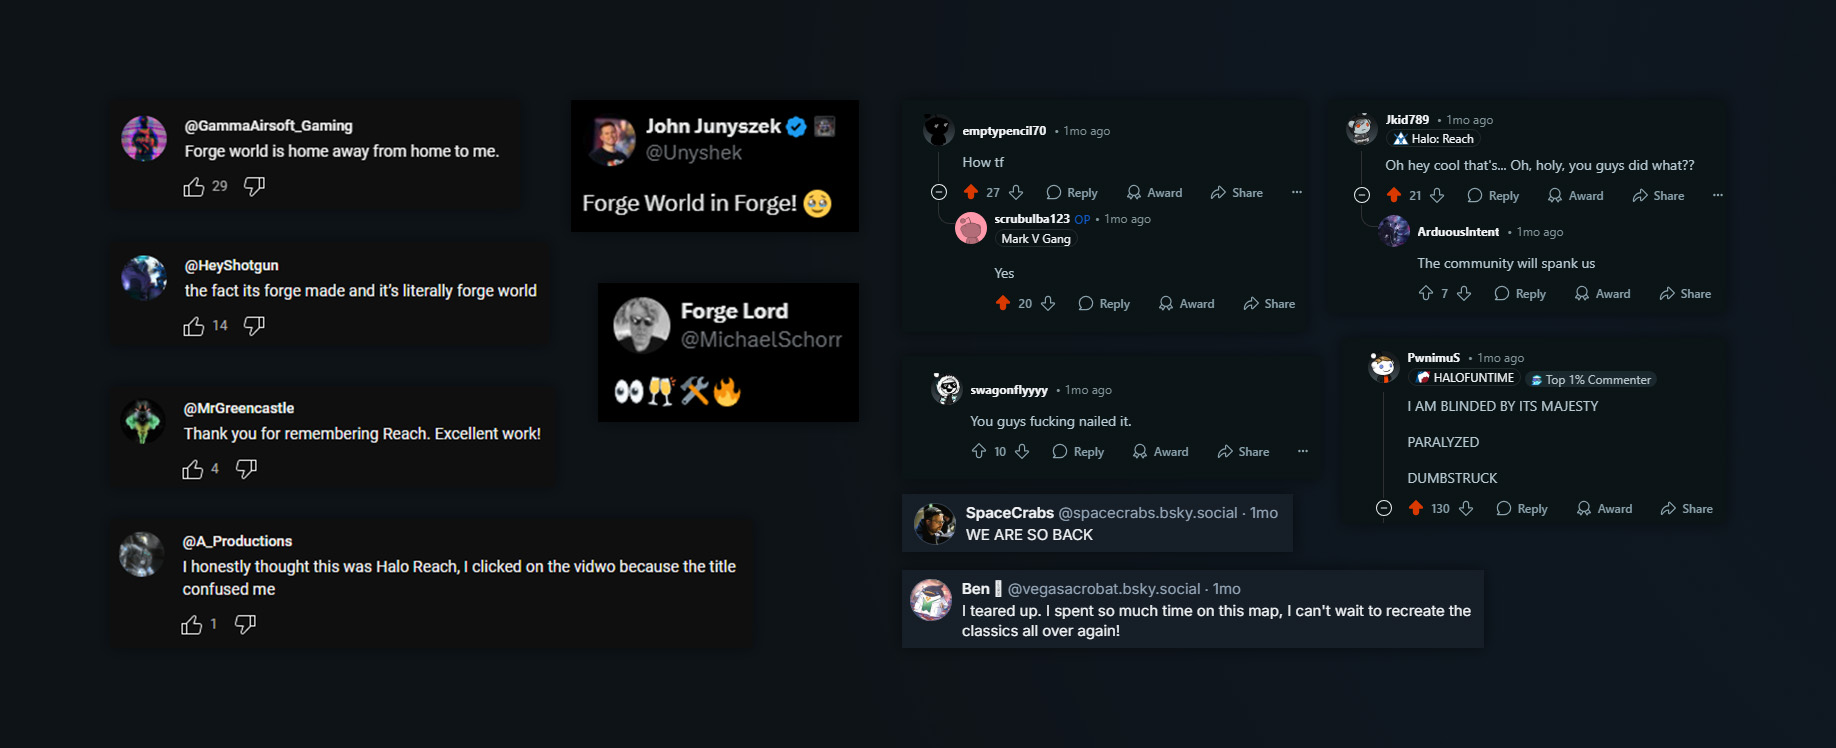
Community features
We were very excited and humbled to have some Halo community members showcase Forge World in a video. Here's the top ones:
We especially loved the ForgeHub map feature hosted by Ducain23, who had initially remade Forge World in Halo 5, as he for sure knew how monumental of a task remaking Forge World in Infinite to this degree was.
Post-release
Custom maps
One of the most exciting parts for the team post-release was seeing the creations forgers would create on Forge World. Every time someone saw a Forge World variant being played on the customs browser or got published, it would be mentioned to the team, which was always fun.
Unless the author has changed the tags of the map, all of the currently published Forge World variants can be found here. I'll go over some of the best creations on Forge World after two months since its release.
Death Derby #4
My favorite creation of Forge World is Death Derby #4, which I am probably biased on as I made it myself, but originally this map was made by ScotrikOG and me in Halo Reach. In other words, this is a direct recreation of our Reach map, and recreating it both level design, and scripting wise was a chore and a half, but I won't bore you with the details here.
In the map you battle against other players in Razorbacks on a floating platform in an effort to be the last player remaining on the platform in order to win a round. If a player dies, they become a spectator who can try and sabotage players still on the platform by shooting them with rockets and Skewer shots.

Forge World Mountain Climbs
My second favorite is also a creation of mine, being a parkour course for practicing all the nine mountain climbs. Each course has a set of guide nav markers showing how the route goes and for the people who care, there is a running timer for each course.
Each course timer displays the fastest time that course has been completed in the session, but player's fastest completed time of each course is stored per player. If a player completes all nine courses, they get access to a Wasp and all players in the lobby are notified of them passing the course. If that player has the fastest total time of the lobby, their name and completion time will show up in the main starting area.
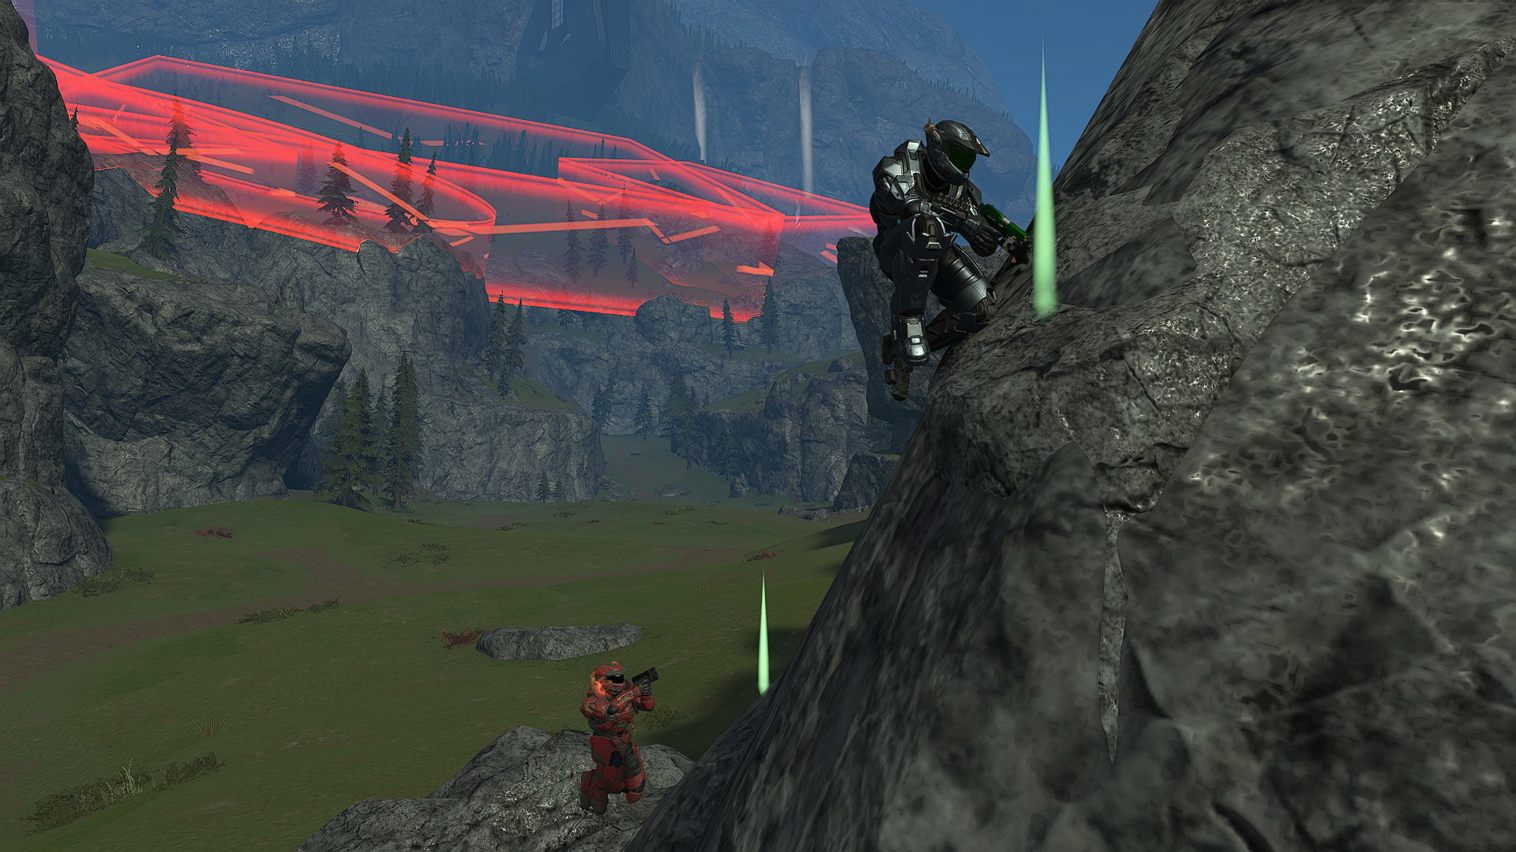
"SpaceCrabs" did a video of him completing each course on an earlier version of the map, which can be seen here. Scripting this experience was unexpectedly difficult as there were some game limitations I had to work around, but I once again won't bore you with the details here.
Forge World Phantom Heavies
Cool map where players battle each other using heavy vehicles around Forge World, including a flyable Phantom. A fun map to put on some time to explore Forge World and crash into players with the Phantom.
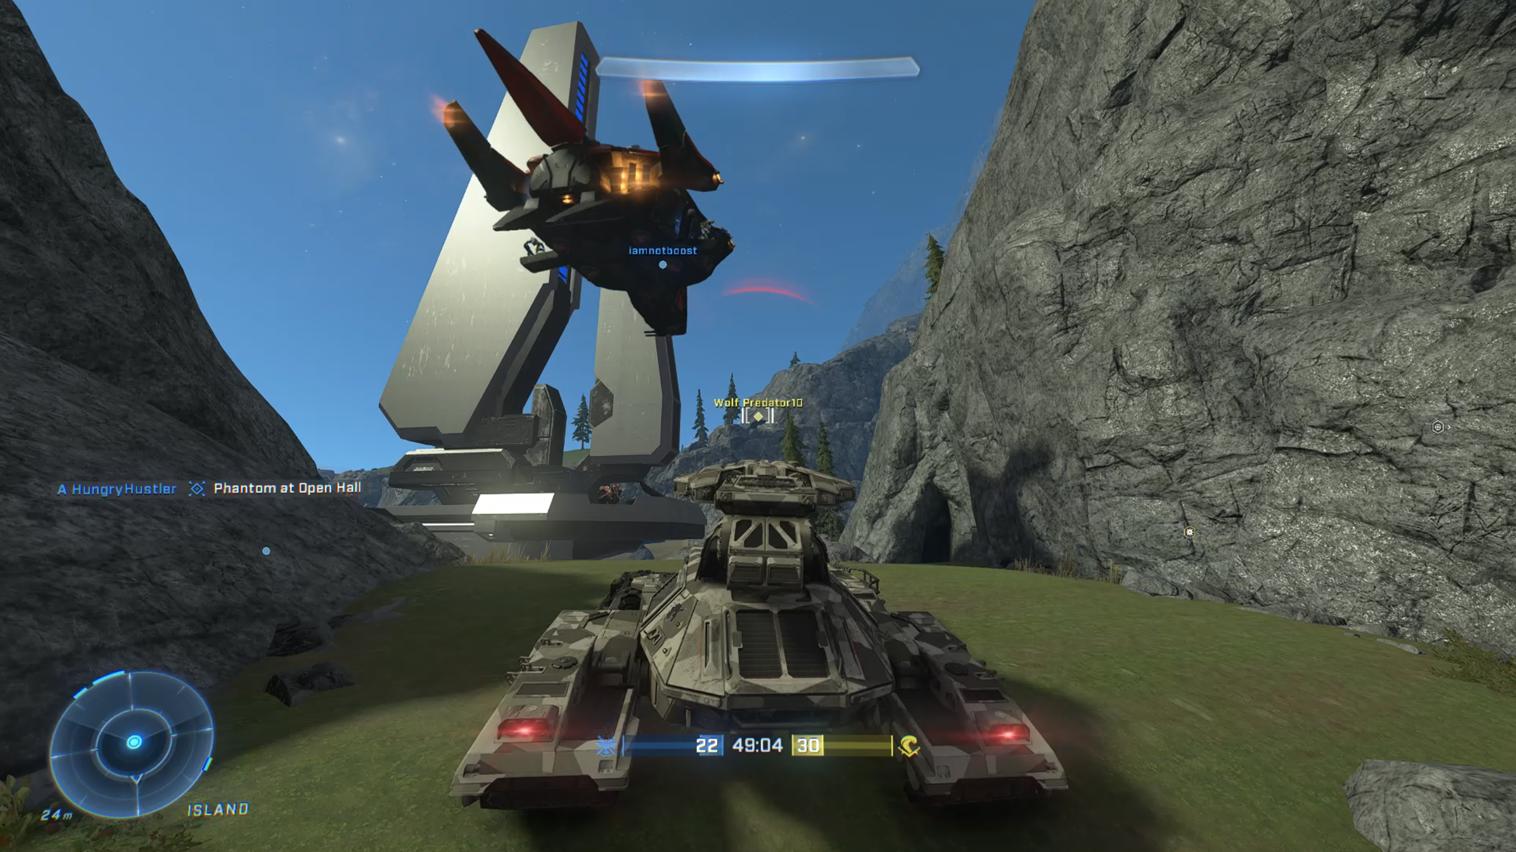
Halo Reach Burger King
Funny map that just shows how even silly creations can be enjoyed by players just to see what people have made.
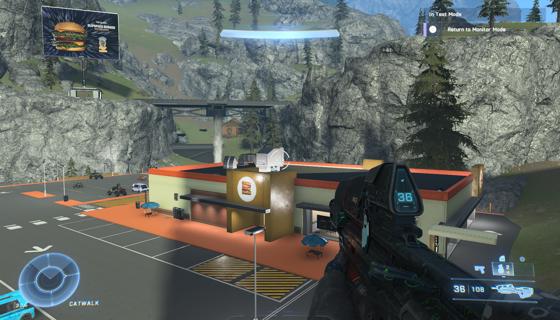
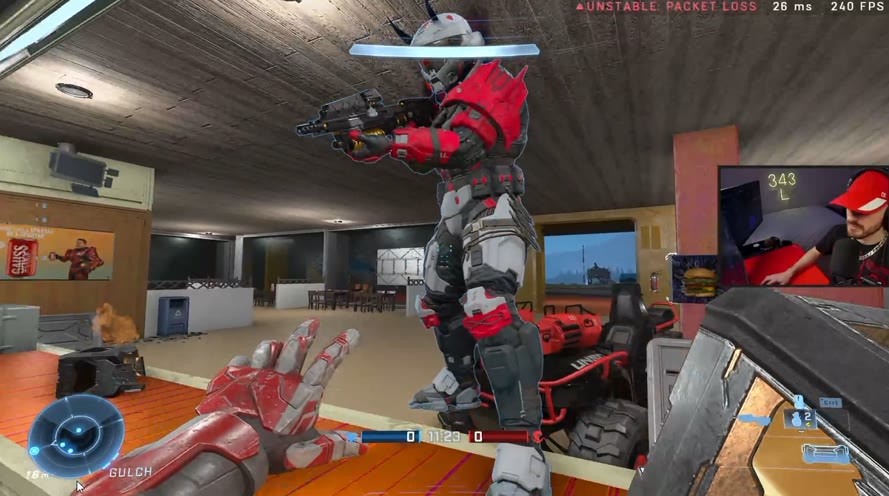
WaterPark
A cool map that is apparently a remake of the creator's original map in Halo Reach that has been reimagined in Halo Infinite. I played some FFA on it and it's got some interesting areas, and looks quite natural on the side of the Island.
Battle Royale:Forge World
The first variant to be published of Forge World. Fun concept, but had some unideal spawning the first time we played with some friends. Fun concept of fighting till the last spartan is standing on the Island area of Forge World.
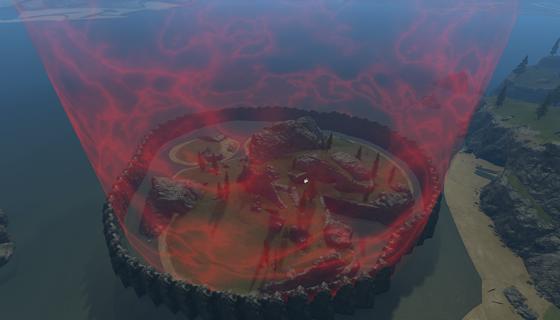
BTB Fortress
Another map that I built on Forge World. I had originally built this on a blank canvas and handed it off for some sweaty players to play on as it is another direct remake of a Reach map. I used the geo of this map to fine-tune the final reflection image on Forge World in order to ensure that a fully Reach-like map built with just Forerunner materials would look good on our canvas.

Post-release updates
Updates done to the map after the release.
v666
First update after release, which addressed feedback from forgers who had created variants of Forge World, as well as issues that the team had noticed on the map.
- Rebuilt lighting a state where it doesn't require weird object hiding tricks like before so anyone can actually rebuild lighting and have the map look fine, where previously it broke some areas like the rock tunnel. Had to adjust global light probe spacing from 17.00 to 15.90.
- Removed Reflection Volume in Rock Archway as it caused unnaturally dark reflections on objects inside it.
- Replaced 14 "Sub Alpine Fir Medium C MP" tree objects with "Sub Alpine Fir Large A MP" due to LOD pop-in issues at low Geometry Quality settings.
- Deleted duplicated tree on Island south side.
- Fixed terrain (Ramp 443) sticking out of rock near back Montana.
- Adjusted background mountain behind Monkey Mountain to fill in the gap more.
- Repositioned and locked map init Scrip Brain in Coliseum.
- Locked Custom Reflections folder and hid the Reflection Volumes and Lights to not confuse newbies to question what they are.
- Adjusted preset Respawn Points to be more visible and easily selectable.
- Adjusted object folderization of Alaska and Coastline to be more compartmentalized.
- Adjusted default Wind settings to be more realistic.
- Blanked Volumetric Fog settings as it's not being used.
Trivia
Some snippets of knowledge about the map too little for an inclusion in the main article.
Easter Eggs
There are 8 easter eggs on the map, some of them more hidden than others:
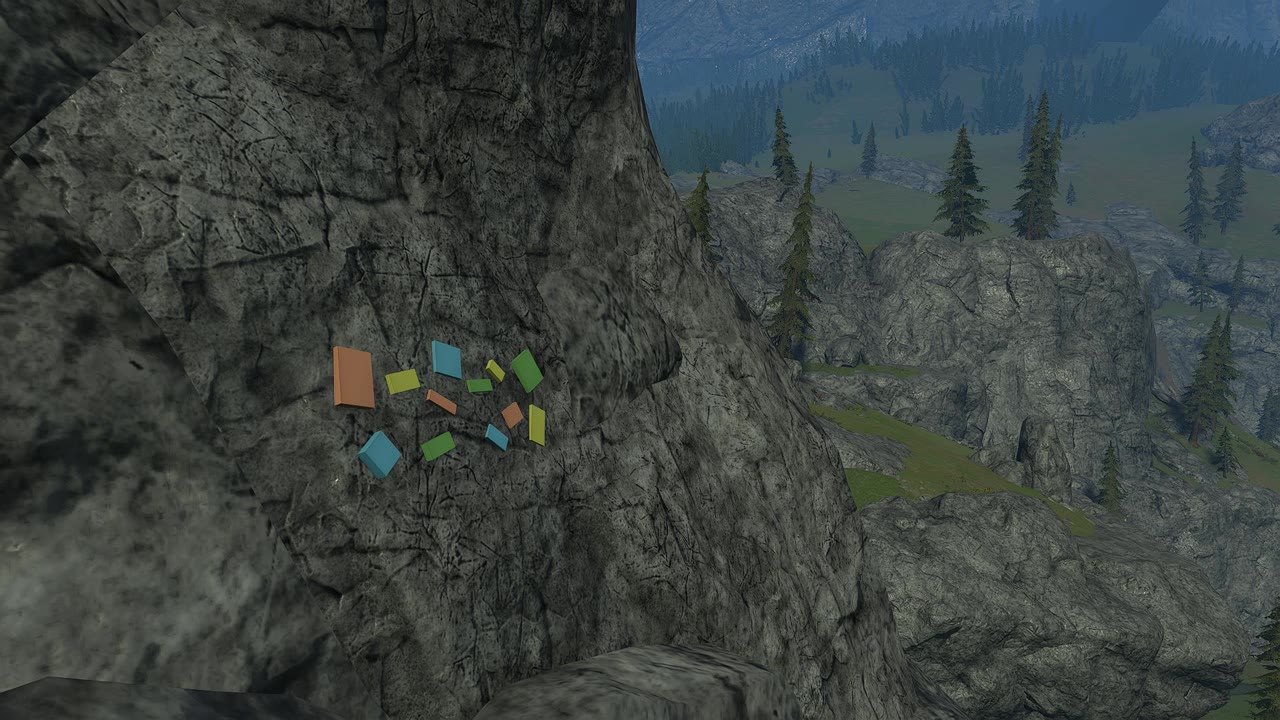
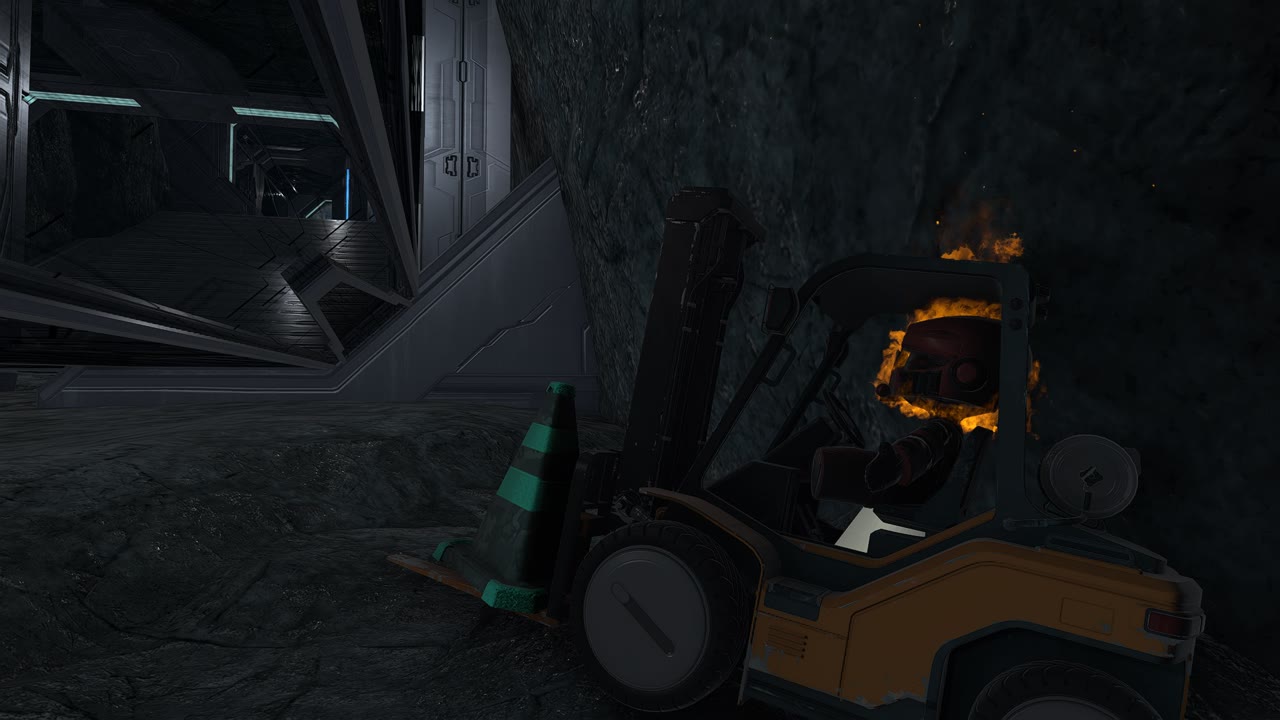
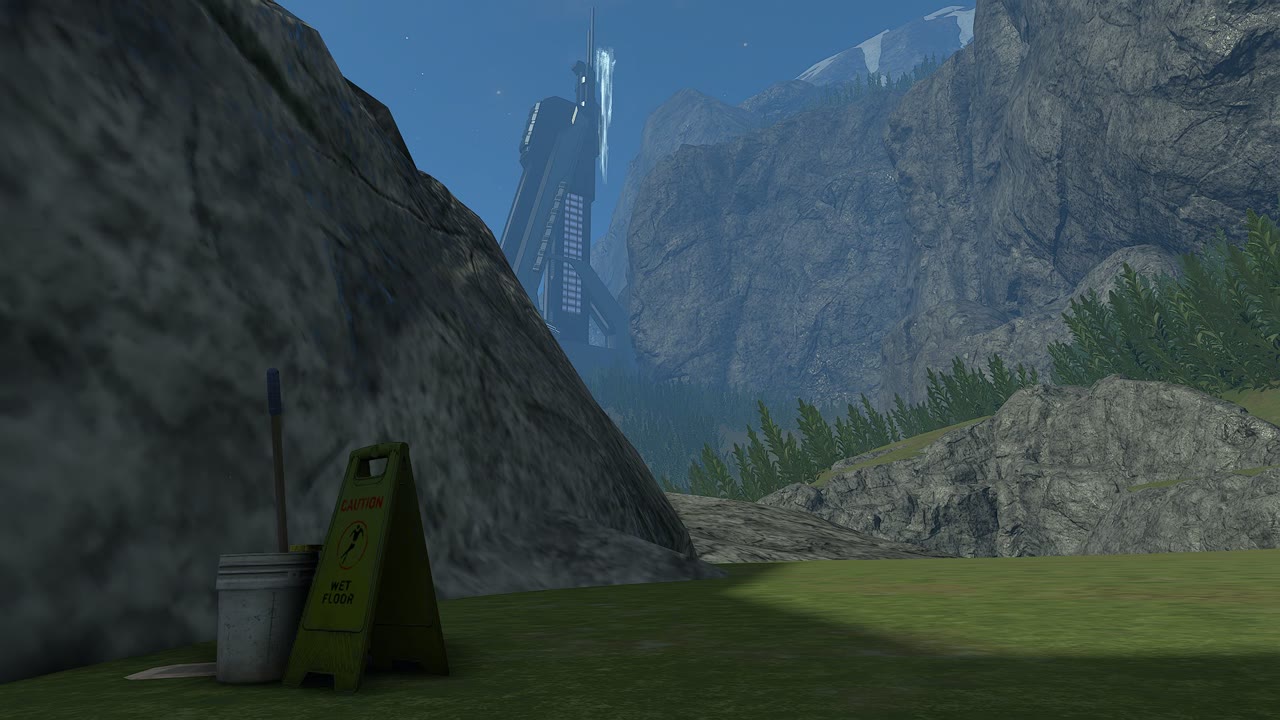
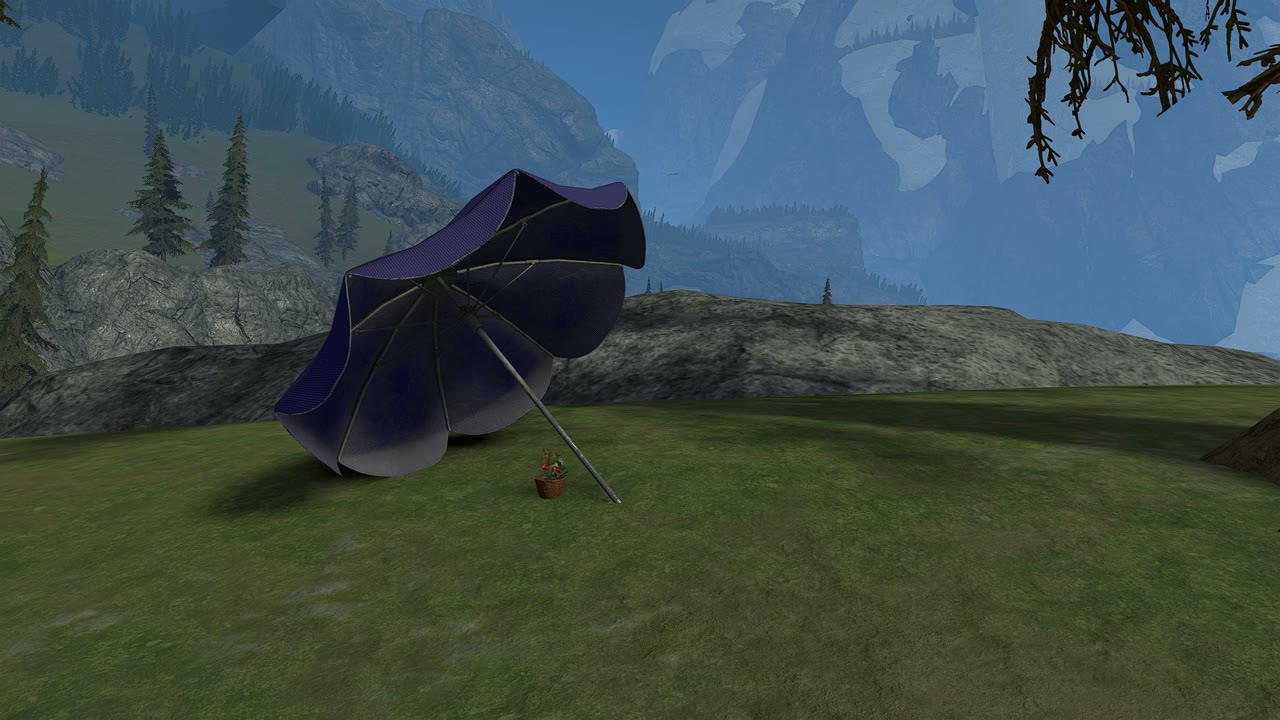
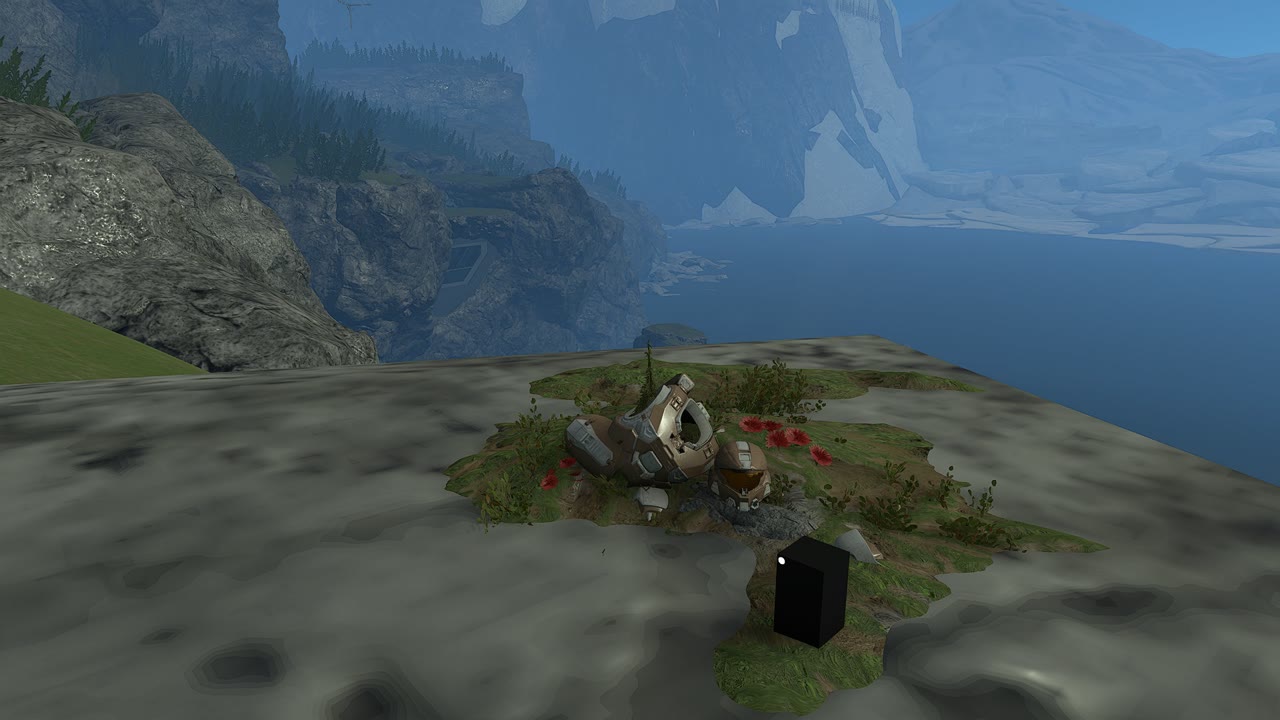
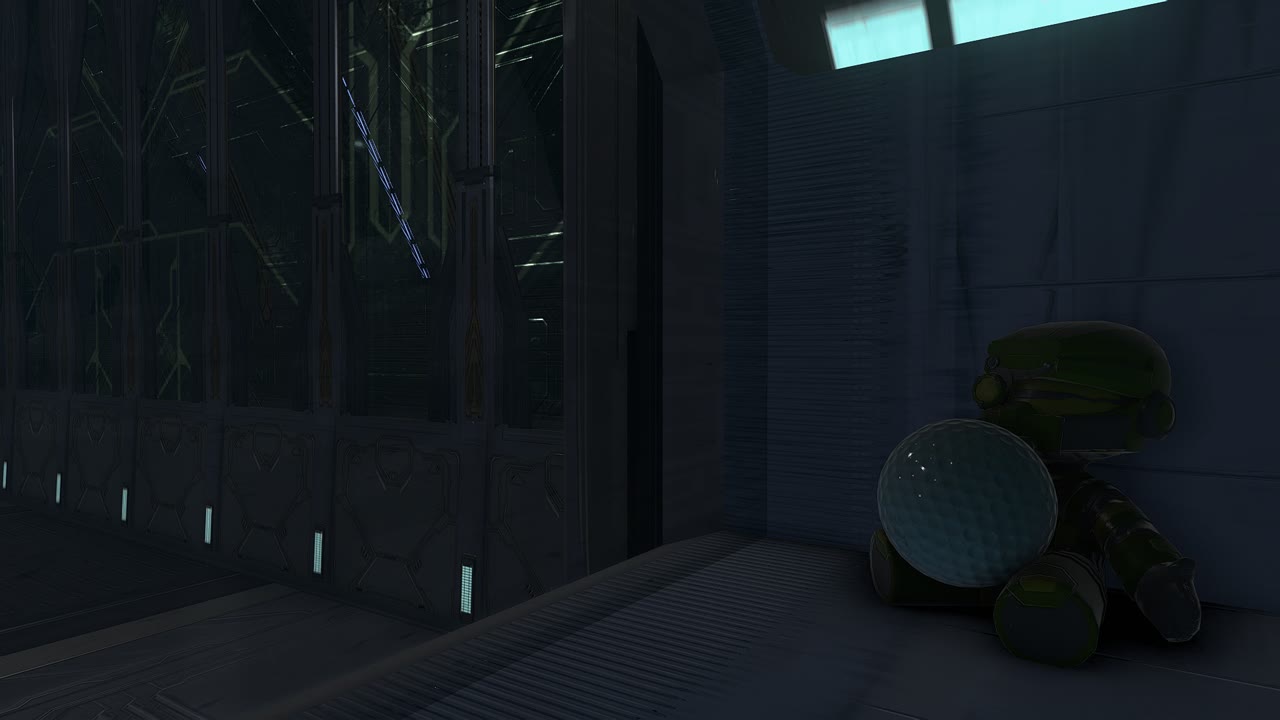
Cloud attempt
Around 10 days before the deadline, I experimented with some fake clouds to put on the map, but ultimately, they didn't make the cut due to the objects having to be placed past the object placement limits and deleting after a session restart. There are no official cloud objects in forge, and the best we can do is either largely scaled fog, or largely scaled dirt decals made to look like streaks of clouds. My attempt was with the decals, but it unfortunately didn't end up working out.
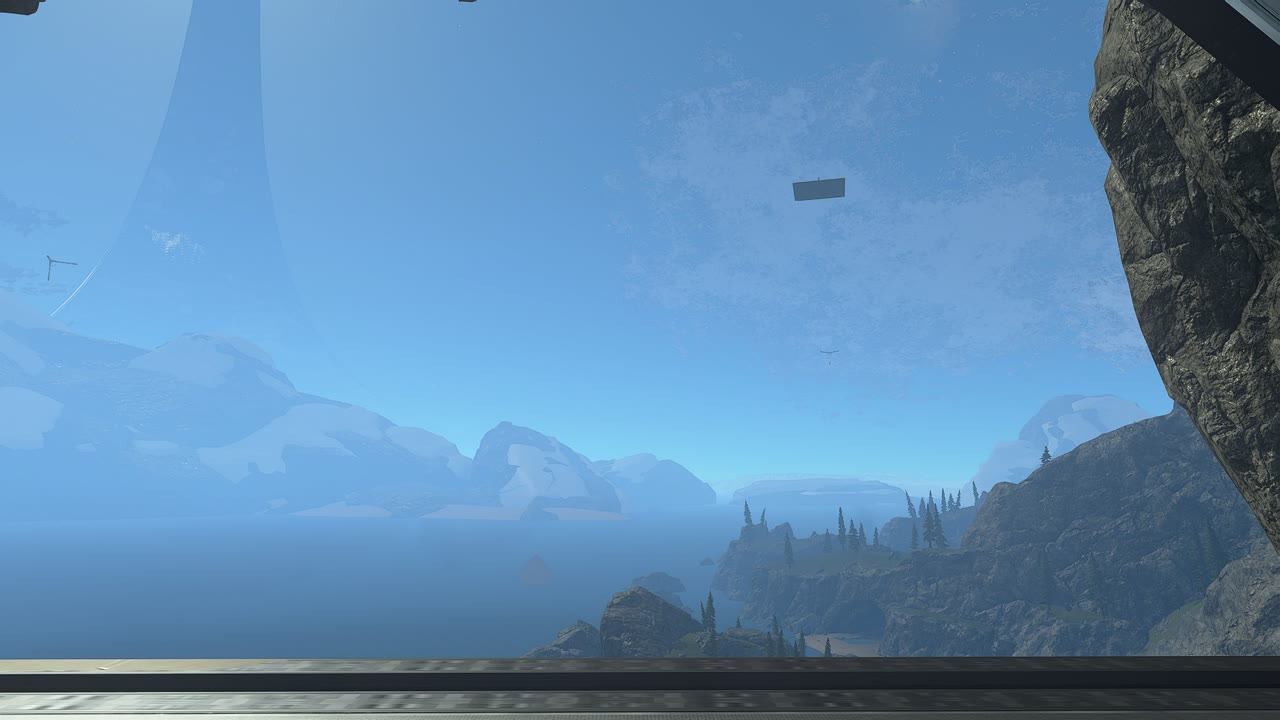
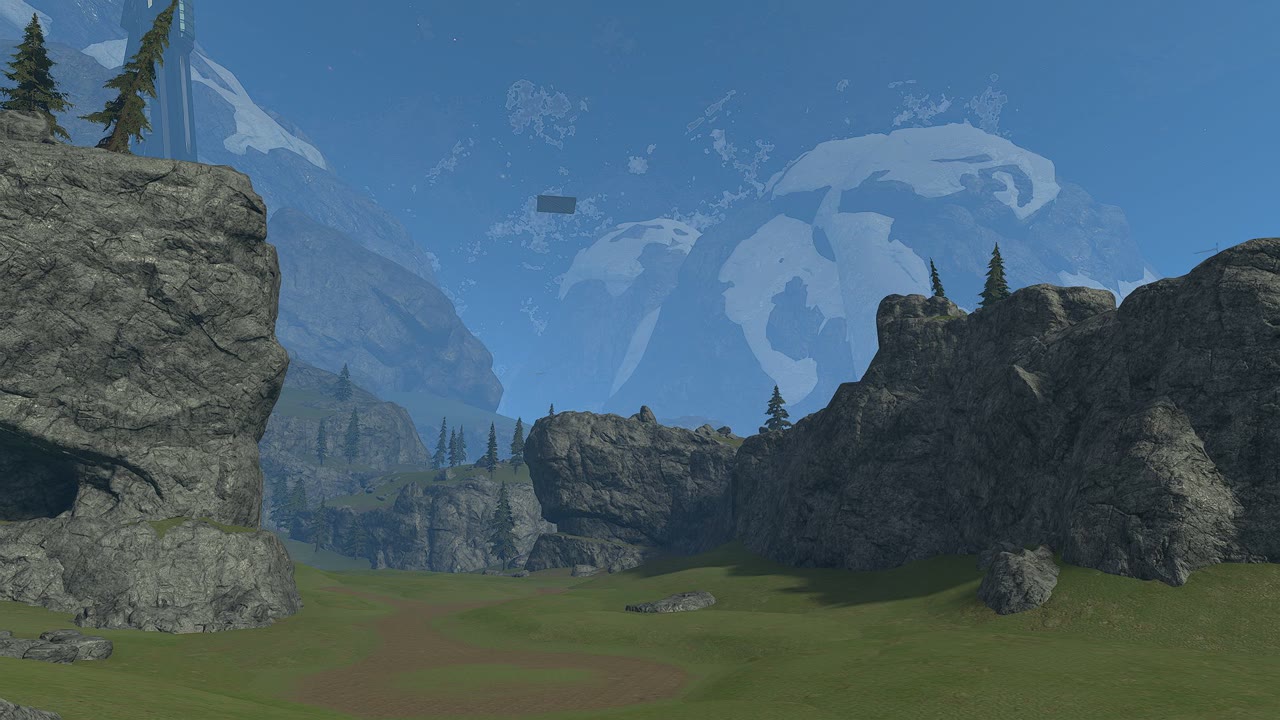
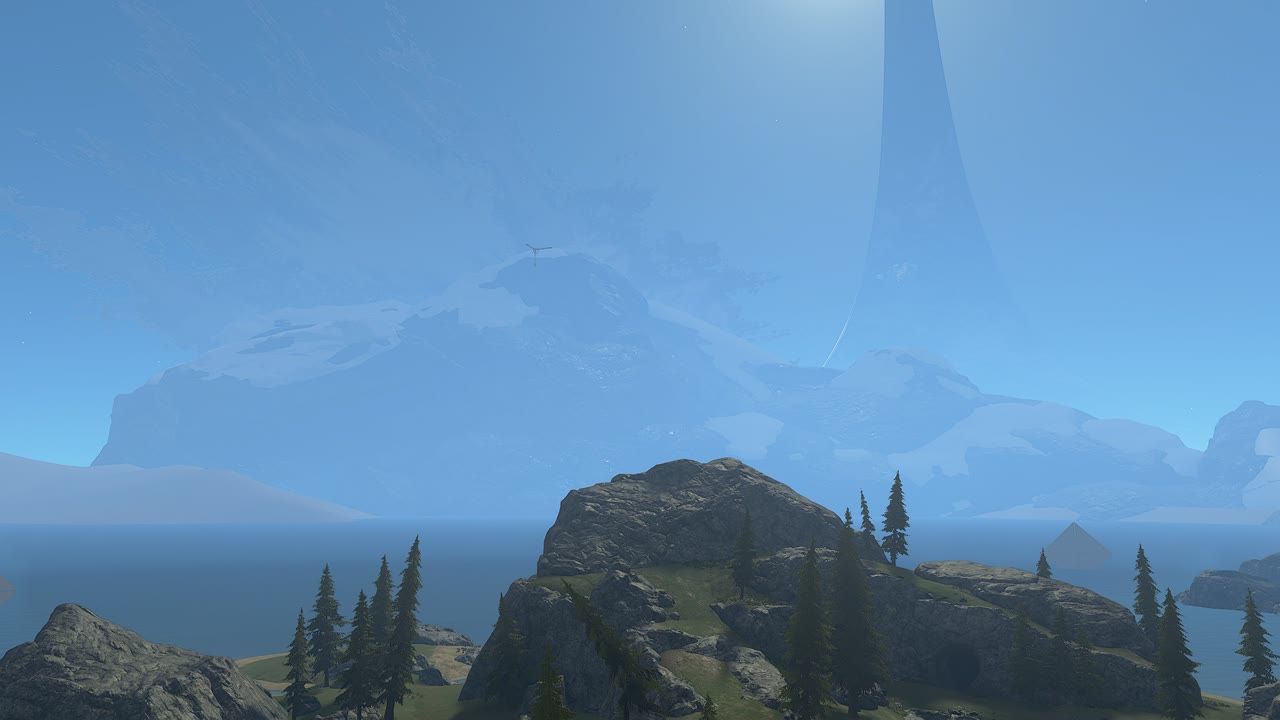
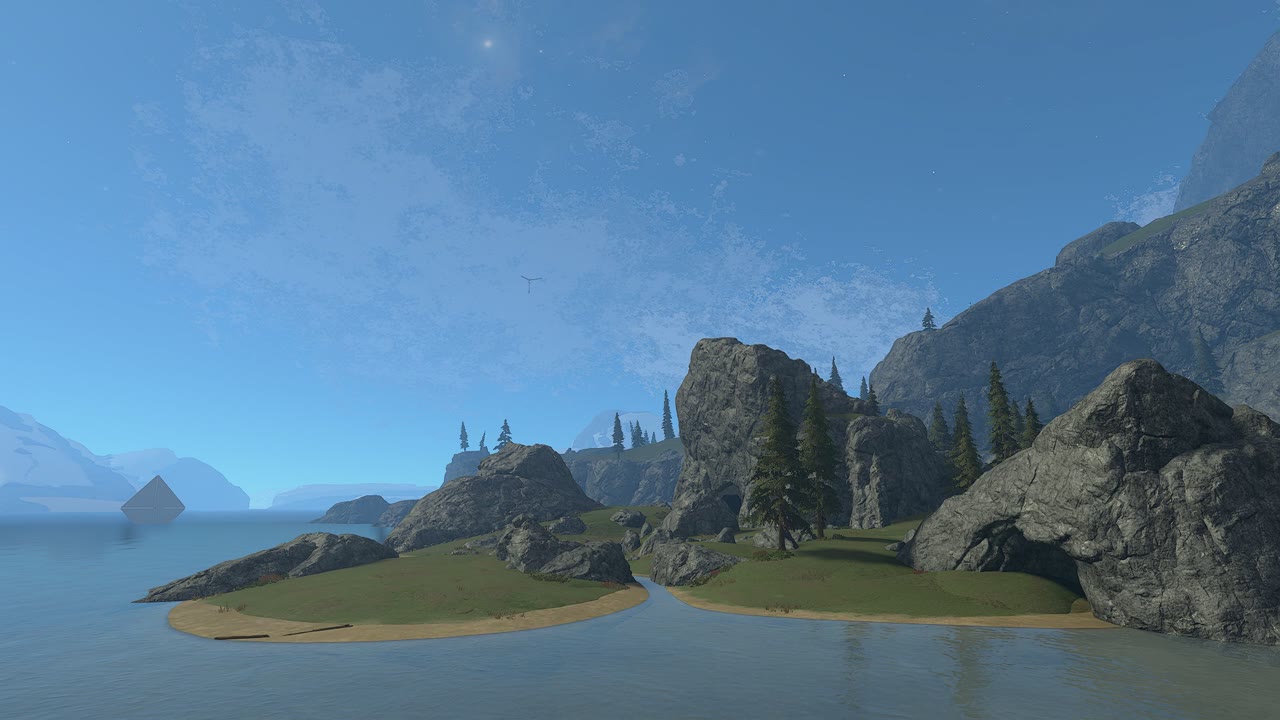
Thoughts
Remaking Forge World in Halo Infinite was an ambitious idea that I never expected to get finished when I had the initial idea for recreating it in Blender. But after combining forces with Scrubulba, Virus11010, Mr IncrediJON, spartan blood 1 & Handsome Huber, and ensuring that it got finished and released with proper care, I can definitely be proud of what we achieved.
Specifically, for me it was an interesting challenge as I got to do some unique technical implementations such as the scale bugged skybox mountains and custom reflections, which I had never done before for a map. It also improved my workflow for creating maps and collaboration with so many people as the last time I was involved in a similar project with a deadline was with Smallhalla.
Also writing this blog post has been a journey in itself. I started writing it on Jan 9th, 2025, but finished it over a month later. I sometimes had weeks where I wasn't writing it due to procrastinating on the amount of effort I'd have to put into mostly acquiring the context images. Having that struggle has taught me to start taking more pictures during my projects so I don't have to scour old chat logs or even recreate the pictures later. Luckily Halo Infinite hadn't deleted the map versions from both our Forge World map files that I needed to go back and get some screenshots on, which was quite a lifesaver in order for me to give the reader the best understanding of a topic with the context images.
I wanted to see Forge World come to life in Halo Infinite partially because I want to see people enjoy it again, but also because I have this need to prove just how much is possible with Halo Infinite's Forge. The editor—while still having a lot of limitations—is a huge leap from Halo 5's UGC tools, and I'm hoping Halo Studios can learn from the feedback of Halo Infinite forgers to make the next Halo's tooling in Unreal Engine 5 have little to no limitations so players can fully unleash their talents in the editor.
Quote from Scrubulba
A quote from Scrubulba after the map was released and the dust had settled for a bit:
Well fellas, we did it.
Virus11010 and I started this project over 18 months ago on May 2023. We tried to cram my original Hemorrhage with bullet2thehead9's Aslyum/The Cage skybox to make Forge World. We had some goals that were clearly too ambitious to just be eyeballing measurements so we stopped a couple of months later.
Enter March of this year and Okom1 stepped in with the Blender file. With the Blender2Forge Printer now available, Forge World could be remade more efficiently and more accurately. After several scaling blunders in June and July, Virus and I had the meat of the project done and kept moving on. A break was taken in September/October and then we hit the road running again with Mr IncrediJON doing the foliage, spartan blood 1 doing the other environmental work and Handsome Huber doing the skybox.
This has been one of the most difficult and creative processes I have ever been a part of. Thank you so much to the guys I listed above and thank you to the larger HFT community as well, whether you dropped the odd pearl of knowledge or helped with the social media coverage.
Thank you. ♥️